Manual
Page 8
English Introduction VII Congratulations and thank you how to provide reliable, no fuss computing. This manual will tell you for purchasing the the GIGABYTE Booktop™ M1305 series notebook computer. It provides basic configuring, operations and care, and troubleshooting. This portable notebook computer provides excellent expansion capability thanks to the docking station, includes multimedia functionality, and is designed to setup and begin using your M1305.
English Introduction VII Congratulations and thank you how to provide reliable, no fuss computing. This manual will tell you for purchasing the the GIGABYTE Booktop™ M1305 series notebook computer. It provides basic configuring, operations and care, and troubleshooting. This portable notebook computer provides excellent expansion capability thanks to the docking station, includes multimedia functionality, and is designed to setup and begin using your M1305.
Manual
Page 9
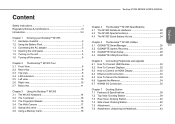
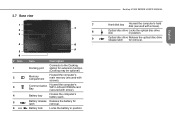
...M1305 SERIES USER'S MANUAL Chapter 4 The Booktop™ M1305 Specifications 4.1 The M1305 Notebook Hardware 22 4.2 The M1305 Special functions 23 4.3 The M1305 Quick Battery life test 24 Chapter 5 The Booktop™ M1305 Utilities 5.1 GIGABYTE Smart Manager 26 VIII 5.2 GIGABYTE Xpress Recovery 28 5.3 GIGABYTE Smart Setup 29 5.4 GIGABYTE... 34 6.7 WWAN 3G Connection 35 Chapter 7 Docking Station 7.1 Features & Specifications 38 7.2 Top View: Docking Station 39 7.3 Rear View: Docking Station 40 7.4 Side Views: Docking Station 40 7.5 Attachment 41 7.6 Attachment: Undocking...
...M1305 SERIES USER'S MANUAL Chapter 4 The Booktop™ M1305 Specifications 4.1 The M1305 Notebook Hardware 22 4.2 The M1305 Special functions 23 4.3 The M1305 Quick Battery life test 24 Chapter 5 The Booktop™ M1305 Utilities 5.1 GIGABYTE Smart Manager 26 VIII 5.2 GIGABYTE Xpress Recovery 28 5.3 GIGABYTE Smart Setup 29 5.4 GIGABYTE... 34 6.7 WWAN 3G Connection 35 Chapter 7 Docking Station 7.1 Features & Specifications 38 7.2 Top View: Docking Station 39 7.3 Rear View: Docking Station 40 7.4 Side Views: Docking Station 40 7.5 Attachment 41 7.6 Attachment: Undocking...
Manual
Page 21
... 8 . 9 5 6 # Icon 1 2 3 4 5 6 Item Description Docking port Connects to the Docking station for extension function. (Docking may be optional) Memory compartment Housed the computer's main memory (secured with screw). ...Optical disc drive Release the optical disc drive release latch for latch removal. Battery release Release the battery for removal. 11 Communication Bay Housed the computer's WiFi LAN and WWAN card (secured with screws). Booktop M1305...
... 8 . 9 5 6 # Icon 1 2 3 4 5 6 Item Description Docking port Connects to the Docking station for extension function. (Docking may be optional) Memory compartment Housed the computer's main memory (secured with screw). ...Optical disc drive Release the optical disc drive release latch for latch removal. Battery release Release the battery for removal. 11 Communication Bay Housed the computer's WiFi LAN and WWAN card (secured with screws). Booktop M1305...
Manual
Page 32
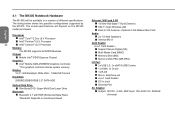
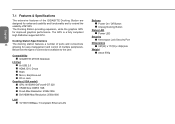
...Core™2 Duo ULV Processor „ Intel® Pentium® ULV Processor 22 „ Intel® Celeron® ULV Processor Memory The M1305 supports 2x DDRIII Modules Chipset „ Mobile Intel® GS45 Express Chipset Graphics „ Intel® Mobile GMA 4500MHD Graphics Controller. *This graphics... „ 4-in-1 Card Reader „ DC-in a number of different specifications. The actual specifications will be available in Jack „ Docking Port AC Adaptor „ Output: 19V DC, 3.42A, 65W Input: 100~240V AC, 50/60Hz Universal Display 13.3", LED Backlight, Wide XGA ...
...Core™2 Duo ULV Processor „ Intel® Pentium® ULV Processor 22 „ Intel® Celeron® ULV Processor Memory The M1305 supports 2x DDRIII Modules Chipset „ Mobile Intel® GS45 Express Chipset Graphics „ Intel® Mobile GMA 4500MHD Graphics Controller. *This graphics... „ 4-in-1 Card Reader „ DC-in a number of different specifications. The actual specifications will be available in Jack „ Docking Port AC Adaptor „ Output: 19V DC, 3.42A, 65W Input: 100~240V AC, 50/60Hz Universal Display 13.3", LED Backlight, Wide XGA ...
Manual
Page 33
... provided the main options to extend battery life. 23 English Booktop M1305 SERIES USER'S MANUAL 4.2 The M1305 Special functions Docking Station (Optional) The M1305 supports the unique docking station. The final configuration depends on the Booktop M1305 users bought. Second Battery Pack (Optional) The M1305 supports unique second battery pack, you can dismount the optical...
... provided the main options to extend battery life. 23 English Booktop M1305 SERIES USER'S MANUAL 4.2 The M1305 Special functions Docking Station (Optional) The M1305 supports the unique docking station. The final configuration depends on the Booktop M1305 users bought. Second Battery Pack (Optional) The M1305 supports unique second battery pack, you can dismount the optical...
Manual
Page 47
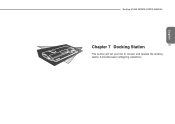
It provides basic configuring, operations. Booktop M1305 SERIES USER'S MANUAL English Chapter 7 Docking Station 37 This section will tell you how to connect and operate the docking station.
It provides basic configuring, operations. Booktop M1305 SERIES USER'S MANUAL English Chapter 7 Docking Station 37 This section will tell you how to connect and operate the docking station.
Manual
Page 48
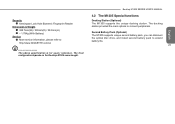
Compatibility „ GIGABYTE M1305 Notebook I/O Port „ 6x USB 2.0 „ HDMI, DVI, D-sub „...132; 10/100/1000Base-T Compliant Ethernet LAN Buttons „ Power On / Off Button „ Unplug Docking Button Status LED „ Power LED Security „ Kensington Lock Security Port Dimensions „ 357(W) x 177(D) x ...supported GPU. Docking Station Specifications 38 The docking station features a number of multiple peripherals. Below lists the types of M1305. English 7.1 Features & Specifications The extensive features of the GIGABYTE Docking Station are ...
Compatibility „ GIGABYTE M1305 Notebook I/O Port „ 6x USB 2.0 „ HDMI, DVI, D-sub „...132; 10/100/1000Base-T Compliant Ethernet LAN Buttons „ Power On / Off Button „ Unplug Docking Button Status LED „ Power LED Security „ Kensington Lock Security Port Dimensions „ 357(W) x 177(D) x ...supported GPU. Docking Station Specifications 38 The docking station features a number of multiple peripherals. Below lists the types of M1305. English 7.1 Features & Specifications The extensive features of the GIGABYTE Docking Station are ...
Manual
Page 49
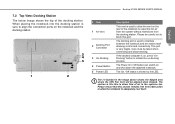
...Power On / Off button can switch on the rear of the docking station. When placing the notebook into the docking station is sure to align the connection ports on the notebook and the docking station. 3 4 5 1 2 Booktop M1305 SERIES USER'S MANUAL # Item Description English 1 Air Vent This... vent is used to interface 2 Docking Port Connector between the notebook and the station itself . 7.2 Top View: Docking Station The below image shows the ...
...Power On / Off button can switch on the rear of the docking station. When placing the notebook into the docking station is sure to align the connection ports on the notebook and the docking station. 3 4 5 1 2 Booktop M1305 SERIES USER'S MANUAL # Item Description English 1 Air Vent This... vent is used to interface 2 Docking Port Connector between the notebook and the station itself . 7.2 Top View: Docking Station The below image shows the ...
Manual
Page 50
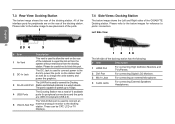
... be careful not to block this port. 2 DC-In Jack The DC Jack is used to connect power to the dock to power the ports on the rear of the GIGABYTE Docking station. The port is capable of speeds up to allow the vent on the station itself as well as to a wired... network. Left Side View English 40 23 4 5 # Item Description 1 Air Vent This vent is used to 1Gbps. 4 USB Ports The Docking Station has a total of...
... be careful not to block this port. 2 DC-In Jack The DC Jack is used to connect power to the dock to power the ports on the rear of the GIGABYTE Docking station. The port is capable of speeds up to allow the vent on the station itself as well as to a wired... network. Left Side View English 40 23 4 5 # Item Description 1 Air Vent This vent is used to 1Gbps. 4 USB Ports The Docking Station has a total of...
Manual
Page 51
... power outlet. Connect the AC Adaptor to the DC-In Jack on the docking station also use only the AC Adaptor supplied in the box with the ˇDocking Station and any power source supplying from the docking station. 7.5 Attachment Attachment: The AC adaptor Connect the AC adaptor to ensure... the left side of the rear of the docking station. 3. It will also enable the charging of the docking station has the Notebook Release Arm; The AC adaptor can be connected to the docking station. Connect the power cord to the AC adapter. 2. Booktop M1305 SERIES USER'S MANUAL Right Side View 2 3...
... power outlet. Connect the AC Adaptor to the DC-In Jack on the docking station also use only the AC Adaptor supplied in the box with the ˇDocking Station and any power source supplying from the docking station. 7.5 Attachment Attachment: The AC adaptor Connect the AC adaptor to ensure... the left side of the rear of the docking station. 3. It will also enable the charging of the docking station has the Notebook Release Arm; The AC adaptor can be connected to the docking station. Connect the power cord to the AC adapter. 2. Booktop M1305 SERIES USER'S MANUAL Right Side View 2 3...
Manual
Page 52
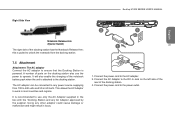
...correctly before connecting the notebook to connect them. Ensure that the notebook is connected first before trying to dock the notebook to the docking station. Line up , the docking connectors will hear a solid click to confirm that these are lined up and follow the instructions on how to...the same side. Ensure that it is placed the right way up the notebook with the docking station as below: 42 Docking Connector Docking Connector The images above and make sure of the docking ports. Please take note of the placement of the positioning. Please look at the images ...
...correctly before connecting the notebook to connect them. Ensure that the notebook is connected first before trying to dock the notebook to the docking station. Line up , the docking connectors will hear a solid click to confirm that these are lined up and follow the instructions on how to...the same side. Ensure that it is placed the right way up the notebook with the docking station as below: 42 Docking Connector Docking Connector The images above and make sure of the docking ports. Please take note of the placement of the positioning. Please look at the images ...

Manual
Page 53
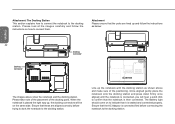
...display device. 7.6 Attachment: Undocking the Notebook Follow the guide below to undock the notebook from the docking station: Please follow the instructions to learn how to remove the notebook. 3 Booktop M1305 SERIES USER'S MANUAL 7.7 How to: Connect an external D-Sub Display Connect an external D-Sub Display... To insert the cable, simply line it up with a display out-put. Pull the Ejector Level out and back until the notebook unclips from the docking station. 3. ...
...display device. 7.6 Attachment: Undocking the Notebook Follow the guide below to undock the notebook from the docking station: Please follow the instructions to learn how to remove the notebook. 3 Booktop M1305 SERIES USER'S MANUAL 7.7 How to: Connect an external D-Sub Display Connect an external D-Sub Display... To insert the cable, simply line it up with a display out-put. Pull the Ejector Level out and back until the notebook unclips from the docking station. 3. ...
Manual
Page 54
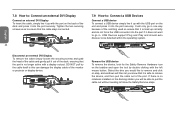
... an external DVI Display To insert the cable, simply line it up with the port on the back of the dock, ensuring that the port is no notebook installed on the docking station you will be able to pull the cable out without needing to : Connect a USB Devices Connect a USB device To... DVI Display To remove the cable simply loosen the securing screws and grab the head of the cable and gently pull it out of the dock and press it into the port securely. If there is no longer active with a display out-put. It will then let you would like to...
... an external DVI Display To insert the cable, simply line it up with the port on the back of the dock, ensuring that the port is no notebook installed on the docking station you will be able to pull the cable out without needing to : Connect a USB Devices Connect a USB device To... DVI Display To remove the cable simply loosen the securing screws and grab the head of the cable and gently pull it out of the dock and press it into the port securely. If there is no longer active with a display out-put. It will then let you would like to...
Manual
Page 55
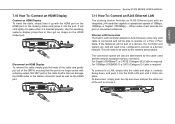
... LAN cable is no longer active with an integrated LAN controller capable of operational speeds of the port to then get an image on the docking station and press it into place when it is this can . To disconnect, simply push the clip arm down , and push it into the RJ45... to a domain network. Use the operating systems display properties to remove it clicks into place. The connection speed will click lightly into the port. Booktop M1305 SERIES USER'S MANUAL 7.11 How To: Connect an RJ45 Ethernet LAN The docking station features an RJ45 Ethernet port with a display output.
... LAN cable is no longer active with an integrated LAN controller capable of operational speeds of the port to then get an image on the docking station and press it into place when it is this can . To disconnect, simply push the clip arm down , and push it into the RJ45... to a domain network. Use the operating systems display properties to remove it clicks into place. The connection speed will click lightly into the port. Booktop M1305 SERIES USER'S MANUAL 7.11 How To: Connect an RJ45 Ethernet LAN The docking station features an RJ45 Ethernet port with a display output.