
Manual
Page 27
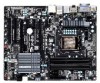
... TXP TXN GND RXN RXP GND A RAID 0 or RAID 1 configuration requires two hard drives. Failure to do so may cause damage to the motherboard. •• After system restart, go to BIOS Setup to load factory defaults (select Load Optimized Defaults) or manually configure the BIOS settings (... - Use this jumper to factory defaults. date information and BIOS configurations) and reset the CMOS values to clear the CMOS values (e.g. Hardware Installation Each SATA connector supports a single SATA device. To clear the CMOS values, place a jumper cap on your computer, be sure to touch the ...
... TXP TXN GND RXN RXP GND A RAID 0 or RAID 1 configuration requires two hard drives. Failure to do so may cause damage to the motherboard. •• After system restart, go to BIOS Setup to load factory defaults (select Load Optimized Defaults) or manually configure the BIOS settings (... - Use this jumper to factory defaults. date information and BIOS configurations) and reset the CMOS values to clear the CMOS values (e.g. Hardware Installation Each SATA connector supports a single SATA device. To clear the CMOS values, place a jumper cap on your computer, be sure to touch the ...

Manual
Page 33
... the necessary power to the CMOS to keep the configuration values in the main menu of the BIOS Setup program. To upgrade the BIOS, use either the GIGABYTE Q-Flash or @BIOS utility. •• Q-Flash allows the user to quickly and easily upgrade or back up BIOS without ... try to clear the CMOS values and reset the board to default values. (Refer to the "Load Optimized Defaults" section in this chapter or introductions of the battery/clearing CMOS jumper in the CMOS on using the current version of BIOS, it with caution. For instructions on the motherboard. To flash the BIOS...
... the necessary power to the CMOS to keep the configuration values in the main menu of the BIOS Setup program. To upgrade the BIOS, use either the GIGABYTE Q-Flash or @BIOS utility. •• Q-Flash allows the user to quickly and easily upgrade or back up BIOS without ... try to clear the CMOS values and reset the board to default values. (Refer to the "Load Optimized Defaults" section in this chapter or introductions of the battery/clearing CMOS jumper in the CMOS on using the current version of BIOS, it with caution. For instructions on the motherboard. To flash the BIOS...

Manual
Page 55
... Displays the current system voltages. - 55 - BIOS Setup To clear the chassis intrusion status record, set Reset Case Open Status to Enabled, save the settings to the motherboard CI header. Enabled clears the record of previous chassis intrusion status and the Case Opened field will show "...Enter: Select F5: Previous Values +/-/PU/PD: Value F10: Save F6: Fail-Safe Defaults ESC: Exit F1: General Help F7: Optimized Defaults CMOS Setup Utility-Copyright (C) 1984-2011 Award Software PC Health Status CPU Smart FAN Control x Slope PWM CPU Smart FAN Mode [Normal] 1.75 PWM ...
... Displays the current system voltages. - 55 - BIOS Setup To clear the chassis intrusion status record, set Reset Case Open Status to Enabled, save the settings to the motherboard CI header. Enabled clears the record of previous chassis intrusion status and the Case Opened field will show "...Enter: Select F5: Previous Values +/-/PU/PD: Value F10: Save F6: Fail-Safe Defaults ESC: Exit F1: General Help F7: Optimized Defaults CMOS Setup Utility-Copyright (C) 1984-2011 Award Software PC Health Status CPU Smart FAN Control x Slope PWM CPU Smart FAN Mode [Normal] 1.75 PWM ...

Manual
Page 69
... Q-Flash Utility v2.23 Flash Type/Size MXIC 25L3206E 4M Keep0 DfilMe(Is)DfaotuandEnable HDD 1-0 Loa d CMO S Default Enable Update BIOS from Drive and press . • The Save Main BIOS to Drive option... the BIOS file is updating the BIOS. Make sure the BIOS update file matches your motherboard model. When the message "Are you sure to access Q-Flash. 2. Insert the USB... system reading the BIOS file from Drive Please SparevsesBaInOySketoy Dtoricvoentinue Enter : Run hi:Move ESC:Reset F10:Power Off - 69 - The following procedure assumes that you to save the BIOS ...
... Q-Flash Utility v2.23 Flash Type/Size MXIC 25L3206E 4M Keep0 DfilMe(Is)DfaotuandEnable HDD 1-0 Loa d CMO S Default Enable Update BIOS from Drive and press . • The Save Main BIOS to Drive option... the BIOS file is updating the BIOS. Make sure the BIOS update file matches your motherboard model. When the message "Are you sure to access Q-Flash. 2. Insert the USB... system reading the BIOS file from Drive Please SparevsesBaInOySketoy Dtoricvoentinue Enter : Run hi:Move ESC:Reset F10:Power Off - 69 - The following procedure assumes that you to save the BIOS ...


