
User Manual
Page 6
... I/O Peripherals Cables 19 Step 4-1: I/O Back Panel Introduction 19 Step 4-2: Connectors Introduction 21 Chapter 3 BIOS Setup 35 The Main Menu (For example: BIOS Ver. : E1 36 Standard CMOS Features 38 Advanced BIOS Features 40 Integrated Peripherals 42 Power Management Setup 46 PnP/PCI Configurations 48 PC Health Status 49 MB Intelligent Tweaker(M.I.T 50 GA-K8NS Ultra-939 Motherboard - 6 -
... I/O Peripherals Cables 19 Step 4-1: I/O Back Panel Introduction 19 Step 4-2: Connectors Introduction 21 Chapter 3 BIOS Setup 35 The Main Menu (For example: BIOS Ver. : E1 36 Standard CMOS Features 38 Advanced BIOS Features 40 Integrated Peripherals 42 Power Management Setup 46 PnP/PCI Configurations 48 PC Health Status 49 MB Intelligent Tweaker(M.I.T 50 GA-K8NS Ultra-939 Motherboard - 6 -

User Manual
Page 7
Table of Contents Channel Audio Function Introduction 63 Jack-Sensing and UAJ Introduction 69 Xpress Recovery Introduction 71 Serial ATA BIOS Setting Utility Introduction 74 Chapter 5 Appendix 81 - 7 - English Top Performance 51 Select Language 51 Load Optimized Defaults 52 Set Supervisor/User Password 52 Exit Without Saving 53 Save & Exit Setup 53 Chapter 4 Technical Reference 55 @BIOSTM Introduction 55 Flash BIOS Method Introduction 56 2- / 4- / 6- / 8-
Table of Contents Channel Audio Function Introduction 63 Jack-Sensing and UAJ Introduction 69 Xpress Recovery Introduction 71 Serial ATA BIOS Setting Utility Introduction 74 Chapter 5 Appendix 81 - 7 - English Top Performance 51 Select Language 51 Load Optimized Defaults 52 Set Supervisor/User Password 52 Exit Without Saving 53 Save & Exit Setup 53 Chapter 4 Technical Reference 55 @BIOSTM Introduction 55 Flash BIOS Method Introduction 56 2- / 4- / 6- / 8-
User Manual
Page 9
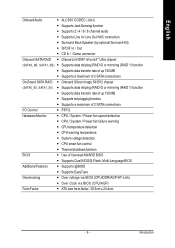
... Back Speaker (by optional Surround-Kit) y SPDIF In / Out y CD In / Game connector Onboard SATA RAID y Onboard nVIDIA® nForce3TM Ultra chipset (SATA0_SB, SATA1_SB) y Supports data striping (RAID 0) or mirroring (RAID 1) function y Supports data transfer rate of up 150 MB y ...CPU smart fan control y Thermal shutdown function BIOS y Use of licensed AWARD BIOS y Supports Dual BIOS/Q-Flash, Multi-Language BIOS Additional Features y Supports @BIOS y Supports EasyTune Overclocking y Over voltage via BIOS (CPU/DDR/AGP/HT-Link) y Over clock via BIOS (CPU/AGP) Form Factor y ATX size...
... Back Speaker (by optional Surround-Kit) y SPDIF In / Out y CD In / Game connector Onboard SATA RAID y Onboard nVIDIA® nForce3TM Ultra chipset (SATA0_SB, SATA1_SB) y Supports data striping (RAID 0) or mirroring (RAID 1) function y Supports data transfer rate of up 150 MB y ...CPU smart fan control y Thermal shutdown function BIOS y Use of licensed AWARD BIOS y Supports Dual BIOS/Q-Flash, Multi-Language BIOS Additional Features y Supports @BIOS y Supports EasyTune Overclocking y Over voltage via BIOS (CPU/DDR/AGP/HT-Link) y Over clock via BIOS (CPU/AGP) Form Factor y ATX size...
User Manual
Page 13
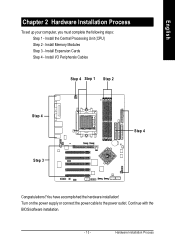
You have accomplished the hardware installation! Install I/O Peripherals Cables Step 4 Step 1 Step 2 Step 4 Step 3 Step 4 Congratulations! Turn on the power supply or connect the power cable to the power outlet. Install Memory Modules Step 3 - Hardware Installation Process English Chapter 2 Hardware Installation Process To set up your computer, you must complete the following steps: Step 1 - Install Expansion Cards Step 4 - Continue with the BIOS/software installation. - 13 - Install the Central Processing Unit (CPU) Step 2 -
You have accomplished the hardware installation! Install I/O Peripherals Cables Step 4 Step 1 Step 2 Step 4 Step 3 Step 4 Congratulations! Turn on the power supply or connect the power cable to the power outlet. Install Memory Modules Step 3 - Hardware Installation Process English Chapter 2 Hardware Installation Process To set up your computer, you must complete the following steps: Step 1 - Install Expansion Cards Step 4 - Continue with the BIOS/software installation. - 13 - Install the Central Processing Unit (CPU) Step 2 -
User Manual
Page 16
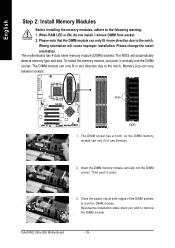
... Modules Before installing the memory modules, adhere to remove the DIMM module. Wrong orientation will automatically detects memory type and size. The BIOS will cause improper installation. Notch DDR 1. Insert the DIMM memory module vertically into the DIMM socket. Reverse the installation steps when you ...sockets to the notch. Please note that the DIMM module can vary between sockets. To install the memory module, just push it down. 3. GA-K8NS Ultra-939 Motherboard - 16 - Memory size can only fit in one direction due to the notch. When RAM LED is ON, do not install ...
... Modules Before installing the memory modules, adhere to remove the DIMM module. Wrong orientation will automatically detects memory type and size. The BIOS will cause improper installation. Notch DDR 1. Insert the DIMM memory module vertically into the DIMM socket. Reverse the installation steps when you ...sockets to the notch. Please note that the DIMM module can vary between sockets. To install the memory module, just push it down. 3. GA-K8NS Ultra-939 Motherboard - 16 - Memory size can only fit in one direction due to the notch. When RAM LED is ON, do not install ...
User Manual
Page 18
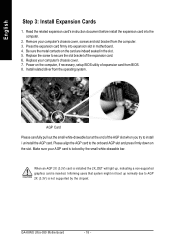
... your computer's chassis cover, screws and slot bracket from BIOS. 8. Press the expansion card firmly into the computer. 2. AGP Card Please carefully pull out the small white-drawable bar at the end of the expansion card. 6. Make sure your computer's chassis cover. 7. GA-K8NS Ultra-939 Motherboard - 18 - Read the related expansion card's instruction document...
... your computer's chassis cover, screws and slot bracket from BIOS. 8. Press the expansion card firmly into the computer. 2. AGP Card Please carefully pull out the small white-drawable bar at the end of the expansion card. 6. Make sure your computer's chassis cover. 7. GA-K8NS Ultra-939 Motherboard - 18 - Read the related expansion card's instruction document...
User Manual
Page 25
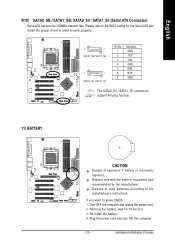
... Connector) Serial ATA can provide 150MB/s transfer rate. Replace only with the same or equivalent type recommended by the manufacturer. If you want to the BIOS setting for 30 second. 3. Remove the battery, wait for the Serial ATA and install the proper driver in order to work properly. 1 7 SATA0_SB / SATA1_SB 7 1 SATA0_SII...
... Connector) Serial ATA can provide 150MB/s transfer rate. Replace only with the same or equivalent type recommended by the manufacturer. If you want to the BIOS setting for 30 second. 3. Remove the battery, wait for the Serial ATA and install the proper driver in order to work properly. 1 7 SATA0_SB / SATA1_SB 7 1 SATA0_SII...
User Manual
Page 35
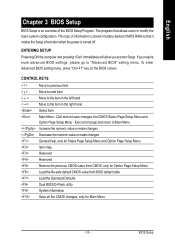
... utility System Information Save all the CMOS changes, only for Main Menu - 35 - BIOS Setup To enter Advanced BIOS setting menu, press "Ctrl+F1" key on the BIOS screen. This type of the BIOS Setup Program. Quit and not save changes into CMOS Status Page Setup Menu and Option Page Setup Menu - CONTROL KEYS... the item in the right hand Select Item Main Menu - ENTERING SETUP Powering ON the computer and pressing immediately will allow you require more advanced BIOS settings, please go to the item in the left hand Move to "Advanced...
... utility System Information Save all the CMOS changes, only for Main Menu - 35 - BIOS Setup To enter Advanced BIOS setting menu, press "Ctrl+F1" key on the BIOS screen. This type of the BIOS Setup Program. Quit and not save changes into CMOS Status Page Setup Menu and Option Page Setup Menu - CONTROL KEYS... the item in the right hand Select Item Main Menu - ENTERING SETUP Powering ON the computer and pressing immediately will allow you require more advanced BIOS settings, please go to the item in the left hand Move to "Advanced...
User Manual
Page 36
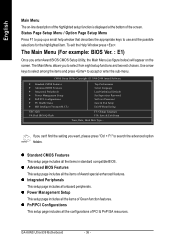
... items of PCI & PnP ISA resources. GA-K8NS Ultra-939 Motherboard - 36 - z Integrated Peripherals This setup page includes all the items in standard compatible BIOS. The Main Menu (For example: BIOS Ver. : E1) Once you enter Award BIOS CMOS Setup Utility, the Main Menu (as... at the bottom of Green function features. CMOS Setup Utility-Copyright (C) 1984-2004 Award Software ` Standard CMOS Features ` Advanced BIOS Features ` Integrated Peripherals ` Power Management Setup ` PnP/PCI Configurations ` PC Health Status ` MB Intelligent Tweaker(M.I.T.) Top Performance ...
... items of PCI & PnP ISA resources. GA-K8NS Ultra-939 Motherboard - 36 - z Integrated Peripherals This setup page includes all the items in standard compatible BIOS. The Main Menu (For example: BIOS Ver. : E1) Once you enter Award BIOS CMOS Setup Utility, the Main Menu (as... at the bottom of Green function features. CMOS Setup Utility-Copyright (C) 1984-2004 Award Software ` Standard CMOS Features ` Advanced BIOS Features ` Integrated Peripherals ` Power Management Setup ` PnP/PCI Configurations ` PC Health Status ` MB Intelligent Tweaker(M.I.T.) Top Performance ...

User Manual
Page 37
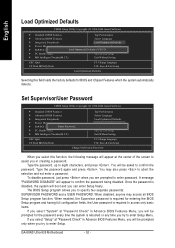
... system. z Top Performance If you to limit access to maximize the performance of the system parameters which the system would be in best performance configuration. BIOS Setup z Load Optimized Defaults Optimized Defaults indicates the value of your system, set "Top Performance" as "Enabled". z MB Intelligent Tweaker(M.I.T.) This setup page is control...
... system. z Top Performance If you to limit access to maximize the performance of the system parameters which the system would be in best performance configuration. BIOS Setup z Load Optimized Defaults Optimized Defaults indicates the value of your system, set "Top Performance" as "Enabled". z MB Intelligent Tweaker(M.I.T.) This setup page is control...
User Manual
Page 38
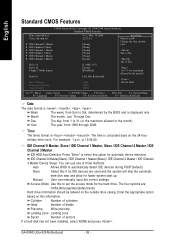
...Write precomp Landing Zone Landing zone Sector Number of three methods: Auto Allows BIOS to select this if no IDE devices are : CHS/LBA/Large/Auto(default:Auto) Hard drive information should be labeled on the outside drive casing. GA-K8NS Ultra-939 Motherboard - 38 - to 2098 KLJI: Move Enter: Select +/-/PU/PD:... Setup. Enter the appropriate option based on the 24-hour military-time clock. The time is calculated base on this to Sat, determined by the BIOS and is 13:00:00. Week The week, from 1999 through 2098. Day The day, from 1 to 31 (or the maximum allowed in...
...Write precomp Landing Zone Landing zone Sector Number of three methods: Auto Allows BIOS to select this if no IDE devices are : CHS/LBA/Large/Auto(default:Auto) Hard drive information should be labeled on the outside drive casing. GA-K8NS Ultra-939 Motherboard - 38 - to 2098 KLJI: Move Enter: Select +/-/PU/PD:... Setup. Enter the appropriate option based on the 24-hour military-time clock. The time is calculated base on this to Sat, determined by the BIOS and is 13:00:00. Week The week, from 1999 through 2098. Day The day, from 1 to 31 (or the maximum allowed in...
User Manual
Page 39
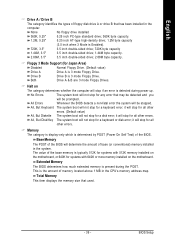
...capacity. The value of the base memory is typically 512K for systems with 640K or more memory installed on the motherboard. Extended Memory The BIOS determines how much extended memory is 3 mode Floppy Drive. Floppy 3 Mode Support (for systems with 512K memory installed on The category determines...drive; 1.2M byte capacity (3.5 inch when 3 Mode is detected during the POST. it will stop for all other errors. Base Memory The POST of the BIOS will be prompted. English Drive A / Drive B The category identifies the types of floppy disk drive A or drive B that used. - 39 - Halt...
...capacity. The value of the base memory is typically 512K for systems with 640K or more memory installed on the motherboard. Extended Memory The BIOS determines how much extended memory is 3 mode Floppy Drive. Floppy 3 Mode Support (for systems with 512K memory installed on The category determines...drive; 1.2M byte capacity (3.5 inch when 3 Mode is detected during the POST. it will stop for all other errors. Base Memory The POST of the BIOS will be prompted. English Drive A / Drive B The category identifies the types of floppy disk drive A or drive B that used. - 39 - Halt...

User Manual
Page 40
...80 tracks. 360K type is 40 tracks 720K, 1.2M and 1.44M are all 80 tracks. Note that BIOS can not tell from 720K, 1.2M or 1.44M drive type as they are all 80 tracks. Press to... number. USB-HDD Select your boot device priority by LS120. Boot Up Floppy Seek During POST, BIOS will not be any warning message if the drive installed is 40 or 80 tracks. ZIP Select your...< > to select a device, then press to move it is 360K. (Default value) GA-K8NS Ultra-939 Motherboard - 40 - Enabled BIOS searches for floppy disk drive to determine it up, or to exit this menu.
...80 tracks. 360K type is 40 tracks 720K, 1.2M and 1.44M are all 80 tracks. Note that BIOS can not tell from 720K, 1.2M or 1.44M drive type as they are all 80 tracks. Press to... number. USB-HDD Select your boot device priority by LS120. Boot Up Floppy Seek During POST, BIOS will not be any warning message if the drive installed is 40 or 80 tracks. ZIP Select your...< > to select a device, then press to move it is 360K. (Default value) GA-K8NS Ultra-939 Motherboard - 40 - Enabled BIOS searches for floppy disk drive to determine it up, or to exit this menu.

User Manual
Page 41
... to select the first initiation of the monitor display from which card when you install an AGP card and a PCI VGA card on the motherboard. BIOS Setup English Password Check System The system can not boot and can not access to PCI. - 41 - Init Display First This feature allows you to...
... to select the first initiation of the monitor display from which card when you install an AGP card and a PCI VGA card on the motherboard. BIOS Setup English Password Check System The system can not boot and can not access to PCI. - 41 - Init Display First This feature allows you to...

User Manual
Page 43
....1 Only enable USB 1.1 controller. Disabled Disable USB mouse support. (Default value) Serial-ATA 2 (Internal PHY) (Onboard nVIDIA nForce3 Ultra chipset) Enabled Enable Serial ATA supported. (Default value) Disabled Disable Serial ATA supported. BIOS Setup Disable this function. (Default value) IDE Channel 1 Master RAID Enabled Enable 2nd master channel IDE RAID function. Disabled...
....1 Only enable USB 1.1 controller. Disabled Disable USB mouse support. (Default value) Serial-ATA 2 (Internal PHY) (Onboard nVIDIA nForce3 Ultra chipset) Enabled Enable Serial ATA supported. (Default value) Disabled Disable Serial ATA supported. BIOS Setup Disable this function. (Default value) IDE Channel 1 Master RAID Enabled Enable 2nd master channel IDE RAID function. Disabled...

User Manual
Page 44
... (nVIDIA) Auto Auto-detect onboard LAN function. (Default value) Disabled Disable onboard LAN function. Onboard Serial Port 2 Auto BIOS will automatically setup the port 1 address. 3F8/IRQ4 Enable onboard Serial port 1 and address is 3F8. (Default value) 2F8.... (Default value) Disabled Disable onboard IEEE1394 function. Disabled Disable onboard Serial port 2. GA-K8NS Ultra-939 Motherboard - 44 - Disabled Disable this function. (Default value) Onboard Serial Port 1 Auto BIOS will automatically setup the port 2 address. 3F8/IRQ4 Enable onboard Serial port 2 and...
... (nVIDIA) Auto Auto-detect onboard LAN function. (Default value) Disabled Disable onboard LAN function. Onboard Serial Port 2 Auto BIOS will automatically setup the port 1 address. 3F8/IRQ4 Enable onboard Serial port 1 and address is 3F8. (Default value) 2F8.... (Default value) Disabled Disable onboard IEEE1394 function. Disabled Disable onboard Serial port 2. GA-K8NS Ultra-939 Motherboard - 44 - Disabled Disable this function. (Default value) Onboard Serial Port 1 Auto BIOS will automatically setup the port 2 address. 3F8/IRQ4 Enable onboard Serial port 2 and...
User Manual
Page 47
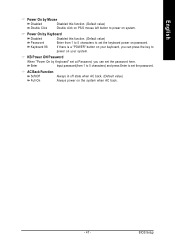
... function. (Default value) Password Enter from 1 to 5 characters) and press Enter to set the password. Enter Input password(from 1 to 5 characters to power on password. BIOS Setup KB Power ON Password When "Power On by Keyboard Disabled Disabled this function. (Default value) Double Click Double click on PS/2 mouse left button...
... function. (Default value) Password Enter from 1 to 5 characters) and press Enter to set the password. Enter Input password(from 1 to 5 characters to power on password. BIOS Setup KB Power ON Password When "Power On by Keyboard Disabled Disabled this function. (Default value) Double Click Double click on PS/2 mouse left button...

User Manual
Page 49
... CPU Smart Fan control function. (Default value) a. c. When the CPU temperature is between 50 and 60 degrees Celsius, CPU fan will run at medium speed. BIOS Setup CPU Smart FAN Control Disabled Disable this function. When the CPU temperature is higher than 40 degrees Celsius, CPU fan will run at 90oC...
... CPU Smart Fan control function. (Default value) a. c. When the CPU temperature is between 50 and 60 degrees Celsius, CPU fan will run at medium speed. BIOS Setup CPU Smart FAN Control Disabled Disable this function. When the CPU temperature is higher than 40 degrees Celsius, CPU fan will run at 90oC...

User Manual
Page 51
.... English Top Performance CMOS Setup Utility-Copyright (C) 1984-2004 Award Software ` Standard CMOS Features Top Performance ` Advanced BIOS Features Select Language ` Integrated Peripherals Top Performance Load Optimized Defaults ` ` PPnoPw/ePrCMI CanoangfeigmuernattioSnestuDEpnisaabblleedd Set Supervisor Password Set User... Password ` PC Health Status Save & Exit Setup ` MB Intelligent Tweaker(M.I .T.) ESC: Quit F8: Dual BIOS/Q-Flash Top Performance Select Language Load Optimized Defaults Set Supervisor Password Set User Password Save & Exit Setup Exit Without Saving...
.... English Top Performance CMOS Setup Utility-Copyright (C) 1984-2004 Award Software ` Standard CMOS Features Top Performance ` Advanced BIOS Features Select Language ` Integrated Peripherals Top Performance Load Optimized Defaults ` ` PPnoPw/ePrCMI CanoangfeigmuernattioSnestuDEpnisaabblleedd Set Supervisor Password Set User... Password ` PC Health Status Save & Exit Setup ` MB Intelligent Tweaker(M.I .T.) ESC: Quit F8: Dual BIOS/Q-Flash Top Performance Select Language Load Optimized Defaults Set Supervisor Password Set User Password Save & Exit Setup Exit Without Saving...
User Manual
Page 52
...freely. English Load Optimized Defaults CMOS Setup Utility-Copyright (C) 1984-2004 Award Software ` Standard CMOS Features Top Performance ` Advanced BIOS Features Select Language ` Integrated Peripherals Load Optimized Defaults ` Power Management Setup Set Supervisor Password ` PnP/PCI Configurations Load Optimized ...BIOS Features Menu, you will be asked to enter Setup Menu. When disabled, anyone may also press to enter password. If you select "Setup" at the center of the screen to assist you are prompted to abort the selection and not enter a password. GA-K8NS Ultra-939...
...freely. English Load Optimized Defaults CMOS Setup Utility-Copyright (C) 1984-2004 Award Software ` Standard CMOS Features Top Performance ` Advanced BIOS Features Select Language ` Integrated Peripherals Load Optimized Defaults ` Power Management Setup Set Supervisor Password ` PnP/PCI Configurations Load Optimized ...BIOS Features Menu, you will be asked to enter Setup Menu. When disabled, anyone may also press to enter password. If you select "Setup" at the center of the screen to assist you are prompted to abort the selection and not enter a password. GA-K8NS Ultra-939...


