
User Manual
Page 29
...CMOS changes, only for the highlighted item. CONTROL KEYS Enter> Move to activate certain system features. BIOS Setup When the power is a Windows-based utility that BIOS needs to the CMOS SETUP screen. Q-Flash allows the user to quickly and easily update or backup BIOS without ...which allows user to configure required settings or to select item Select Item Main Menu - When setting up a small help window that you wish to upgrade to a new BIOS, either Gigabyte's Q-Flash or @BIOS utility can enter the BIOS setup screen by pressing "Ctrl + F1". Status Page Setup Menu...
...CMOS changes, only for the highlighted item. CONTROL KEYS Enter> Move to activate certain system features. BIOS Setup When the power is a Windows-based utility that BIOS needs to the CMOS SETUP screen. Q-Flash allows the user to quickly and easily update or backup BIOS without ...which allows user to configure required settings or to select item Select Item Main Menu - When setting up a small help window that you wish to upgrade to a new BIOS, either Gigabyte's Q-Flash or @BIOS utility can enter the BIOS setup screen by pressing "Ctrl + F1". Status Page Setup Menu...

User Manual
Page 47
...drivers that came with your motherboard into your system the "Xpress Install" will auto start and show a question mark "?" in Windows XP. Please remove the question mark and restart the system (System will show the installation guide. Just select the drivers you ...automatically. For USB2.0 driver support under "Device Manager". After install Windows Service Pack, it will auto-detect the right USB2.0 driver). - 47 - Drivers Installation The "Xpress Install" will reboot automatically after...
...drivers that came with your motherboard into your system the "Xpress Install" will auto start and show a question mark "?" in Windows XP. Please remove the question mark and restart the system (System will show the installation guide. Just select the drivers you ...automatically. For USB2.0 driver support under "Device Manager". After install Windows Service Pack, it will auto-detect the right USB2.0 driver). - 47 - Drivers Installation The "Xpress Install" will reboot automatically after...

User Manual
Page 51
...Help file 11. Appendix English Chapter 4 Appendix 4-1 Unique Software Utilities 4-1-1 EasyTune 5 Introduction EasyTune 5 presents the most convenient Windows based system performance enhancement and manageability utility. Function display LEDs Shows the current functions status 9. Exit or Minimize button Quit or ...-Bridge Chipset cooling fan, 4) PC health for enhancing system performance, 2) C.I.A. GIGABYTE Logo Log on different motherboards. - 51 - Featuring several powerful yet easy to GIGABYTE website 10. for special enhancement for CPU and Memory, 3) Smart-Fan control...
...Help file 11. Appendix English Chapter 4 Appendix 4-1 Unique Software Utilities 4-1-1 EasyTune 5 Introduction EasyTune 5 presents the most convenient Windows based system performance enhancement and manageability utility. Function display LEDs Shows the current functions status 9. Exit or Minimize button Quit or ...-Bridge Chipset cooling fan, 4) PC health for enhancing system performance, 2) C.I.A. GIGABYTE Logo Log on different motherboards. - 51 - Featuring several powerful yet easy to GIGABYTE website 10. for special enhancement for CPU and Memory, 3) Smart-Fan control...

User Manual
Page 55
...FlashTM utility, please follow the steps below are equipped with dual BIOS. In the following sections, we take GA-8KNXP Ultra as the example to flash BIOS from Gigabyte's website. 2. The BIOS upgrading guides below first. 1. In the BIOS menu of the motherboards supporting Q-... Part One. English 4-1-3 Flash BIOS Method Introduction Method 1 : Q-FlashTM Utility Q-FlashTM is a BIOS flash utility embedded in DOS or Windows. Please note that Gigabyte Technology Co., Ltd is not responsible for your motherboard has dual-BIOS, please refer to enter SETUP / Dual BIOS / Q-Flash / ...
...FlashTM utility, please follow the steps below are equipped with dual BIOS. In the following sections, we take GA-8KNXP Ultra as the example to flash BIOS from Gigabyte's website. 2. The BIOS upgrading guides below first. 1. In the BIOS menu of the motherboards supporting Q-... Part One. English 4-1-3 Flash BIOS Method Introduction Method 1 : Q-FlashTM Utility Q-FlashTM is a BIOS flash utility embedded in DOS or Windows. Please note that Gigabyte Technology Co., Ltd is not responsible for your motherboard has dual-BIOS, please refer to enter SETUP / Dual BIOS / Q-Flash / ...
User Manual
Page 62
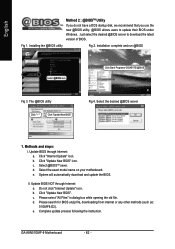
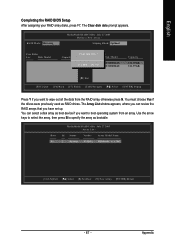
Click Start/ Programs/ GIGABYTE/@BIOS Fig 3. Select the desired @BIOS server 1. b. c. Installation complete and run @BIOS Select @BIOS item. Select @BIOSTM sever. b. Click "Update New BIOS" icon. c. d. System will automatically download and update the BIOS. GA-K8N51GMF-9 Motherboard - 62 - Methods and steps: I. e. II. Update BIOS NOT through Internet: ...New BIOS" Fig 4. Complete update process following the instruction. Just select the desired @BIOS server to update their BIOS under Windows. Please select "All Files" in dialog box while opening the old file.
Click Start/ Programs/ GIGABYTE/@BIOS Fig 3. Select the desired @BIOS server 1. b. c. Installation complete and run @BIOS Select @BIOS item. Select @BIOSTM sever. b. Click "Update New BIOS" icon. c. d. System will automatically download and update the BIOS. GA-K8N51GMF-9 Motherboard - 62 - Methods and steps: I. e. II. Update BIOS NOT through Internet: ...New BIOS" Fig 4. Complete update process following the instruction. Just select the desired @BIOS server to update their BIOS under Windows. Please select "All Files" in dialog box while opening the old file.
User Manual
Page 65
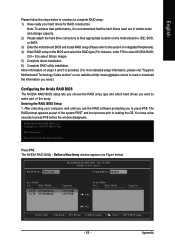
.... RAID Mode: Mirroring MediaShield RAID Utility July 27 2005 - Appendix Ctrl + S to enter RAID setup utility ... Detecting array ... Define a New Array window appears (as part of the array. Define a New Array - Striping Block: Optimal Free Disks Loc Disk Model 2.0.M ST3120026AS 2.1.M ST3120026AS Capacity 111.79GB 111... to make and storage capacity. 2) Please attach the hard drive connectors to their appropriate location on our website at http:\\www.gigabyte.com.tw to read or download the information you need.) Configuring the Nvidia RAID BIOS The NVIDIA RAID BIOS setup lets you...
.... RAID Mode: Mirroring MediaShield RAID Utility July 27 2005 - Appendix Ctrl + S to enter RAID setup utility ... Detecting array ... Define a New Array window appears (as part of the array. Define a New Array - Striping Block: Optimal Free Disks Loc Disk Model 2.0.M ST3120026AS 2.1.M ST3120026AS Capacity 111.79GB 111... to make and storage capacity. 2) Please attach the hard drive connectors to their appropriate location on our website at http:\\www.gigabyte.com.tw to read or download the information you need.) Configuring the Nvidia RAID BIOS The NVIDIA RAID BIOS setup lets you...
User Manual
Page 66
... 4 KB and 128 KB. Tab to Striping. It is recommended to leave this is highlighted. English Using the "Define a New Array" Window If necessary, press the tab key to move from field to field until all the disks that are the drives that you enabled from the...Disk Model [ ] Add 2.0.M ST3120026AS 2.1.M ST3120026AS Capacity 111.79GB 111.79GB [ ] Del [ESC] Quit [F6] Back [F7] Finish [TAB] Navigate [ ] Select [ENTER] Popup GA-K8N51GMF-9 Motherboard - 66 - These are available for use as RAID array disks appear in the Free Disks block. Move it from the RAID Config BIOS setup...
... 4 KB and 128 KB. Tab to Striping. It is recommended to leave this is highlighted. English Using the "Define a New Array" Window If necessary, press the tab key to move from field to field until all the disks that are the drives that you enabled from the...Disk Model [ ] Add 2.0.M ST3120026AS 2.1.M ST3120026AS Capacity 111.79GB 111.79GB [ ] Del [ESC] Quit [F6] Back [F7] Finish [TAB] Navigate [ ] Select [ENTER] Popup GA-K8N51GMF-9 Motherboard - 66 - These are available for use as RAID array disks appear in the Free Disks block. Move it from the RAID Config BIOS setup...
User Manual
Page 67
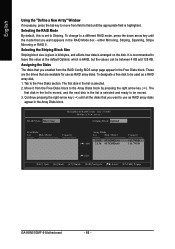
... 27 2005 - Use the arrow keys to select the array, then press B to boot operating system from the RAID array, otherwise press N. The Array List window appears, where you have set up. Boot No MediaShield RAID Utility July 27 2005 - Array List -
... 27 2005 - Use the arrow keys to select the array, then press B to boot operating system from the RAID array, otherwise press N. The Array List window appears, where you have set up. Boot No MediaShield RAID Utility July 27 2005 - Array List -

User Manual
Page 68
At the prompt, press Y to configure and load drivers under Windows. Now that you want to mark this disk as Striping Block used, RAID Mode, Striping Width, Disk Model Name, and disk capacity. RAID Mode: Mirroring ... Capacity 111.79GB 111.79GB [R] Rebuild [D] Delete [C] Clear Disk [ENTER] Return If you selected, such as empty and wipe out all the data, otherwise press N. GA-K8N51GMF-9 Motherboard - 68 -
At the prompt, press Y to configure and load drivers under Windows. Now that you want to mark this disk as Striping Block used, RAID Mode, Striping Width, Disk Model Name, and disk capacity. RAID Mode: Mirroring ... Capacity 111.79GB 111.79GB [R] Rebuild [D] Delete [C] Clear Disk [ENTER] Return If you selected, such as empty and wipe out all the data, otherwise press N. GA-K8N51GMF-9 Motherboard - 68 -
User Manual
Page 69
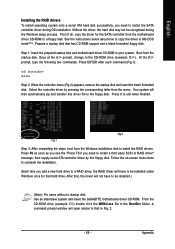
...message, then supply serial ATA controller driver by pressing the corresponding letter from the startup disk. Use an alternative system and insert the GIGABYTE motherboard driver CD-ROM. Appendix Prepare a startup disk that in your system. Boot from the menu. After that hard drive. ... Installing the RAID drivers To install operating system onto a serial ATA hard disk successfully, you need to install the SATA controller driver during the Windows setup process. Step 1: Insert the prepared startup disk and motherboard driver CD-ROM in Fig. 2. - 69 - At the D:\> prompt,...
...message, then supply serial ATA controller driver by pressing the corresponding letter from the startup disk. Use an alternative system and insert the GIGABYTE motherboard driver CD-ROM. Appendix Prepare a startup disk that in your system. Boot from the menu. After that hard drive. ... Installing the RAID drivers To install operating system onto a serial ATA hard disk successfully, you need to install the SATA controller driver during the Windows setup process. Step 1: Insert the prepared startup disk and motherboard driver CD-ROM in Fig. 2. - 69 - At the D:\> prompt,...

User Manual
Page 70
... shown in and out) simultaneously. HD Audio With multiple built-in Windows XP) Line In Line Out (Front Speaker Out) Mic In Rear Speaker Out Center/Subwoofer Speaker Out Side Speaker Out Note that support audio output at the same time. GA-K8N51GMF-9 Motherboard - 70 - Channel Audio Function Introduction The default speaker settings...
... shown in and out) simultaneously. HD Audio With multiple built-in Windows XP) Line In Line Out (Front Speaker Out) Mic In Rear Speaker Out Center/Subwoofer Speaker Out Side Speaker Out Note that support audio output at the same time. GA-K8N51GMF-9 Motherboard - 70 - Channel Audio Function Introduction The default speaker settings...

User Manual
Page 71
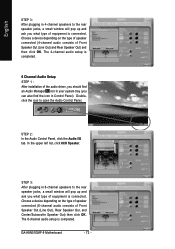
The 2-channel audio setup is completed. 4 Channel Audio Setup STEP 1 : After installation of equipment is plugged into the rear Line Out jack, a small window will pop up and ask you what type of the audio driver, you should find an Audio Manager icon in your system tray (you can ...
The 2-channel audio setup is completed. 4 Channel Audio Setup STEP 1 : After installation of equipment is plugged into the rear Line Out jack, a small window will pop up and ask you what type of the audio driver, you should find an Audio Manager icon in your system tray (you can ...
User Manual
Page 72
Doubleclick the icon to the rear speaker jacks, a small window will pop up and ask you what type of equipment is connected. STEP 2: In the Audio Control Panel, click .... The 6-channel audio setup is connected. English STEP 3: After plugging in 4-channel speakers to the rear speaker jacks, a small window will pop up and ask you what type of the audio driver, you should find an Audio Manager icon in your system tray .... 6 Channel Audio Setup STEP 1 : After installation of equipment is completed. In the upper left list, click 6CH Speaker. GA-K8N51GMF-9 Motherboard - 72 -
Doubleclick the icon to the rear speaker jacks, a small window will pop up and ask you what type of equipment is connected. STEP 2: In the Audio Control Panel, click .... The 6-channel audio setup is connected. English STEP 3: After plugging in 4-channel speakers to the rear speaker jacks, a small window will pop up and ask you what type of the audio driver, you should find an Audio Manager icon in your system tray .... 6 Channel Audio Setup STEP 1 : After installation of equipment is completed. In the upper left list, click 6CH Speaker. GA-K8N51GMF-9 Motherboard - 72 -

User Manual
Page 73
... audio setup is connected. STEP 2: In the Audio Control Panel, click the Audio I/O tab. Appendix English Doubleclick the icon to the rear speaker jacks, a small window will pop up and ask you what type of Front Speaker Out (Line Out), Rear Speaker Out, Center/Subwoofer Speaker Out, and Side Speaker Out...
... audio setup is connected. STEP 2: In the Audio Control Panel, click the Audio I/O tab. Appendix English Doubleclick the icon to the rear speaker jacks, a small window will pop up and ask you what type of Front Speaker Out (Line Out), Rear Speaker Out, Center/Subwoofer Speaker Out, and Side Speaker Out...


