Manual
Page 18
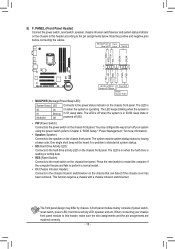
... LED keeps blinking when the system is on the chassis front panel. When connecting your system using the power switch (refer to Chapter 2, "BIOS Setup," "Power Management," for more information). •• Speaker (Speaker): Connects to the speaker on the chassis front panel. The LED ... wire assignments and the pin assignments are matched correctly. - 18 - PW+ PWSPEAK+ SPEAK- RESCI-RES+ CI+ PWR+ PWR- Hard Drive Reset Activity LED Switch Power LED Chassis Intrusion Header •• MSG/PWR (Message/Power/Sleep LED): System Status LED S0 On S1 Blinking S3/...
... LED keeps blinking when the system is on the chassis front panel. When connecting your system using the power switch (refer to Chapter 2, "BIOS Setup," "Power Management," for more information). •• Speaker (Speaker): Connects to the speaker on the chassis front panel. The LED ... wire assignments and the pin assignments are matched correctly. - 18 - PW+ PWSPEAK+ SPEAK- RESCI-RES+ CI+ PWR+ PWR- Hard Drive Reset Activity LED Switch Power LED Chassis Intrusion Header •• MSG/PWR (Message/Power/Sleep LED): System Status LED S0 On S1 Blinking S3/...
Manual
Page 22
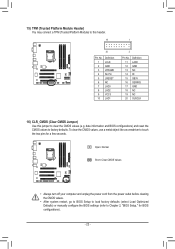
...power cord from the power outlet before clearing the CMOS values. •• After system restart, go to BIOS Setup to load factory defaults (select Load Optimized Defaults) or manually configure the BIOS settings (refer to clear the CMOS values (e.g. F_AUDIO(H) DB_PORT Voltage measurement module(X58A-O PCIe power connector (...20 Definition LAD0 GND NC ID SB3V SERIRQ GND NC NC SUSCLK 16) CLR_CMOS (Clear CMOS Jumper) Use this jumper to Chapter 2, "BIOS Setup," for a few seconds. To clear the CMOS values, use a metal object like a screwdriver to factory defaults. date information and...
...power cord from the power outlet before clearing the CMOS values. •• After system restart, go to BIOS Setup to load factory defaults (select Load Optimized Defaults) or manually configure the BIOS settings (refer to clear the CMOS values (e.g. F_AUDIO(H) DB_PORT Voltage measurement module(X58A-O PCIe power connector (...20 Definition LAD0 GND NC ID SB3V SERIRQ GND NC NC SUSCLK 16) CLR_CMOS (Clear CMOS Jumper) Use this jumper to Chapter 2, "BIOS Setup," for a few seconds. To clear the CMOS values, use a metal object like a screwdriver to factory defaults. date information and...

Manual
Page 23
...reset the board to default values. (Refer to the "Load Optimized Defaults" section in this chapter or introductions of the battery/clear CMOS jumper in system's failure to boot. Inadequately altering the settings may result in system malfunction. •• It is turned on. Chapter 2 BIOS Setup BIOS...how to activate certain system features. BIOS includes a BIOS Setup program that searches and downloads the latest version of BIOS, it is potentially risky, if you not flash the BIOS. To upgrade the BIOS, use either the GIGABYTE Q-Flash or @BIOS utility. •• Q-Flash...
...reset the board to default values. (Refer to the "Load Optimized Defaults" section in this chapter or introductions of the battery/clear CMOS jumper in system's failure to boot. Inadequately altering the settings may result in system malfunction. •• It is turned on. Chapter 2 BIOS Setup BIOS...how to activate certain system features. BIOS includes a BIOS Setup program that searches and downloads the latest version of BIOS, it is potentially risky, if you not flash the BIOS. To upgrade the BIOS, use either the GIGABYTE Q-Flash or @BIOS utility. •• Q-Flash...
Manual
Page 25
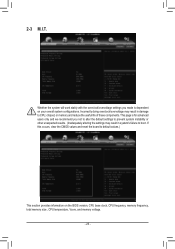
...may result in damage to default values.) This section provides information on your overall system configurations. If this occurs, clear the CMOS values and reset the board to CPU, chipset, or memory and reduce the useful life of these components. Whether the system will work stably with the ... instability or other unexpected results. (Inadequately altering the settings may result in system's failure to boot. 2-3 M.I.T. This page is dependent on the BIOS version, CPU base clock, CPU frequency, memory frequency, total memory size , CPU temperature, Vcore, and memory voltage. - 25 -
...may result in damage to default values.) This section provides information on your overall system configurations. If this occurs, clear the CMOS values and reset the board to CPU, chipset, or memory and reduce the useful life of these components. Whether the system will work stably with the ... instability or other unexpected results. (Inadequately altering the settings may result in system's failure to boot. 2-3 M.I.T. This page is dependent on the BIOS version, CPU base clock, CPU frequency, memory frequency, total memory size , CPU temperature, Vcore, and memory voltage. - 25 -
Manual
Page 29
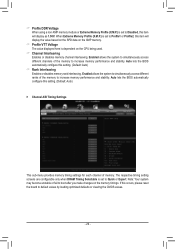
...Profile (X.M.P.) is set to Quick or Expert. Enabled allows the system to simultaneously access different channels of memory. Auto lets the BIOS automatically configure this item will display as 1.50V. Note: Your system may become unstable or fail to increase memory performance and... stability. Auto lets the BIOS automatically configure this occurs, please reset the board to increase memory performance and stability. The respective timing setting screens are configurable only when DRAM Timing...
...Profile (X.M.P.) is set to Quick or Expert. Enabled allows the system to simultaneously access different channels of memory. Auto lets the BIOS automatically configure this item will display as 1.50V. Note: Your system may become unstable or fail to increase memory performance and... stability. Auto lets the BIOS automatically configure this occurs, please reset the board to increase memory performance and stability. The respective timing setting screens are configurable only when DRAM Timing...


