Manual
Page 3
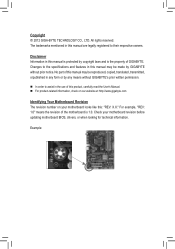
..., or when looking for technical information. Check your motherboard looks like this manual is protected by GIGABYTE without GIGABYTE's prior written permission. „„ In order to assist in this : "REV: X.X." All rights reserved. The trademarks mentioned in this manual are legally registered to the specifications and features in this manual may be made...
..., or when looking for technical information. Check your motherboard looks like this manual is protected by GIGABYTE without GIGABYTE's prior written permission. „„ In order to assist in this : "REV: X.X." All rights reserved. The trademarks mentioned in this manual are legally registered to the specifications and features in this manual may be made...
Manual
Page 4
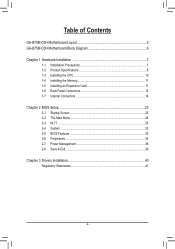
Table of Contents GA-B75M-D3H Motherboard Layout 5 GA-B75M-D3H Motherboard Block Diagram 6 Chapter 1 Hardware Installation 7 1-1 Installation Precautions 7 1-2 Product Specifications 8 1-3 Installing the CPU 10 1-4 Installing the Memory 11 1-5 Installing an Expansion Card 11 1-6 Back Panel Connectors 12 1-7 Internal Connectors 14 Chapter 2 BIOS Setup 23 2-1 Startup Screen 23 2-2 The Main Menu 24 2-3 M.I.T...25 2-4 System...32 2-5 BIOS Features 33 2-6 Peripherals...35 2-7 Power Management 38 2-8 Save & Exit...39 Chapter 3 Drivers Installation 40 Regulatory Statements 41 - 4 -
Table of Contents GA-B75M-D3H Motherboard Layout 5 GA-B75M-D3H Motherboard Block Diagram 6 Chapter 1 Hardware Installation 7 1-1 Installation Precautions 7 1-2 Product Specifications 8 1-3 Installing the CPU 10 1-4 Installing the Memory 11 1-5 Installing an Expansion Card 11 1-6 Back Panel Connectors 12 1-7 Internal Connectors 14 Chapter 2 BIOS Setup 23 2-1 Startup Screen 23 2-2 The Main Menu 24 2-3 M.I.T...25 2-4 System...32 2-5 BIOS Features 33 2-6 Peripherals...35 2-7 Power Management 38 2-8 Save & Exit...39 Chapter 3 Drivers Installation 40 Regulatory Statements 41 - 4 -
Manual
Page 10
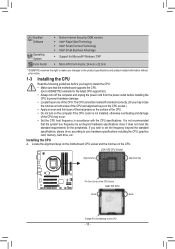
...CPU: •• Make sure that the system bus frequency be inserted if oriented incorrectly. (Or you wish to set beyond the standard specifications, please do so according to prevent hardware damage. •• Locate the pin one of the CPU may locate the notches on both sides...8226;• Do not turn on the computer if the CPU cooler is not recommended that the motherboard supports the CPU. (Go to GIGABYTE's website for the peripherals. Locate the alignment keys on the motherboard CPU socket and the notches on the CPU - 10 - LGA1155 CPU Socket Alignment Key Alignment Key...
...CPU: •• Make sure that the system bus frequency be inserted if oriented incorrectly. (Or you wish to set beyond the standard specifications, please do so according to prevent hardware damage. •• Locate the pin one of the CPU may locate the notches on both sides...8226;• Do not turn on the computer if the CPU cooler is not recommended that the motherboard supports the CPU. (Go to GIGABYTE's website for the peripherals. Locate the alignment keys on the motherboard CPU socket and the notches on the CPU - 10 - LGA1155 CPU Socket Alignment Key Alignment Key...
Manual
Page 11
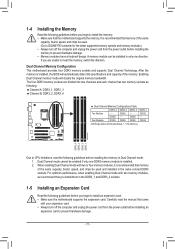
... of the same capacity, brand, speed, and chips be used . (Go to GIGABYTE's website for the latest supported memory speeds and memory modules.) •• Always turn... guidelines before installing an expansion card to install an expansion card: •• Make sure the motherboard supports the expansion card. DS/SS - - 1-4 Installing the Memory Read the following guidelines before ... DDR3_2 DDR3_3 DDR3_1 Two Modules - - Enabling Dual Channel memory mode will automatically detect the specifications and capacity of the same capacity, brand, speed, and chips be enabled if only one...
... of the same capacity, brand, speed, and chips be used . (Go to GIGABYTE's website for the latest supported memory speeds and memory modules.) •• Always turn... guidelines before installing an expansion card to install an expansion card: •• Make sure the motherboard supports the expansion card. DS/SS - - 1-4 Installing the Memory Read the following guidelines before ... DDR3_2 DDR3_3 DDR3_1 Two Modules - - Enabling Dual Channel memory mode will automatically detect the specifications and capacity of the same capacity, brand, speed, and chips be enabled if only one...
Manual
Page 13
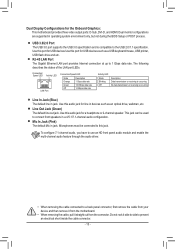
... jack for the Onboard Graphics: This motherboard provides three video output ports: D-Sub, DVI-D, and HDMI. Line Out Jack (Green) The default line out jack. Dual monitor confgurations are supported in jack. USB 3.0/2.0 Port The USB 3.0 port supports the USB 3.0 specification and is occurring Line In Jack (...Blue) The default line in jack. Use this port for a headphone or 2-channel speaker. Microphones must be used to the USB 2.0/1.1 specification. Use this port for USB devices Use this audio jack for USB devices such as an optical drive, walkman, etc. Use this jack. ...
... jack for the Onboard Graphics: This motherboard provides three video output ports: D-Sub, DVI-D, and HDMI. Line Out Jack (Green) The default line out jack. Dual monitor confgurations are supported in jack. USB 3.0/2.0 Port The USB 3.0 port supports the USB 3.0 specification and is occurring Line In Jack (...Blue) The default line in jack. Use this port for a headphone or 2-channel speaker. Microphones must be used to the USB 2.0/1.1 specification. Use this port for USB devices Use this audio jack for USB devices such as an optical drive, walkman, etc. Use this jack. ...


