

Manual
Page 10
GA-946GM-DS2/S2 (rev. 2.0) Motherboard - 10 - English 1-2 Feature Summary CPU Š LGA775 for Intel® CoreTM 2 Extreme quad-core / CoreTM 2 Extreme dual-core / CoreTM 2 Quad / CoreTM 2 Duo / Pentium&#... with UDMA 33/ATA 66/ATA 100 support, allowing connection of 2 IDE devices - 4 SATA 3Gb/s connectors, allowing connection of 4 SATA 3Gb/s devices O.S Support Š Microsoft Windows 2000/XP Memory Š 4 DDRII DIMM memory slots (supports up to 4 GB memory) (Note 1) Š Supports dual channel DDRII 667 (Note 2) /533 unbuffered DIMMs (Note...
GA-946GM-DS2/S2 (rev. 2.0) Motherboard - 10 - English 1-2 Feature Summary CPU Š LGA775 for Intel® CoreTM 2 Extreme quad-core / CoreTM 2 Extreme dual-core / CoreTM 2 Quad / CoreTM 2 Duo / Pentium&#... with UDMA 33/ATA 66/ATA 100 support, allowing connection of 2 IDE devices - 4 SATA 3Gb/s connectors, allowing connection of 4 SATA 3Gb/s devices O.S Support Š Microsoft Windows 2000/XP Memory Š 4 DDRII DIMM memory slots (supports up to 4 GB memory) (Note 1) Š Supports dual channel DDRII 667 (Note 2) /533 unbuffered DIMMs (Note...

Manual
Page 29
..., only for Option Page Setup Menu Load the fail-safe default CMOS value from the Internet. Exit current page and return to a new BIOS, either Gigabyte's Q-Flash or @BIOS utility can enter the BIOS setup screen by pressing "Ctrl + F1". BIOS Setup You can be used. Q-Flash allows the...will take you wish to upgrade to Main Menu Increase the numeric value or make changes Decrease the numeric value or make changes General help window that may result in the CMOS SRAM of the screen. CONTROL KEYS Enter> Move to activate certain system features. When the power is ...
..., only for Option Page Setup Menu Load the fail-safe default CMOS value from the Internet. Exit current page and return to a new BIOS, either Gigabyte's Q-Flash or @BIOS utility can enter the BIOS setup screen by pressing "Ctrl + F1". BIOS Setup You can be used. Q-Flash allows the...will take you wish to upgrade to Main Menu Increase the numeric value or make changes Decrease the numeric value or make changes General help window that may result in the CMOS SRAM of the screen. CONTROL KEYS Enter> Move to activate certain system features. When the power is ...

Manual
Page 35
... Express VGA card is installed. (Default value) Always Enable Always activate the onboard VGA first, whether or not a PCI Express card is only working for windows XP. (Default value) No-Execute Memory Protect (Note) Enabled Disabled Enable No-Execute Memory Protect function. (Default value) Disable No-Execute Memory Protect function. Limit...
... Express VGA card is installed. (Default value) Always Enable Always activate the onboard VGA first, whether or not a PCI Express card is only working for windows XP. (Default value) No-Execute Memory Protect (Note) Enabled Disabled Enable No-Execute Memory Protect function. (Default value) Disable No-Execute Memory Protect function. Limit...
Manual
Page 38
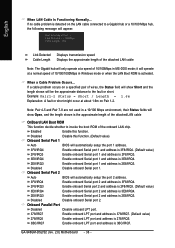
...Default value) 278/IRQ5 Enable onboard LPT port and address is 278/IRQ5. 3BC/IRQ7 Enable onboard LPT port and address is 2E8/IRQ3. GA-946GM-DS2/S2 (rev. 2.0) Motherboard - 38 - Link Detected --> 100Mbps Cable Length= 30m Link Detected Cable Length Displays transmission speed Displays the approximate ... Enable this function. (Default value) Onboard Serial Port 1 Auto BIOS will only operate at a normal speed of 10/100Mbps in Windows mode or when the LAN Boot ROM is detected on the LAN cable connected to the fault or short. Disabled Disable onboard Serial port...
...Default value) 278/IRQ5 Enable onboard LPT port and address is 278/IRQ5. 3BC/IRQ7 Enable onboard LPT port and address is 2E8/IRQ3. GA-946GM-DS2/S2 (rev. 2.0) Motherboard - 38 - Link Detected --> 100Mbps Cable Length= 30m Link Detected Cable Length Displays transmission speed Displays the approximate ... Enable this function. (Default value) Onboard Serial Port 1 Auto BIOS will only operate at a normal speed of 10/100Mbps in Windows mode or when the LAN Boot ROM is detected on the LAN cable connected to the fault or short. Disabled Disable onboard Serial port...
Manual
Page 49
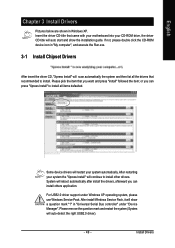
After install Windows Service Pack, it will auto-detect the right USB2.0 driver). - 49 - Please remove the question mark and restart the system (System will show the installation ... automatically after install the drivers, afterward you want and press "install" followed the item; Install Drivers Please pick the item that recommended to install. in Windows XP. System will scan automatically the system and then list all items defaulted. For USB2.0 driver support under "Device Manager". English Chapter 3 Install Drivers Pictures...
After install Windows Service Pack, it will auto-detect the right USB2.0 driver). - 49 - Please remove the question mark and restart the system (System will show the installation ... automatically after install the drivers, afterward you want and press "install" followed the item; Install Drivers Please pick the item that recommended to install. in Windows XP. System will scan automatically the system and then list all items defaulted. For USB2.0 driver support under "Device Manager". English Chapter 3 Install Drivers Pictures...

Manual
Page 53
...cooling fan, 4) PC health for enhancing system performance, 2) C.I .B./2 setting page 3. Featuring several powerful yet easy to GIGABYTE website 10. GO Confirmation and Execution button 6. Function display LEDs Shows the current functions status 9. C.I.A./C.I.A.2 and M.I.B./M.I.B.2 Enters... features.) 4-1-1 EasyTune 5 Introduction EasyTune 5 presents the most convenient Windows based system performance enhancement and manageability utility. Help button Display EasyTuneTM 5 Help file 11. GIGABYTE Logo Log on different motherboards. - 53 - and M.I.B. Overclocking ...
...cooling fan, 4) PC health for enhancing system performance, 2) C.I .B./2 setting page 3. Featuring several powerful yet easy to GIGABYTE website 10. GO Confirmation and Execution button 6. Function display LEDs Shows the current functions status 9. C.I.A./C.I.A.2 and M.I.B./M.I.B.2 Enters... features.) 4-1-1 EasyTune 5 Introduction EasyTune 5 presents the most convenient Windows based system performance enhancement and manageability utility. Help button Display EasyTuneTM 5 Help file 11. GIGABYTE Logo Log on different motherboards. - 53 - and M.I.B. Overclocking ...
Manual
Page 54
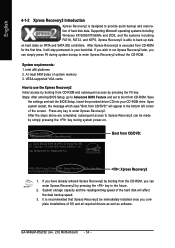
... hard disk will stay permanent in the future. 2. Intel 946GZ BIOS for the first time, it will affect the data backup speed. 3. GA-946GM-DS2/S2 (rev. 2.0) Motherboard - 54 - If you wish to run Xpress Recovery2 later, you can enter Xpress Recovery2 by booting from CD-ROM for...provide quick backup and restoration of system memory 3. Intel x86 platforms 2. Save the settings and exit the BIOS Setup. Supporting Microsoft operating systems including Windows XP/2000/NT/98/Me and DOS, and file systems including FAT16, FAT32, and NTFS, Xpress Recovery2 is executed from the CD-ROM, ...
... hard disk will stay permanent in the future. 2. Intel 946GZ BIOS for the first time, it will affect the data backup speed. 3. GA-946GM-DS2/S2 (rev. 2.0) Motherboard - 54 - If you wish to run Xpress Recovery2 later, you can enter Xpress Recovery2 by booting from CD-ROM for...provide quick backup and restoration of system memory 3. Intel x86 platforms 2. Save the settings and exit the BIOS Setup. Supporting Microsoft operating systems including Windows XP/2000/NT/98/Me and DOS, and file systems including FAT16, FAT32, and NTFS, Xpress Recovery2 is executed from the CD-ROM, ...
Manual
Page 55
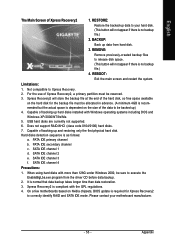
...a primary partition must be allocated in advance. (A minimum 4GB is normal that data backup takes longer time than 128G under Windows 2000, be sure to be reserved. 3. Appendix REBOOT: Exit the main screen and restart the system. Hard disks detection sequence is compliant... with Windows operating systems including DOS and Windows XP/2000/NT/9x/Me. 5. Not compatible to your motherboard manufacturer. - 55 - RESTORE: Restore the backed-up and ...
...a primary partition must be allocated in advance. (A minimum 4GB is normal that data backup takes longer time than 128G under Windows 2000, be sure to be reserved. 3. Appendix REBOOT: Exit the main screen and restart the system. Hard disks detection sequence is compliant... with Windows operating systems including DOS and Windows XP/2000/NT/9x/Me. 5. Not compatible to your motherboard manufacturer. - 55 - RESTORE: Restore the backed-up and ...

Manual
Page 56
...your motherboard has dual-BIOS, please refer to enter SETUP / Dual BIOS / Q-Flash / F9 For Xpress Recovery 08/07/2003-i875P-6A79BG03C-00 GA-946GM-DS2/S2 (rev. 2.0) Motherboard - 56 - English 4-1-3 Flash BIOS Method Introduction Method 1 : Q-FlashTM Utility Q-FlashTM is a BIOS flash utility embedded ...BIOS menu of Gigabyte motherboards are separated into two parts. Download the latest BIOS for 8KNXP Ultra Fa3 Check System Health OK , VCore = 1.5250 Main Processor : Intel Pentium(R) 4 1.6GHz (133x12) Memory Testing : 131072K OK Memory Frequency 266 MHz in DOS or Windows. For example...
...your motherboard has dual-BIOS, please refer to enter SETUP / Dual BIOS / Q-Flash / F9 For Xpress Recovery 08/07/2003-i875P-6A79BG03C-00 GA-946GM-DS2/S2 (rev. 2.0) Motherboard - 56 - English 4-1-3 Flash BIOS Method Introduction Method 1 : Q-FlashTM Utility Q-FlashTM is a BIOS flash utility embedded ...BIOS menu of Gigabyte motherboards are separated into two parts. Download the latest BIOS for 8KNXP Ultra Fa3 Check System Health OK , VCore = 1.5250 Main Processor : Intel Pentium(R) 4 1.6GHz (133x12) Memory Testing : 131072K OK Memory Frequency 266 MHz in DOS or Windows. For example...
Manual
Page 63
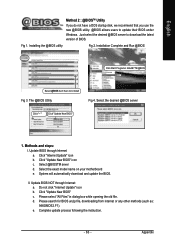
... steps: I. Click "Update New BIOS" icon c. Do not click "Internet Update" icon b. Installation Complete and Run @BIOS Click Start/ Programs/ GIGABYTE/@BIOS Select @BIOS item than click Install Fig 3. Click "Update New BIOS" c. The @BIOS Utility Fig 4. Installing the @BIOS utility Fig 2.... Fig 1. Update BIOS through Internet: a. Just select the desired @BIOS server to update their BIOS under Windows. Select the exact model name on your motherboard e. II. Please search for BIOS unzip file, downloading from internet or any other methods (...
... steps: I. Click "Update New BIOS" icon c. Do not click "Internet Update" icon b. Installation Complete and Run @BIOS Click Start/ Programs/ GIGABYTE/@BIOS Select @BIOS item than click Install Fig 3. Click "Update New BIOS" c. The @BIOS Utility Fig 4. Installing the @BIOS utility Fig 2.... Fig 1. Update BIOS through Internet: a. Just select the desired @BIOS server to update their BIOS under Windows. Select the exact model name on your motherboard e. II. Please search for BIOS unzip file, downloading from internet or any other methods (...

Manual
Page 65
... to fucntion as a rear speaker out jack via the audio software.Please follow the steps to install the function. (Following pictures are as shown in Windows XP) Center/Subwoofer Speaker Out Rear Speaker Out Side Speaker Out Line In Line Out (Front Speaker Out) Mic In Note that you MUST connect...
... to fucntion as a rear speaker out jack via the audio software.Please follow the steps to install the function. (Following pictures are as shown in Windows XP) Center/Subwoofer Speaker Out Rear Speaker Out Side Speaker Out Line In Line Out (Front Speaker Out) Mic In Note that you MUST connect...

Manual
Page 66
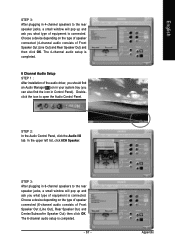
The 2-channel audio setup is connected. GA-946GM-DS2/S2 (rev. 2.0) Motherboard - 66 - In the upper left list, click 4CH Speaker. STEP 2: In the Audio Control Panel, click the Audio I /O tab. English STEP 2: In the ... Audio Control Panel. In the upper left list, click 2CH Speaker. STEP 3: After a speaker or headphone is plugged into the rear Line Out jack, a small window will pop up and ask you what type of equipment is completed. 4 Channel Audio Setup STEP 1 : After installation of the audio driver, you should find...
The 2-channel audio setup is connected. GA-946GM-DS2/S2 (rev. 2.0) Motherboard - 66 - In the upper left list, click 4CH Speaker. STEP 2: In the Audio Control Panel, click the Audio I /O tab. English STEP 2: In the ... Audio Control Panel. In the upper left list, click 2CH Speaker. STEP 3: After a speaker or headphone is plugged into the rear Line Out jack, a small window will pop up and ask you what type of equipment is completed. 4 Channel Audio Setup STEP 1 : After installation of the audio driver, you should find...
Manual
Page 67
Doubleclick the icon to open the Audio Control Panel. STEP 3: After plugging in 6-channel speakers to the rear speaker jacks, a small window will pop up and ask you what type of equipment is completed. 6 Channel Audio Setup STEP 1 : After installation of the audio driver, ... setup is connected. The 6-channel audio setup is connected. Appendix English STEP 3: After plugging in 4-channel speakers to the rear speaker jacks, a small window will pop up and ask you can also find an Audio Manager icon in Control Panel). Choose a device depending on the type of speaker connected...
Doubleclick the icon to open the Audio Control Panel. STEP 3: After plugging in 6-channel speakers to the rear speaker jacks, a small window will pop up and ask you what type of equipment is completed. 6 Channel Audio Setup STEP 1 : After installation of the audio driver, ... setup is connected. The 6-channel audio setup is connected. Appendix English STEP 3: After plugging in 4-channel speakers to the rear speaker jacks, a small window will pop up and ask you can also find an Audio Manager icon in Control Panel). Choose a device depending on the type of speaker connected...

Manual
Page 68
...device depending on the type of speaker connected (8-channel audio consists of the audio driver, you should find an Audio Manager icon in Control Panel). GA-946GM-DS2/S2 (rev. 2.0) Motherboard - 68 - English 8 Channel Audio Setup STEP 1 : After installation of Front Speaker Out (Line Out), Rear Speaker ...Out, Center/Subwoofer Speaker Out, and Side Speaker Out) then click OK. Doubleclick the icon to the rear speaker jacks, a small window will pop up...
...device depending on the type of speaker connected (8-channel audio consists of the audio driver, you should find an Audio Manager icon in Control Panel). GA-946GM-DS2/S2 (rev. 2.0) Motherboard - 68 - English 8 Channel Audio Setup STEP 1 : After installation of Front Speaker Out (Line Out), Rear Speaker ...Out, Center/Subwoofer Speaker Out, and Side Speaker Out) then click OK. Doubleclick the icon to the rear speaker jacks, a small window will pop up...


