

Manual
Page 16
... PCI Express x16 slot and press firmly down on the card are indeed seated in motherboard. 4. Please align the VGA card to the left shows. GA-946GM-DS2/S2 (rev. 2.0) Motherboard - 16 - Be sure the metal contacts on the slot. Replace the screw to secure the slot bracket of the PCI Express x16 slot... a VGA card or to release an installed card, users can install your computer's chassis cover, screws and slot bracket from the operating system. Install related driver from the computer. 3. Make sure your computer's chassis cover. 7.
... PCI Express x16 slot and press firmly down on the card are indeed seated in motherboard. 4. Please align the VGA card to the left shows. GA-946GM-DS2/S2 (rev. 2.0) Motherboard - 16 - Be sure the metal contacts on the slot. Replace the screw to secure the slot bracket of the PCI Express x16 slot... a VGA card or to release an installed card, users can install your computer's chassis cover, screws and slot bracket from the operating system. Install related driver from the computer. 3. Make sure your computer's chassis cover. 7.

Manual
Page 50
English 3-2 Software Applications This page displays all the tools that Gigabyte developed and some free software, you can choose anyone you want and press "install" to install them. 3-3 Driver CD Information This page lists the contents of software and drivers in this CD-title. GA-946GM-DS2/S2 (rev. 2.0) Motherboard - 50 -
English 3-2 Software Applications This page displays all the tools that Gigabyte developed and some free software, you can choose anyone you want and press "install" to install them. 3-3 Driver CD Information This page lists the contents of software and drivers in this CD-title. GA-946GM-DS2/S2 (rev. 2.0) Motherboard - 50 -
Manual
Page 54
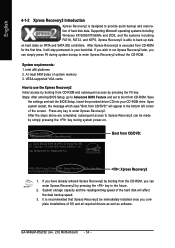
...SATA IDE controllers. If you have already entered Xpress Recovery2 by pressing the key in your CD-ROM drive. Insert the provided driver CD into your hard disk. GA-946GM-DS2/S2 (rev. 2.0) Motherboard - 54 - At least 64M bytes of the hard disk will stay permanent in the future. 2. ... systems including FAT16, FAT32, and NTFS, Xpress Recovery2 is executed from the CD-ROM, you can enter Xpress Recovery2 by booting from CD-ROM for 946GM-DS2 F1a . . . . :BIOS Setup/Q-Flash, : Xpress Recovery2, : Boot Menu 10/16/2006-946GZ-ICH7-6A79LG0LC-00 : Xpress Recovery2 1. After Xpress...
...SATA IDE controllers. If you have already entered Xpress Recovery2 by pressing the key in your CD-ROM drive. Insert the provided driver CD into your hard disk. GA-946GM-DS2/S2 (rev. 2.0) Motherboard - 54 - At least 64M bytes of the hard disk will stay permanent in the future. 2. ... systems including FAT16, FAT32, and NTFS, Xpress Recovery2 is executed from the CD-ROM, you can enter Xpress Recovery2 by booting from CD-ROM for 946GM-DS2 F1a . . . . :BIOS Setup/Q-Flash, : Xpress Recovery2, : Boot Menu 10/16/2006-946GZ-ICH7-6A79LG0LC-00 : Xpress Recovery2 1. After Xpress...

Manual
Page 66
... tray (you what type of the audio driver, you should find the icon in Control Panel). STEP 3: After a speaker or headphone is connected. Choose Headphone or Line Out depending on the device connected and click OK. In the upper left list, click 2CH Speaker. GA-946GM-DS2/S2 (rev. 2.0) Motherboard - 66 - In the upper left...
... tray (you what type of the audio driver, you should find the icon in Control Panel). STEP 3: After a speaker or headphone is connected. Choose Headphone or Line Out depending on the device connected and click OK. In the upper left list, click 2CH Speaker. GA-946GM-DS2/S2 (rev. 2.0) Motherboard - 66 - In the upper left...

Manual
Page 68
... 8-channel speakers to open the Audio Control Panel. STEP 2: In the Audio Control Panel, click the Audio I/O tab. GA-946GM-DS2/S2 (rev. 2.0) Motherboard - 68 - English 8 Channel Audio Setup STEP 1 : After installation of the audio driver, you should find an Audio Manager icon in your system tray (you what type of Front Speaker Out (Line...
... 8-channel speakers to open the Audio Control Panel. STEP 2: In the Audio Control Panel, click the Audio I/O tab. GA-946GM-DS2/S2 (rev. 2.0) Motherboard - 68 - English 8 Channel Audio Setup STEP 1 : After installation of the audio driver, you should find an Audio Manager icon in your system tray (you what type of Front Speaker Out (Line...


