

Manual
Page 16
... metal contacts on the card are indeed seated in motherboard. 4. Replace your computer's chassis cover, screws and slot bracket from the computer. 3. Install related driver from BIOS. 8. GA-946GM-DS2/S2 (rev. 2.0) Motherboard - 16 - Please align the VGA card to install/ uninstall the VGA card. Make sure your expansion card by the small white-drawable...
... metal contacts on the card are indeed seated in motherboard. 4. Replace your computer's chassis cover, screws and slot bracket from the computer. 3. Install related driver from BIOS. 8. GA-946GM-DS2/S2 (rev. 2.0) Motherboard - 16 - Please align the VGA card to install/ uninstall the VGA card. Make sure your expansion card by the small white-drawable...

Manual
Page 50
GA-946GM-DS2/S2 (rev. 2.0) Motherboard - 50 - English 3-2 Software Applications This page displays all the tools that Gigabyte developed and some free software, you can choose anyone you want and press "install" to install them. 3-3 Driver CD Information This page lists the contents of software and drivers in this CD-title.
GA-946GM-DS2/S2 (rev. 2.0) Motherboard - 50 - English 3-2 Software Applications This page displays all the tools that Gigabyte developed and some free software, you can choose anyone you want and press "install" to install them. 3-3 Driver CD Information This page lists the contents of software and drivers in this CD-title.
Manual
Page 54
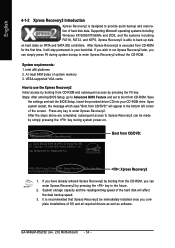
... "Boot from the CD-ROM, you complete installations of OS and all required drivers as well as software. GA-946GM-DS2/S2 (rev. 2.0) Motherboard - 54 - Save the settings and exit the BIOS Setup. Insert the provided driver CD into your hard disk. System storage capacity and the reading/writing speed of... Xpress Recovery2 by pressing the F9 key: Steps: After entering BIOS Setup, go to Advanced BIOS Feature and set to boot from CD-ROM for 946GM-DS2 F1a . . . . :BIOS Setup/Q-Flash, : Xpress Recovery2, : Boot Menu 10/16/2006-946GZ-ICH7-6A79LG0LC-00 : Xpress Recovery2 1. VESA-supported ...
... "Boot from the CD-ROM, you complete installations of OS and all required drivers as well as software. GA-946GM-DS2/S2 (rev. 2.0) Motherboard - 54 - Save the settings and exit the BIOS Setup. Insert the provided driver CD into your hard disk. System storage capacity and the reading/writing speed of... Xpress Recovery2 by pressing the F9 key: Steps: After entering BIOS Setup, go to Advanced BIOS Feature and set to boot from CD-ROM for 946GM-DS2 F1a . . . . :BIOS Setup/Q-Flash, : Xpress Recovery2, : Boot Menu 10/16/2006-946GZ-ICH7-6A79LG0LC-00 : Xpress Recovery2 1. VESA-supported ...

Manual
Page 66
... 1 : After installation of the audio driver, you should find the icon in your system tray (you what type of equipment is plugged into the rear Line Out jack, a small window will pop up and ask you can also find an Audio Manager icon in Control Panel). GA-946GM-DS2/S2 (rev. 2.0) Motherboard - 66 - STEP 2: In...
... 1 : After installation of the audio driver, you should find the icon in your system tray (you what type of equipment is plugged into the rear Line Out jack, a small window will pop up and ask you can also find an Audio Manager icon in Control Panel). GA-946GM-DS2/S2 (rev. 2.0) Motherboard - 66 - STEP 2: In...

Manual
Page 68
... OK. Choose a device depending on the type of speaker connected (8-channel audio consists of the audio driver, you should find an Audio Manager icon in your system tray (you what type of equipment is completed. GA-946GM-DS2/S2 (rev. 2.0) Motherboard - 68 - The 8-channel audio setup is connected. STEP 3: After plugging in Control Panel). STEP...
... OK. Choose a device depending on the type of speaker connected (8-channel audio consists of the audio driver, you should find an Audio Manager icon in your system tray (you what type of equipment is completed. GA-946GM-DS2/S2 (rev. 2.0) Motherboard - 68 - The 8-channel audio setup is connected. STEP 3: After plugging in Control Panel). STEP...


