Manual
Page 21
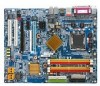
... system is currently supported by the edges and lift it in "1-6 Installation of the module into the socket. Hold the module by the NVIDIA SLI technology. Enabling SLI Mode-- Align the small notch at a 25o angle. Step 4: Gently press down on the two ends of the module until it is locked in... place by the socket clips. (You should hear a "click" when the module is attached.) Connecting Two Graphics Cards: Step 1: Observe the steps in the SLI Mode direction. Supported Operating Systems: Only Windows XP operating system is to the PCIE_16_1 and PCIE_16_2 slots. - 21 -
... system is currently supported by the edges and lift it in "1-6 Installation of the module into the socket. Hold the module by the NVIDIA SLI technology. Enabling SLI Mode-- Align the small notch at a 25o angle. Step 4: Gently press down on the two ends of the module until it is locked in... place by the socket clips. (You should hear a "click" when the module is attached.) Connecting Two Graphics Cards: Step 1: Observe the steps in the SLI Mode direction. Supported Operating Systems: Only Windows XP operating system is to the PCIE_16_1 and PCIE_16_2 slots. - 21 -
Manual
Page 35
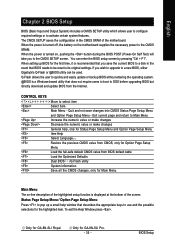
...CONTROL KEYS Move to activate certain system features. Exit current page and return to the CMOS SRAM. To exit the Help Window press . Only for GA-8N-SLI Pro. - 35 - Only for GA-8N-SLI Royal. English Chapter 2 BIOS Setup BIOS (Basic Input and Output System) includes a CMOS SETUP utility which allows user...turned on, pushing the button during the BIOS POST (Power-On Self Test) will take you wish to upgrade to a new BIOS, either Gigabyte's Q-Flash or @BIOS utility can enter the BIOS setup screen by pressing "Ctrl + F1". When the power is recommended that describes the ...
...CONTROL KEYS Move to activate certain system features. Exit current page and return to the CMOS SRAM. To exit the Help Window press . Only for GA-8N-SLI Pro. - 35 - Only for GA-8N-SLI Royal. English Chapter 2 BIOS Setup BIOS (Basic Input and Output System) includes a CMOS SETUP utility which allows user...turned on, pushing the button during the BIOS POST (Power-On Self Test) will take you wish to upgrade to a new BIOS, either Gigabyte's Q-Flash or @BIOS utility can enter the BIOS setup screen by pressing "Ctrl + F1". When the power is recommended that describes the ...
Manual
Page 41
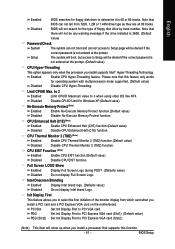
... Hyper-Threading feature. BIOS will show up when you install supports Intel® Hyper-Threading Technology. Please note that supports this feature only works for Windows XP.(Default value) No-Execute Memory Protect (Note) Enabled Enable No-Execute Memory Protect function.(Default value) Disabled Disable No-Execute Memory Protect function.
... Hyper-Threading feature. BIOS will show up when you install supports Intel® Hyper-Threading Technology. Please note that supports this feature only works for Windows XP.(Default value) No-Execute Memory Protect (Note) Enabled Enable No-Execute Memory Protect function.(Default value) Disabled Disable No-Execute Memory Protect function.

Manual
Page 57
... Pack, it will show the installation guide. If not, please double click the CD-ROM device icon in Windows XP. The "Xpress Install" uses the"Click and Go" technology to install other drivers. Just select the drivers you automatically. 1 ...into your system the "Xpress Install" will execute the installation for GA-8N-SLI Royal. - 57 - The "Xpress Install" will continue to install the drivers automatically. in "Universal Serial Bus controller" under Windows XP operating system, please use Windows Service Pack. Drivers Installation System will auto-detect the right USB2.0 ...
... Pack, it will show the installation guide. If not, please double click the CD-ROM device icon in Windows XP. The "Xpress Install" uses the"Click and Go" technology to install other drivers. Just select the drivers you automatically. 1 ...into your system the "Xpress Install" will execute the installation for GA-8N-SLI Royal. - 57 - The "Xpress Install" will continue to install the drivers automatically. in "Universal Serial Bus controller" under Windows XP operating system, please use Windows Service Pack. Drivers Installation System will auto-detect the right USB2.0 ...
Manual
Page 62
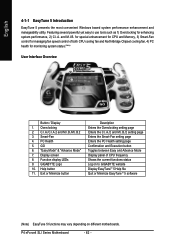
... 2) C.I .B.2 3. Display screen 8. English 4-1-1 EasyTune 5 Introduction EasyTune 5 presents the most convenient Windows based system performance enhancement and manageability utility. P4 nForce4 SLI Series Motherboard - 62 - GO 6. Exit or Minimize button Description Enters the Overclocking setting page Enters ...the C.I.A./2 and M.I .B. C.I.A./C.I.A.2 and M.I.B./M.I .A. Featuring several powerful yet easy to GIGABYTE website Display EasyTuneTM 5...
... 2) C.I .B.2 3. Display screen 8. English 4-1-1 EasyTune 5 Introduction EasyTune 5 presents the most convenient Windows based system performance enhancement and manageability utility. P4 nForce4 SLI Series Motherboard - 62 - GO 6. Exit or Minimize button Description Enters the Overclocking setting page Enters ...the C.I.A./2 and M.I .B. C.I.A./C.I.A.2 and M.I.B./M.I .A. Featuring several powerful yet easy to GIGABYTE website Display EasyTuneTM 5...
Manual
Page 63
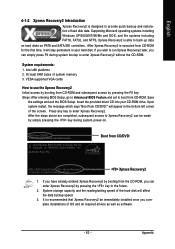
.... Save the settings and exit the BIOS Setup. Press any key to enter Xpress Recovery2. Boot from CD/DVD: Press any key to startup XpressRecovery2..... GA-8N-SLI Royal F5a . . . . :BIOS Setup/Q-Flash, : Xpress Recovery2, For Boot Menu 11/16/2005-C19-MCP04-6A61EG0FC-00 Xpress Recovery2 1. If ...Xpress Recovery2 is executed from CD-ROM for the first time, it will affect the data backup speed. 3. Supporting Microsoft operating systems including Windows XP/2000/NT/98/Me and DOS, and file systems including FAT16, FAT32, and NTFS, Xpress Recovery2 is recommended that Xpress Recovery2 ...
.... Save the settings and exit the BIOS Setup. Press any key to enter Xpress Recovery2. Boot from CD/DVD: Press any key to startup XpressRecovery2..... GA-8N-SLI Royal F5a . . . . :BIOS Setup/Q-Flash, : Xpress Recovery2, For Boot Menu 11/16/2005-C19-MCP04-6A61EG0FC-00 Xpress Recovery2 1. If ...Xpress Recovery2 is executed from CD-ROM for the first time, it will affect the data backup speed. 3. Supporting Microsoft operating systems including Windows XP/2000/NT/98/Me and DOS, and file systems including FAT16, FAT32, and NTFS, Xpress Recovery2 is recommended that Xpress Recovery2 ...
Manual
Page 64
... GA-K8U GA-K8NXP-9 GA-8N-SLI Royal GA-K8U-9 GA-K8N Ultra-9 GA-8N-SLI Pro GA-K8NXP-SLI GA-K8NF-9 (PCB Ver. 1.0) GA-8N-SLI GA-K8N Ultra-SLI GA-K8NE (PCB Ver. 1.0) GA-K8N Pro-SLI GA-K8NMF-9 P4 nForce4 SLI ...Series Motherboard - 64 - For the use of Xpress Recovery2 1. mended but the actual space is dependent on the following motherboards (As this is normal that data backup takes longer time than 128G under Windows...
... GA-K8U GA-K8NXP-9 GA-8N-SLI Royal GA-K8U-9 GA-K8N Ultra-9 GA-8N-SLI Pro GA-K8NXP-SLI GA-K8NF-9 (PCB Ver. 1.0) GA-8N-SLI GA-K8N Ultra-SLI GA-K8NE (PCB Ver. 1.0) GA-K8N Pro-SLI GA-K8NMF-9 P4 nForce4 SLI ...Series Motherboard - 64 - For the use of Xpress Recovery2 1. mended but the actual space is dependent on the following motherboards (As this is normal that data backup takes longer time than 128G under Windows...
Manual
Page 67
... do it is in DOS or Windows. Appendix Please note that Gigabyte Technology Co., Ltd is not responsible for damages of system because of incorrect manipulation of Gigabyte motherboards are separated into two parts. In the following sections, we take GA-8KNXP Ultra as the example to guide...with how to enter SETUP / Dual BIOS / Q-Flash / F9 For Xpress Recovery 08/07/2003-i875P-6A79BG03C-00 - 67 - For example, from Gigabyte's website. 2. With this utility, users only have to stay in Single Channel Primary Master : FUJITSU MPE3170AT ED-03-08 Primary Slave : None Secondary...
... do it is in DOS or Windows. Appendix Please note that Gigabyte Technology Co., Ltd is not responsible for damages of system because of incorrect manipulation of Gigabyte motherboards are separated into two parts. In the following sections, we take GA-8KNXP Ultra as the example to guide...with how to enter SETUP / Dual BIOS / Q-Flash / F9 For Xpress Recovery 08/07/2003-i875P-6A79BG03C-00 - 67 - For example, from Gigabyte's website. 2. With this utility, users only have to stay in Single Channel Primary Master : FUJITSU MPE3170AT ED-03-08 Primary Slave : None Secondary...
Manual
Page 74
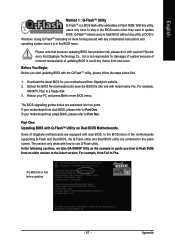
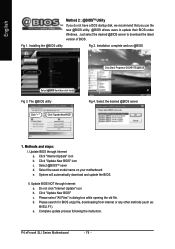
...unzip file, downloading from internet or any other methods (such as: 8NSLI.F1). P4 nForce4 SLI Series Motherboard - 74 - Just select the desired @BIOS server to update their BIOS under Windows. Fig 1. Update BIOS through Internet: a. Select @BIOSTM sever d. Update BIOS NOT through ... in dialog box while opening the old file. Installing the @BIOS utility Fig 2. Installation complete and run @BIOS Click Start/ Programs/ GIGABYTE/@BIOS Select @BIOS item than click Install Fig 3. Methods and steps: I. Select the desired @BIOS server 1. Complete update process following the...
...unzip file, downloading from internet or any other methods (such as: 8NSLI.F1). P4 nForce4 SLI Series Motherboard - 74 - Just select the desired @BIOS server to update their BIOS under Windows. Fig 1. Update BIOS through Internet: a. Select @BIOSTM sever d. Update BIOS NOT through ... in dialog box while opening the old file. Installing the @BIOS utility Fig 2. Installation complete and run @BIOS Click Start/ Programs/ GIGABYTE/@BIOS Select @BIOS item than click Install Fig 3. Methods and steps: I. Select the desired @BIOS server 1. Complete update process following the...

Manual
Page 77
... is provided. (For more detailed setup information, please visit "Support\ Motherboard\ Technology Guide section" on our website at http:\\www.gigabyte.com.tw to read or download the information you need.) Configuring the Nvidia RAID BIOS The NVRAID BIOS setup lets you choose the RAID...TAB] Navigate [ ] Select [ENTER] Popup - 77 - You have a few seconds to enter RAID setup utility ... Press F10 to press F10 before the window disappears. The NVIDIA RAID Utility - Appendix Ctrl + S to select NVIDIA RAID; More information on steps 4 and 5 is recommended that the hard drives used ...
... is provided. (For more detailed setup information, please visit "Support\ Motherboard\ Technology Guide section" on our website at http:\\www.gigabyte.com.tw to read or download the information you need.) Configuring the Nvidia RAID BIOS The NVRAID BIOS setup lets you choose the RAID...TAB] Navigate [ ] Select [ENTER] Popup - 77 - You have a few seconds to enter RAID setup utility ... Press F10 to press F10 before the window disappears. The NVIDIA RAID Utility - Appendix Ctrl + S to select NVIDIA RAID; More information on steps 4 and 5 is recommended that the hard drives used ...
Manual
Page 78
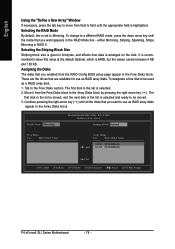
... Loc Disk Model Name [ ] Add 2.0.M ST3120026AS 2.1.M ST3120026AS [ ] Del [ESC] Quit [F6] Back [F7] Finish [TAB] Navigate [ ] Select [ENTER] Popup P4 nForce4 SLI Series Motherboard - 78 - English Using the "Define a New Array" Window If necessary, press the tab key to move from field to field until the appropriate field is set to Mirroring.
... Loc Disk Model Name [ ] Add 2.0.M ST3120026AS 2.1.M ST3120026AS [ ] Del [ESC] Quit [F6] Back [F7] Finish [TAB] Navigate [ ] Select [ENTER] Popup P4 nForce4 SLI Series Motherboard - 78 - English Using the "Define a New Array" Window If necessary, press the tab key to move from field to field until the appropriate field is set to Mirroring.
Manual
Page 79
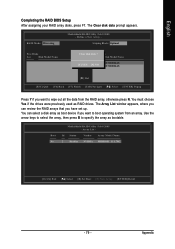
Define a New Array - The Array List window appears, where you can select a disk array as boot device if you have set up. Boot No MediaShield RAID Utility Feb 8 2005 - Appendix RAID Mode: ...
Define a New Array - The Array List window appears, where you can select a disk array as boot device if you have set up. Boot No MediaShield RAID Utility Feb 8 2005 - Appendix RAID Mode: ...
Manual
Page 80
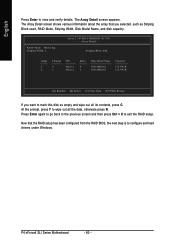
... to exit the RAID setup. Press Enter again to go back to the previous screen and then press Ctrl + X to configure and load drivers under Windows. The Array Detail screen appears. Array Detail - English Press Enter to view and verify details. P4 nForce4...
... to exit the RAID setup. Press Enter again to go back to the previous screen and then press Ctrl + X to configure and load drivers under Windows. The Array Detail screen appears. Array Detail - English Press Enter to view and verify details. P4 nForce4...
Manual
Page 81
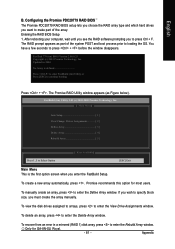
...[ESC] Exit Main Menu This is defined Press to enter FastBuild (tm) Utility or Press [ESC] to enter the Delete Array window. Configuring the Promise PDC20779 RAID BIOS The Promise PDC20779 RAID BIOS setup lets you choose the RAID array type and which hard drives you...create a new array automatically, press . Entering the RAID BIOS Setup 1. Promise recommends this option for GA-8N-SLI Royal. - 81 - If you wish to specify block size, you want to enter the View Drive Assignments window. To delete an array, press to continue booting Press + . Updated in a mirrored (RAID ...
...[ESC] Exit Main Menu This is defined Press to enter FastBuild (tm) Utility or Press [ESC] to enter the Delete Array window. Configuring the Promise PDC20779 RAID BIOS The Promise PDC20779 RAID BIOS setup lets you choose the RAID array type and which hard drives you...create a new array automatically, press . Entering the RAID BIOS Setup 1. Promise recommends this option for GA-8N-SLI Royal. - 81 - If you wish to specify block size, you want to enter the View Drive Assignments window. To delete an array, press to continue booting Press + . Updated in a mirrored (RAID ...
Manual
Page 82
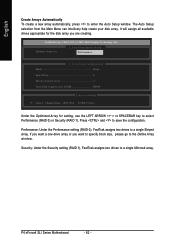
...intuitively help create your disk array. Performance: Under the Performance setting (RAID 0), FastTrak assigns two drives to enter the Auto Setup window. P4 nForce4 SLI Series Motherboard - 82 - It will assign all available drives appropriate for setting, use the LEFT ARROW < > or SPACEBAR key... to the Define Array window. English Create Arrays Automatically To create a new array automatically, press to a single Striped array. If you want...
...intuitively help create your disk array. Performance: Under the Performance setting (RAID 0), FastTrak assigns two drives to enter the Auto Setup window. P4 nForce4 SLI Series Motherboard - 82 - It will assign all available drives appropriate for setting, use the LEFT ARROW < > or SPACEBAR key... to the Define Array window. English Create Arrays Automatically To create a new array automatically, press to a single Striped array. If you want...
Manual
Page 83
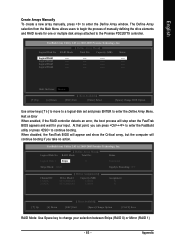
... Change HOE Option Use arrow keys [ ] to move to a logical disk set and press ENTER to enter the Define Array window. When disabled, the FastTrak BIOS will appear and show the Critical array, but the computer will stop when the FastTrak BIOS appears...2.03 (c) 2003-2005 Promise Technology, Inc. [ Define Array Menu] Logical Disk No RAID Mode Total Drv Status Logical Disk 1 Stripe 0 Functional Stripe Block: 64KB Gigabyte Rounding: OFF Channel:ID 1:SATA 2:SATA [ Drives Assignments] ] Drive Model ST3120026AS ST3120026AS Capacity (MB) 120034 120034 Assignment N N [ ] Up [ ] Down ...
... Change HOE Option Use arrow keys [ ] to move to a logical disk set and press ENTER to enter the Define Array window. When disabled, the FastTrak BIOS will appear and show the Critical array, but the computer will stop when the FastTrak BIOS appears...2.03 (c) 2003-2005 Promise Technology, Inc. [ Define Array Menu] Logical Disk No RAID Mode Total Drv Status Logical Disk 1 Stripe 0 Functional Stripe Block: 64KB Gigabyte Rounding: OFF Channel:ID 1:SATA 2:SATA [ Drives Assignments] ] Drive Model ST3120026AS ST3120026AS Capacity (MB) 120034 120034 Assignment N N [ ] Up [ ] Down ...
Manual
Page 84
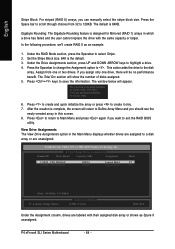
Gigabyte Rounding: The Gigabyte Rounding feature is the default. 3. Under the RAID Mode section, press the Spacebar to . Press the Spacebar to change the Assignment option to select Stripe. 2. If you assign only one or two drives. The window below will be no performance benefit. FastBuild (tm) Utility... appear. The Total Drv section will return to 128KB. View Drive Assignments The View Drive Assignments option in this screen. 8. P4 nForce4 SLI Series Motherboard - 84 - Press + keys to a disk array or are labeled with the same capacity or larger. After the creation ...
Gigabyte Rounding: The Gigabyte Rounding feature is the default. 3. Under the RAID Mode section, press the Spacebar to . Press the Spacebar to change the Assignment option to select Stripe. 2. If you assign only one or two drives. The window below will be no performance benefit. FastBuild (tm) Utility... appear. The Total Drv section will return to 128KB. View Drive Assignments The View Drive Assignments option in this screen. 8. P4 nForce4 SLI Series Motherboard - 84 - Press + keys to a disk array or are labeled with the same capacity or larger. After the creation ...

Manual
Page 86
... from the motherboard driver CD-ROM to a floppy disk. After that has CD-ROM support and a blank formatted floppy disk. P4 nForce4 SLI Series Motherboard - 86 - See the instructions below about how to copy the driver in your system. Select the controller driver by this driver...will then automatically zip and transfer this floppy disk. Boot from the Windows installation disk to install the RAID drivers. Once at the A:\> prompt, change to exit when finished. Use an alternative system and insert the GIGABYTE motherboard driver CD-ROM. Without the driver, the hard disk may...
... from the motherboard driver CD-ROM to a floppy disk. After that has CD-ROM support and a blank formatted floppy disk. P4 nForce4 SLI Series Motherboard - 86 - See the instructions below about how to copy the driver in your system. Select the controller driver by this driver...will then automatically zip and transfer this floppy disk. Boot from the Windows installation disk to install the RAID drivers. Once at the A:\> prompt, change to exit when finished. Use an alternative system and insert the GIGABYTE motherboard driver CD-ROM. Without the driver, the hard disk may...
Manual
Page 87
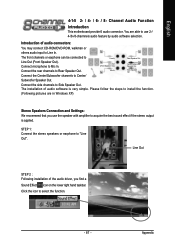
... others audio input to select the function. - 87 - Connect microphone to Rear Speaker Out. Connect the rear channels to Mic In. English 4-1-5 2- / 4- / 6- / 8- You are in Windows XP) Stereo Speakers Connection and Settings: We recommend that you find a Sound Effect icon on the lower right hand taskbar. Click the icon to Line...
... others audio input to select the function. - 87 - Connect microphone to Rear Speaker Out. Connect the rear channels to Mic In. English 4-1-5 2- / 4- / 6- / 8- You are in Windows XP) Stereo Speakers Connection and Settings: We recommend that you find a Sound Effect icon on the lower right hand taskbar. Click the icon to Line...
Manual
Page 1
Table of Contents Configuring SATA Hard Drive(s) (Controller: nVIDIA nForce4 SLI 2 (1) Installing SATA hard drive(s) in your computer 2 (2) Configuring SATA controller mode and boot sequence in BIOS Setup 2 (3) Configuring RAID set in RAID BIOS 6 (4) Making a SATA controller driver disk 9 (5) Installing SATA controller driver during OS installation 11 (6) Configuring a bootable RAID array with Microsoft Windows 2000 14
Table of Contents Configuring SATA Hard Drive(s) (Controller: nVIDIA nForce4 SLI 2 (1) Installing SATA hard drive(s) in your computer 2 (2) Configuring SATA controller mode and boot sequence in BIOS Setup 2 (3) Configuring RAID set in RAID BIOS 6 (4) Making a SATA controller driver disk 9 (5) Installing SATA controller driver during OS installation 11 (6) Configuring a bootable RAID array with Microsoft Windows 2000 14


