Manual
Page 7
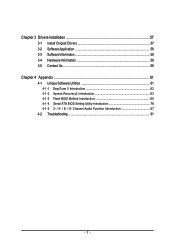
Channel Audio Function Introduction 87 4-2 Troubleshooting 91 - 7 - Chapter 3 Drivers Installation 57 3-1 Install Chipset Drivers 57 3-2 SoftwareApplication 58 3-3 Software Information 58 3-4 Hardware Information 59 3-5 Contact Us ...59 Chapter 4 Appendix 61 4-1 Unique Software Utilities 61 4-1-1 EasyTune 5 Introduction 62 4-1-2 Xpress Recovery2 Introduction 63 4-1-3 Flash BIOS Method Introduction 65 4-1-4 Serial ATA BIOS Setting Utility Introduction 76 4-1-5 2- / 4- / 6- / 8-
Channel Audio Function Introduction 87 4-2 Troubleshooting 91 - 7 - Chapter 3 Drivers Installation 57 3-1 Install Chipset Drivers 57 3-2 SoftwareApplication 58 3-3 Software Information 58 3-4 Hardware Information 59 3-5 Contact Us ...59 Chapter 4 Appendix 61 4-1 Unique Software Utilities 61 4-1-1 EasyTune 5 Introduction 62 4-1-2 Xpress Recovery2 Introduction 63 4-1-3 Flash BIOS Method Introduction 65 4-1-4 Serial ATA BIOS Setting Utility Introduction 76 4-1-5 2- / 4- / 6- / 8-
Manual
Page 23
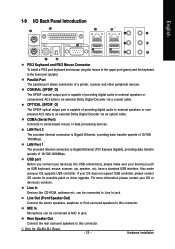
...provided Internet connection is capable of 10/100/ 1000Mbps. Also make sure your OS does not support USB controller, please contact OS vendor for GA-8N-SLI Royal. - 23 - MIC In Microphone can be connected to this connector. COMA (Serial Port) Connects to the lower port (purple).... keyboard, mouse, scanner, zip, speaker...etc. Only for possible patch or driver upgrade. OPTICAL (SPDIF_O) The SPDIF optical output port is Gigabit Ethernet, providing data transfer speeds of providing digital audio to external speakers or compressed AC3 data to Line In jack. Line In ...
...provided Internet connection is capable of 10/100/ 1000Mbps. Also make sure your OS does not support USB controller, please contact OS vendor for GA-8N-SLI Royal. - 23 - MIC In Microphone can be connected to this connector. COMA (Serial Port) Connects to the lower port (purple).... keyboard, mouse, scanner, zip, speaker...etc. Only for possible patch or driver upgrade. OPTICAL (SPDIF_O) The SPDIF optical output port is Gigabit Ethernet, providing data transfer speeds of providing digital audio to external speakers or compressed AC3 data to Line In jack. Line In ...
Manual
Page 87
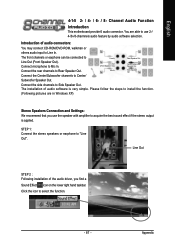
...Out. Connect the side channels to Line Out (Front Speaker Out). Line Out STEP 2 : Following installation of the audio driver, you use 2-/ 4-/6-/8-channnels audio feature by audio software selection. Connect the rear channels to acquire the best sound effect if the stereo output is very simple. Please... find a Sound Effect icon on the lower right hand taskbar. Introduction of audio software is applied. The installation of audio connectors: You may connect CD-ROM/DVD-ROM, walkman or others audio input to use the speaker with amplifier to Rear Speaker Out. Connect the ...
...Out. Connect the side channels to Line Out (Front Speaker Out). Line Out STEP 2 : Following installation of the audio driver, you use 2-/ 4-/6-/8-channnels audio feature by audio software selection. Connect the rear channels to acquire the best sound effect if the stereo output is very simple. Please... find a Sound Effect icon on the lower right hand taskbar. Introduction of audio software is applied. The installation of audio connectors: You may connect CD-ROM/DVD-ROM, walkman or others audio input to use the speaker with amplifier to Rear Speaker Out. Connect the ...
Manual
Page 88
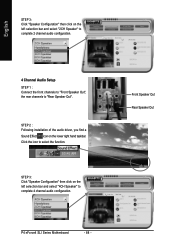
STEP 2 : Following installation of the audio driver, you find a Sound Effect icon on the left selection bar and select "2CH Speaker" to complete 2 channel audio configuration. 4 Channel Audio Setup STEP 1 : Connect the front channels to "Front Speaker Out", the rear channels to "Rear Speaker Out". Click the... STEP 3: Click "Speaker Configuration" then click on the left selection bar and select "4CH Speaker" to complete 4 channel audio configuration. P4 nForce4 SLI Series Motherboard - 88 - STEP 3: Click "Speaker Configuration" then click on the lower right hand taskbar.
STEP 2 : Following installation of the audio driver, you find a Sound Effect icon on the left selection bar and select "2CH Speaker" to complete 2 channel audio configuration. 4 Channel Audio Setup STEP 1 : Connect the front channels to "Front Speaker Out", the rear channels to "Rear Speaker Out". Click the... STEP 3: Click "Speaker Configuration" then click on the left selection bar and select "4CH Speaker" to complete 4 channel audio configuration. P4 nForce4 SLI Series Motherboard - 88 - STEP 3: Click "Speaker Configuration" then click on the lower right hand taskbar.
Manual
Page 89
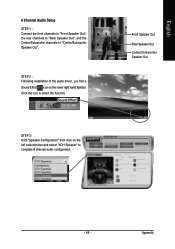
STEP 2 : Following installation of the audio driver, you find a Sound Effect icon on the left selection bar and select "6CH Speaker" to "Center/Subwoofer Speaker Out". Appendix STEP 3: Click "Speaker Configuration" then click on the lower right hand taskbar. Front Speaker Out Rear Speaker Out Center/Subwoofer Speaker Out - 89 - English 6 Channel Audio Setup STEP 1 : Connect the front channels to "Front Speaker Out", the rear channels to "Rear Speaker Out", and the Center/Subwoofer channels to complete 6 channel audio configuration. Click the icon to select the function.
STEP 2 : Following installation of the audio driver, you find a Sound Effect icon on the left selection bar and select "6CH Speaker" to "Center/Subwoofer Speaker Out". Appendix STEP 3: Click "Speaker Configuration" then click on the lower right hand taskbar. Front Speaker Out Rear Speaker Out Center/Subwoofer Speaker Out - 89 - English 6 Channel Audio Setup STEP 1 : Connect the front channels to "Front Speaker Out", the rear channels to "Rear Speaker Out", and the Center/Subwoofer channels to complete 6 channel audio configuration. Click the icon to select the function.
Manual
Page 90
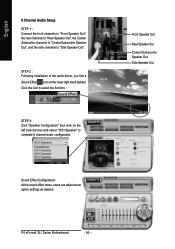
STEP 2 : Following installation of the audio driver, you find a Sound Effect icon on the left selection bar and select "8CH Speaker" to select the function. Front Speaker Out Rear Speaker Out Center/... menu, users can adjust sound option settings as desired. Click the icon to complete 8 channel audio configuration. STEP 3: Click "Speaker Configuration" then click on the lower right hand taskbar. P4 nForce4 SLI Series Motherboard - 90 - English 8 Channel Audio Setup STEP 1 : Connect the front channels to "Front Speaker Out", the rear channels to "Rear...
STEP 2 : Following installation of the audio driver, you find a Sound Effect icon on the left selection bar and select "8CH Speaker" to select the function. Front Speaker Out Rear Speaker Out Center/... menu, users can adjust sound option settings as desired. Click the icon to complete 8 channel audio configuration. STEP 3: Click "Speaker Configuration" then click on the lower right hand taskbar. P4 nForce4 SLI Series Motherboard - 90 - English 8 Channel Audio Setup STEP 1 : Connect the front channels to "Front Speaker Out", the rear channels to "Rear...
Manual
Page 14
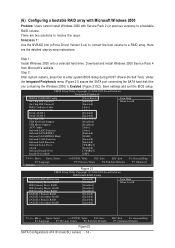
...-ATAII 1 Serial-ATAII 2 On-Chip USB USB Keyboard Support USB Mouse Support AC97 Audio Onboard LAN2 Function Onboard SATAII/IDE3 Onboard SATAII/IDE3 Mode Onboard 1394b Function Onboard LAN Function... F3: Language F5: Previous Values F6: Fail-Safe Defaults Figure22 SATA Configurations (P4 nForce4 SLI series) - 14 - Here are two solutions to enter system BIOS Setup during POST (Power-On Self... Test). Solutions 1: Use the NVRAID tool (nForce Driver Version 5.xx) to convert the boot volume to a bootable RAID volume. Download and install ...
...-ATAII 1 Serial-ATAII 2 On-Chip USB USB Keyboard Support USB Mouse Support AC97 Audio Onboard LAN2 Function Onboard SATAII/IDE3 Onboard SATAII/IDE3 Mode Onboard 1394b Function Onboard LAN Function... F3: Language F5: Previous Values F6: Fail-Safe Defaults Figure22 SATA Configurations (P4 nForce4 SLI series) - 14 - Here are two solutions to enter system BIOS Setup during POST (Power-On Self... Test). Solutions 1: Use the NVRAID tool (nForce Driver Version 5.xx) to convert the boot volume to a bootable RAID volume. Download and install ...


