
Manual
Page 16
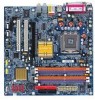
... the metal contacts on the computer, if necessary, setup BIOS utility of expansion card from the operating system. Install related driver from BIOS. 8. Please align the VGA card to install/Uninstall the VGA card. Read the related expansion card's instruction document...the computer. 3. Remove your VGA card is locked by following the steps outlined below: 1. Power on the card are indeed seated in motherboard. 4. GA-8I915G-MF/GA-8I915GM Motherboard - 16 - Replace your expansion card by the small white-drawable bar. Installing a PCI Express x 16 expansion card: Please carefully ...
... the metal contacts on the computer, if necessary, setup BIOS utility of expansion card from the operating system. Install related driver from BIOS. 8. Please align the VGA card to install/Uninstall the VGA card. Read the related expansion card's instruction document...the computer. 3. Remove your VGA card is locked by following the steps outlined below: 1. Power on the card are indeed seated in motherboard. 4. GA-8I915G-MF/GA-8I915GM Motherboard - 16 - Replace your expansion card by the small white-drawable bar. Installing a PCI Express x 16 expansion card: Please carefully ...
Manual
Page 47
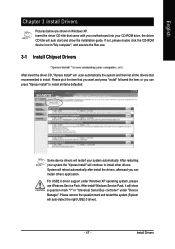
... item; System will continue to install all the drivers that you can press "Xpress Install" to install other drivers. Insert the driver CD-title that came with your motherboard into your CD-ROM drive, the driver CD-title will auto-detect the right USB2.0 driver). - 47 - English Chapter 3 Install Drivers Pictures below are shown in "My computer...
... item; System will continue to install all the drivers that you can press "Xpress Install" to install other drivers. Insert the driver CD-title that came with your motherboard into your CD-ROM drive, the driver CD-title will auto-detect the right USB2.0 driver). - 47 - English Chapter 3 Install Drivers Pictures below are shown in "My computer...

Manual
Page 48
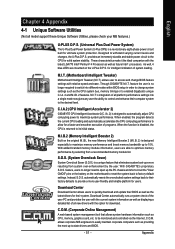
GA-8I915G-MF/GA-8I915GM Motherboard - 48 - English 3-2 Software Applications This page displays all the tools that Gigabyte developed and some free software, you can choose anyone you want and press "install" to install them. 3-3 Driver CD Information This page lists the contents of software and drivers in this CD-title.
GA-8I915G-MF/GA-8I915GM Motherboard - 48 - English 3-2 Software Applications This page displays all the tools that Gigabyte developed and some free software, you can choose anyone you want and press "install" to install them. 3-3 Driver CD Information This page lists the contents of software and drivers in this CD-title.

Manual
Page 49
English 3-4 Hardware Information This page lists all device you have for details. - 49 - F5 3-5 Contact Us Please see the last page for this motherboard. Install Drivers
English 3-4 Hardware Information This page lists all device you have for details. - 49 - F5 3-5 Contact Us Please see the last page for this motherboard. Install Drivers
Manual
Page 51
... Intelligent Booster 2) Built on the U-Plus D.P.S. With GIGABYTE's proprietary S.O.S. Instead, S.O.S. M.I .T.) allows user to the CPU for users. provides an immensely durable and stable power circuit to access and change system settings such as the latest drivers for their computer system to maximize system performance. M.I.T. (Motherboard Intelligent Tweaker) Motherboard Intelligent Tweaker (M.I .T.'s integration of all new...
... Intelligent Booster 2) Built on the U-Plus D.P.S. With GIGABYTE's proprietary S.O.S. Instead, S.O.S. M.I .T.) allows user to the CPU for users. provides an immensely durable and stable power circuit to access and change system settings such as the latest drivers for their computer system to maximize system performance. M.I.T. (Motherboard Intelligent Tweaker) Motherboard Intelligent Tweaker (M.I .T.'s integration of all new...

Manual
Page 54
...Health OK . . . Execute Restore Utility 3. It is recommended that Xpress Recovery be immediately installed after OS and all required driver and software installations are complete. Execute Backup Utility 2. English 2. Remove Backup Image 4. System storage capacity as well as drive reading...affect backup speed. 3. GIGABYTE Technology CO. , Ltd. 1. Press DEL to enter SETUP / Q-Flash, F9 For Xpress Recovery 08/16/2002-I845GE-6A69YG01C-00 F9 For Xpress Recovery Xpress Recovery V1.0 (C) Copy Right 2003. Exit and Restart 1. GA-8I915G-MF/GA-8I915GM Motherboard - 54 - Award ...
...Health OK . . . Execute Restore Utility 3. It is recommended that Xpress Recovery be immediately installed after OS and all required driver and software installations are complete. Execute Backup Utility 2. English 2. Remove Backup Image 4. System storage capacity as well as drive reading...affect backup speed. 3. GIGABYTE Technology CO. , Ltd. 1. Press DEL to enter SETUP / Q-Flash, F9 For Xpress Recovery 08/16/2002-I845GE-6A69YG01C-00 F9 For Xpress Recovery Xpress Recovery V1.0 (C) Copy Right 2003. Exit and Restart 1. GA-8I915G-MF/GA-8I915GM Motherboard - 54 - Award ...

Manual
Page 65
...by audio software selection. Line Out STEP 2 : Following installation of the audio driver, you 'll not be connected to Center/ Mic In Side Speaker Out Subwoofer Speaker Out. Channel Audio Function Introduction This motherboard provide 6 audio connector. You are in Windows XP) If you set the ...Out Center/Subwoofer Speaker Out Connect the rear channels to Side Speaker Out. STEP 1: Connect the stereo speakers or earphone to the motherboard before system start-up or you find a Sound Effect icon on the lower right hand taskbar. The installation of audio connectors: ...
...by audio software selection. Line Out STEP 2 : Following installation of the audio driver, you 'll not be connected to Center/ Mic In Side Speaker Out Subwoofer Speaker Out. Channel Audio Function Introduction This motherboard provide 6 audio connector. You are in Windows XP) If you set the ...Out Center/Subwoofer Speaker Out Connect the rear channels to Side Speaker Out. STEP 1: Connect the stereo speakers or earphone to the motherboard before system start-up or you find a Sound Effect icon on the lower right hand taskbar. The installation of audio connectors: ...
Manual
Page 66
STEP 2 : Following installation of the audio driver, you find a Sound Effect icon on the lower right hand taskbar. GA-8I915G-MF/GA-8I915GM Motherboard - 66 - Front Speaker Out Rear Speaker Out STEP 3: Click "Speaker Configuration" then click on the left selection bar and select "2CH Speaker" to complete 2 channel ...
STEP 2 : Following installation of the audio driver, you find a Sound Effect icon on the lower right hand taskbar. GA-8I915G-MF/GA-8I915GM Motherboard - 66 - Front Speaker Out Rear Speaker Out STEP 3: Click "Speaker Configuration" then click on the left selection bar and select "2CH Speaker" to complete 2 channel ...
Manual
Page 68
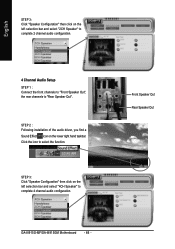
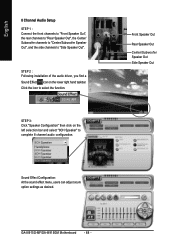
...STEP 3: Click "Speaker Configuration" then click on the lower right hand taskbar. Front Speaker Out Rear Speaker Out Center/Subwoofer Speaker Out Side Speaker Out GA-8I915G-MF/GA-8I915GM Motherboard - 68 - English 8 Channel Audio Setup STEP 1 : Connect the front channels to "Front Speaker Out", the rear channels to "Rear Speaker Out... Effect Configuration: At the sound effect menu, users can adjust sound option settings as desired. STEP 2 : Following installation of the audio driver, you find a Sound Effect icon on the left selection bar and select "8CH Speaker" to "Side Speaker Out".
...STEP 3: Click "Speaker Configuration" then click on the lower right hand taskbar. Front Speaker Out Rear Speaker Out Center/Subwoofer Speaker Out Side Speaker Out GA-8I915G-MF/GA-8I915GM Motherboard - 68 - English 8 Channel Audio Setup STEP 1 : Connect the front channels to "Front Speaker Out", the rear channels to "Rear Speaker Out... Effect Configuration: At the sound effect menu, users can adjust sound option settings as desired. STEP 2 : Following installation of the audio driver, you find a Sound Effect icon on the left selection bar and select "8CH Speaker" to "Side Speaker Out".


