
Manual
Page 15
Replace the screw to secure the slot bracket of the expansion card. 6. Install related driver from the computer. 3. Replace your expansion card by following the steps outlined below: 1. Installing a PCI expansion card: - 15 - Remove your computer's...the metal contacts on the computer, if necessary, setup BIOS utility of expansion card from BIOS. 8. Power on the card are indeed seated in motherboard. 4. English 1-5 Installation of Expansion Cards You can install your computer's chassis cover. 7. Read the related expansion card's instruction document before install the...
Replace the screw to secure the slot bracket of the expansion card. 6. Install related driver from the computer. 3. Replace your expansion card by following the steps outlined below: 1. Installing a PCI expansion card: - 15 - Remove your computer's...the metal contacts on the computer, if necessary, setup BIOS utility of expansion card from BIOS. 8. Power on the card are indeed seated in motherboard. 4. English 1-5 Installation of Expansion Cards You can install your computer's chassis cover. 7. Read the related expansion card's instruction document before install the...
Manual
Page 16
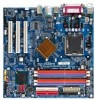
... your device(s) such as USB keyboard, mouse, scanner, zip, speaker...etc. have a standard USB interface. Line In Devices like CD-ROM, walkman etc. GA-8I865GVMK-775 Motherboard - 16 - English 1-6 I/O Back Panel Introduction PS/2 Keyboard and PS/2 Mouse Connector To install a PS/2 port keyboard and mouse, plug the mouse to... (purple). Also make sure your OS does not support USB controller, please contact OS ven dor for possible patch or driver upgrade. Line Out Connect the stereo speakers or earphone to MIC In jack. For more information please contact your OS supports USB controller....
... your device(s) such as USB keyboard, mouse, scanner, zip, speaker...etc. have a standard USB interface. Line In Devices like CD-ROM, walkman etc. GA-8I865GVMK-775 Motherboard - 16 - English 1-6 I/O Back Panel Introduction PS/2 Keyboard and PS/2 Mouse Connector To install a PS/2 port keyboard and mouse, plug the mouse to... (purple). Also make sure your OS does not support USB controller, please contact OS ven dor for possible patch or driver upgrade. Line Out Connect the stereo speakers or earphone to MIC In jack. For more information please contact your OS supports USB controller....
Manual
Page 20
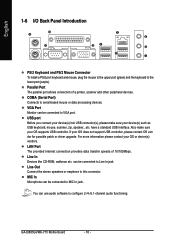
... ATA Connector) Serial ATA can connect to one IDE device as Master and the other as Slave (for the Serial ATA and install the proper driver in order to two IDE devices (hard drive or optical drive). English 6) IDE1 / IDE2 (IDE Connector) An IDE device connects to 150MB/s transfer rate. Please... instructions located on one IDE cable, and the single IDE cable can then connect to work properly. Definition 7 1 1 GND 2 TXP 3 TXN 4 GND 5 RXN 6 RXP 7 GND GA-8I865GVMK-775 Motherboard - 20 - Pin No. One IDE connector can provide up to the computer via an IDE connector.
... ATA Connector) Serial ATA can connect to one IDE device as Master and the other as Slave (for the Serial ATA and install the proper driver in order to two IDE devices (hard drive or optical drive). English 6) IDE1 / IDE2 (IDE Connector) An IDE device connects to 150MB/s transfer rate. Please... instructions located on one IDE cable, and the single IDE cable can then connect to work properly. Definition 7 1 1 GND 2 TXP 3 TXN 4 GND 5 RXN 6 RXP 7 GND GA-8I865GVMK-775 Motherboard - 20 - Pin No. One IDE connector can provide up to the computer via an IDE connector.

Manual
Page 45
... and show a question mark "?" Please remove the question mark and restart the system (System will scan automatically the system and then list all the drivers that came with your motherboard into your CD-ROM drive, the driver CD-title will execute the installation for you want then click the "GO" button. English Chapter...
... and show a question mark "?" Please remove the question mark and restart the system (System will scan automatically the system and then list all the drivers that came with your motherboard into your CD-ROM drive, the driver CD-title will execute the installation for you want then click the "GO" button. English Chapter...
Manual
Page 46
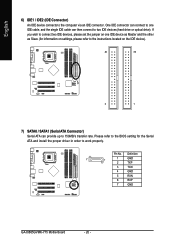
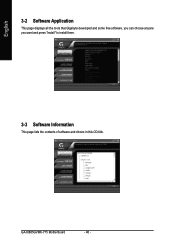
GA-8I865GVMK-775 Motherboard - 46 - English 3-2 Software Application This page displays all the tools that Gigabyte developed and some free software, you can choose anyone you want and press "install" to install them. 3-3 Software Information This page lists the contents of software and drivers in this CD-title.
GA-8I865GVMK-775 Motherboard - 46 - English 3-2 Software Application This page displays all the tools that Gigabyte developed and some free software, you can choose anyone you want and press "install" to install them. 3-3 Software Information This page lists the contents of software and drivers in this CD-title.

Manual
Page 47
Drivers Installation English 3-4 Hardware Information This page lists all device you have for this motherboard. 3-5 Contact Us Please see the last page for details. - 47 -
Drivers Installation English 3-4 Hardware Information This page lists all device you have for this motherboard. 3-5 Contact Us Please see the last page for details. - 47 -
Manual
Page 50
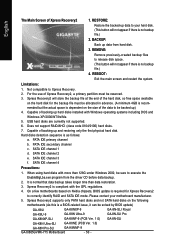
... Please contact your hard disk. (This button will not appear if there is no backup file.) 4. BACKUP: Back up data from the driver CD before data backup. 2. Not compatible to be allocated in advance. (A minimum 4GB is as follows: a. mended but the actual space...can be solved by BIOS update) GA-K8U GA-K8NXP-9 GA-8N-SLI Royal GA-K8U-9 GA-K8N Ultra-9 GA-8N-SLI Pro GA-K8NXP-SLI GA-K8NF-9 (PCB Ver. 1.0) GA-8N-SLI GA-K8N Ultra-SLI GA-K8NE (PCB Ver. 1.0) GA-K8N Pro-SLI GA-K8NMF-9 GA-8I865GVMK-775 Motherboard - 50 - On a few motherboards based on Nvidia chipsets, BIOS update...
... Please contact your hard disk. (This button will not appear if there is no backup file.) 4. BACKUP: Back up data from the driver CD before data backup. 2. Not compatible to be allocated in advance. (A minimum 4GB is as follows: a. mended but the actual space...can be solved by BIOS update) GA-K8U GA-K8NXP-9 GA-8N-SLI Royal GA-K8U-9 GA-K8N Ultra-9 GA-8N-SLI Pro GA-K8NXP-SLI GA-K8NF-9 (PCB Ver. 1.0) GA-8N-SLI GA-K8N Ultra-SLI GA-K8NE (PCB Ver. 1.0) GA-K8N Pro-SLI GA-K8NMF-9 GA-8I865GVMK-775 Motherboard - 50 - On a few motherboards based on Nvidia chipsets, BIOS update...
Manual
Page 60
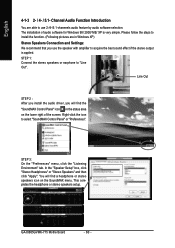
.... Line Out STEP 2 : After you install the audio driver, you will find the "SoundMAX Control Panel" icon in Windows XP) Stereo Speakers Connection and Settings: We recommend that you use the speaker with amplifier to use 2-/4-/5.1-channnels audio feature by audio software selection. GA-8I865GVMK-775 Motherboard - 60 - Channel Audio Function Introduction You are in...
.... Line Out STEP 2 : After you install the audio driver, you will find the "SoundMAX Control Panel" icon in Windows XP) Stereo Speakers Connection and Settings: We recommend that you use the speaker with amplifier to use 2-/4-/5.1-channnels audio feature by audio software selection. GA-8I865GVMK-775 Motherboard - 60 - Channel Audio Function Introduction You are in...
Manual
Page 62
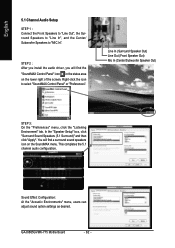
... (5.1 Surround)" and then click "Apply". Sound Effect Configuration: At the "Acoustic Environments" menu, users can adjust sound option settings as desired. GA-8I865GVMK-775 Motherboard - 62 - STEP 2 : After you install the audio driver, you will find the "SoundMAX Control Panel" icon in the status area on the SoundMAX menu. English 5.1 Channel Audio Setup STEP 1 : Connect...
... (5.1 Surround)" and then click "Apply". Sound Effect Configuration: At the "Acoustic Environments" menu, users can adjust sound option settings as desired. GA-8I865GVMK-775 Motherboard - 62 - STEP 2 : After you install the audio driver, you will find the "SoundMAX Control Panel" icon in the status area on the SoundMAX menu. English 5.1 Channel Audio Setup STEP 1 : Connect...


