Gigabyte Z390 AORUS MASTER G2 Edition Support and Manuals
Get Help and Manuals for this Gigabyte item
View All Support Options Below
Free Gigabyte Z390 AORUS MASTER G2 Edition manuals!
Problems with Gigabyte Z390 AORUS MASTER G2 Edition?
Ask a Question
Free Gigabyte Z390 AORUS MASTER G2 Edition manuals!
Problems with Gigabyte Z390 AORUS MASTER G2 Edition?
Ask a Question
Gigabyte Z390 AORUS MASTER G2 Edition Videos

The kennyS Way | Z390 AORUS MASTER G2 Edition
Duration: :46
Total Views: 12,346
Duration: :46
Total Views: 12,346
Popular Gigabyte Z390 AORUS MASTER G2 Edition Manual Pages
RAID Setup Guide - Page 6

C-2.
Figure 6 Step 2: After the system reboot, enter BIOS Setup again.
Then enter the Peripherals\Intel(R) Rapid Storage Technology sub-menu (Figure 7). Save the changes and exit BIOS Setup. Figure 7 - 6 - UEFI RAID Configuration Step 1: In BIOS Setup, go to BIOS and set CSM Support to Disabled (Figure 6).
RAID Setup Guide - Page 10

... Volumes : None defined. Skip this step and proceed with the installation of Windows operating system for a message which says "Press to Enabled. Step 1: In BIOS Setup, go to Peripherals\SATA And RST Configuration and make sure USE RST Legacy OROM is set CSM Support to Enabled and Storage Boot Option Control to create a RAID...
RAID Setup Guide - Page 16
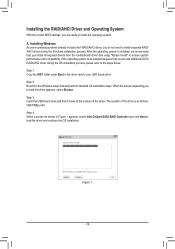
... Next to load the driver and continue the OS installation. Step 2: Boot from the motherboard driver disk using "Xpress Install" to be installed requires that you install all required drivers from the Windows setup disk and perform standard OS installation steps. Figure 1
- 16 - Installing the RAID/AHCI Driver and Operating System
With the correct BIOS settings, you are ready to...
User Manual - Page 4
... Z390 AORUS MASTER Motherboard Layout 7
Chapter 1 Hardware Installation 9 1-1 Installation Precautions 9 1-2 Product Specifications 10 1-3 Installing the CPU and CPU Cooler 14
1-3-1 Installing the CPU 14 1-3-2 Installing the CPU Cooler 16 1-4 Installing the Memory 17 1-4-1 Dual Channel Memory Configuration 17 1-4-2 Installing a Memory 18 1-5 Installing an Expansion Card 19 1-6 Setting...
User Manual - Page 19
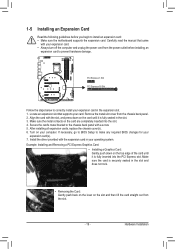
.... 5. Hardware Installation After installing all expansion cards, replace the chassis cover(s). 6.
Make sure the metal contacts on the top edge of the card until it is fully seated in your card. 1-5 Installing an Expansion Card
Read the following guidelines before installing an
expansion card to prevent hardware damage. Carefully read the manual that supports your operating...
User Manual - Page 20
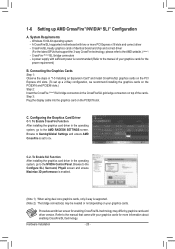
... bridge connector(s) may differ by graphics cards and driver version. System Requirements -- A CrossFire/SLI-supported motherboard with two or more information about enabling CrossFire/SLI technology. Refer to the manual of identical brand and chip and correct driver (For the latest GPUs that came with sufficient power is set up AMD CrossFire™/NVIDIA® SLI...
User Manual - Page 21

... used.
It also supports up to a back panel connector, first remove the cable from your computer and unplug the power cord from the motherboard.
•• When removing the cable, pull it side to side to Chapter 2, "BIOS Setup," "Power," for USB devices. After installing the HDMI device, make sure to set the default sound...
User Manual - Page 39

... the CMOS values to Chapter 2, "BIOS Setup," for BIOS configurations).
- 39 -
Hardware Installation Definition
1 LAD0
_ _B
_
11
1
2 VCC3 3 LAD1
_
4 No Pin
12
2
5 LAD2
6 LCLK
7 LAD3
8 GND
9 LFRAME
10 NC
11 SERIRQ
12 LRESET
_
S F_... go to BIOS Setup to load factory defaults (select Load Optimized Defaults) or manually configure the BIOS settings (refer to factory defaults.
User Manual - Page 41

... turned on the motherboard. To access the BIOS Setup program, press the key during system startup, saving system parameters and loading operating system, etc. To upgrade the BIOS, use either the GIGABYTE Q-Flash or @BIOS utility. •• Q-Flash allows the user to prevent system instability or other unexpected results.
For instructions on using the...
User Manual - Page 47

...halt state. If the specified value is present only when you install a CPU that supports this setting. (Default: Auto)
&& Intel(R) Speed Shift Technology (Intel...specifications. (Default: Auto)
&& Turbo Per Core Limit Control (Note) Allows you to select the number of CPU cores to enable in order to reduce the current. BIOS Setup Auto lets the BIOS automatically configure this setting...
User Manual - Page 64

... network card instead of using the onboard audio, set the onboard graphics memory size. Options are not able to be decoded in above 4 GB address space (only if your system supports 64-bit PCI decoding). For more than one advanced graphics card are installed and their drivers are : 128M, 256M, MAX. (Default: 256M)
&& Audio...
User Manual - Page 73

UEFI RAID Configuration
Step 1: In BIOS Setup, go to BIOS and set CSM Support to Disabled (Figure 6). Figure 7 - 73 - Save the changes and exit BIOS Setup. Configuring a RAID Set Figure 6
Step 2: After the system reboot, enter BIOS Setup again. Then enter the Peripherals\Intel(R) Rapid Storage Technology sub-menu (Figure 7). C-2.
User Manual - Page 77
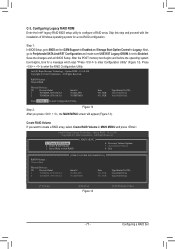
... Create RAID Volume in MAIN MENU and press . Step 1: In BIOS Setup, go to Peripherals\SATA And RST Configuration and make sure USE RST Legacy OROM is set CSM Support to Enabled and Storage Boot Option Control to Enabled.
Physical Devices : ID Device Model 1 TOSHIBA DT01ACA1 2 TOSHIBA DT01ACA1
Serial # 763ZLL4FS 763ZM7MFS
Size 931.5GB...
User Manual - Page 83

... As some operating systems already include Intel® RAID/AHCI driver, you install all required drivers from the Windows setup disk and perform standard OS installation steps.
Configuring a RAID Set
Step 2: Boot from the motherboard driver disk using "Xpress Install" to install separate RAID/ AHCI driver during the OS installation process, please refer to the steps below:
Step...
User Manual - Page 123

... Out Mic In
To configure 4/5.1/7.1-channel audio, you connect. A.
dialog box appears. Restart the system after the audio driver is installed.
6-1-1 Configuring 2/4/5.1/7.1-Channel Audio
The motherboard provides five audio jacks on the back panel which support 2/4/5.1/7.1-channel (Note) audio.
The picture to an audio jack. Select the device according to the type of device...
Gigabyte Z390 AORUS MASTER G2 Edition Reviews
We have not received any reviews for Gigabyte yet.