
Manual
Page 5
Chapter 3 Drivers Installation 45 3-1 Install Chipset Drivers 45 3-2 SoftwareApplication 46 3-3 Software Information 46 3-4 Hardware Information 47 3-5 Contact Us ...47 Chapter 4 Appendix 49 4-1 Unique Software Utilities 49 4-1-1 Xpress Recovery2 Introduction 49 4-1-2 Flash BIOS Method Introduction 51 4-1-3 2- / 4- / 5.1- Channel Audio Function Introduction 60 4-2 Troubleshooting 64 - 5 -
Chapter 3 Drivers Installation 45 3-1 Install Chipset Drivers 45 3-2 SoftwareApplication 46 3-3 Software Information 46 3-4 Hardware Information 47 3-5 Contact Us ...47 Chapter 4 Appendix 49 4-1 Unique Software Utilities 49 4-1-1 Xpress Recovery2 Introduction 49 4-1-2 Flash BIOS Method Introduction 51 4-1-3 2- / 4- / 5.1- Channel Audio Function Introduction 60 4-2 Troubleshooting 64 - 5 -
Manual
Page 16
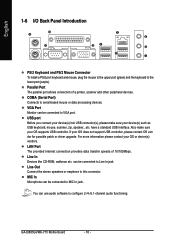
... interface. MIC In Microphone can be connected to Line In jack. GA-8I865GVMK-775 Motherboard - 16 - For more information please contact your OS does not support USB controller, please contact OS ven dor for possible patch or driver upgrade. can be connected to this connector. USB port Before you ... To install a PS/2 port keyboard and mouse, plug the mouse to the upper port (green) and the keyboard to configure 2-/4-/5.1-channel audio functioning. Parallel Port The parallel port allows connection of 10/100Mbps. You can be connected to VGA port. Also make sure your OS ...
... interface. MIC In Microphone can be connected to Line In jack. GA-8I865GVMK-775 Motherboard - 16 - For more information please contact your OS does not support USB controller, please contact OS ven dor for possible patch or driver upgrade. can be connected to this connector. USB port Before you ... To install a PS/2 port keyboard and mouse, plug the mouse to the upper port (green) and the keyboard to configure 2-/4-/5.1-channel audio functioning. Parallel Port The parallel port allows connection of 10/100Mbps. You can be connected to VGA port. Also make sure your OS ...
Manual
Page 60
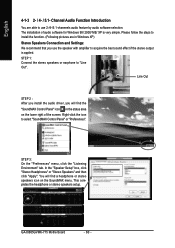
...Panel" or "Preferences". Line Out STEP 2 : After you install the audio driver, you use 2-/4-/5.1-channnels audio feature by audio software selection. You will find a headphone or stereo speakers icon on the lower right of audio software for Windows 98/ 2000/ ME/ XP is applied. STEP 1:... headphone or stereo speakers setup. Channel Audio Function Introduction You are in Windows XP) Stereo Speakers Connection and Settings: We recommend that you will find the "SoundMAX Control Panel" icon in the status area on the SoundMAX menu. GA-8I865GVMK-775 Motherboard - 60 - STEP 3: On...
...Panel" or "Preferences". Line Out STEP 2 : After you install the audio driver, you use 2-/4-/5.1-channnels audio feature by audio software selection. You will find a headphone or stereo speakers icon on the lower right of audio software for Windows 98/ 2000/ ME/ XP is applied. STEP 1:... headphone or stereo speakers setup. Channel Audio Function Introduction You are in Windows XP) Stereo Speakers Connection and Settings: We recommend that you will find the "SoundMAX Control Panel" icon in the status area on the SoundMAX menu. GA-8I865GVMK-775 Motherboard - 60 - STEP 3: On...
Manual
Page 61
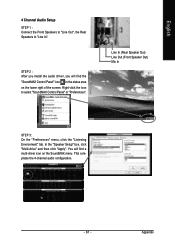
..."Listening Environment" tab. In the "Speaker Setup" box, click "Multi-drive" and then click "Apply". This completes the 4-channel audio configuration. - 61 - English 4 Channel Audio Setup STEP 1 : Connect the Front Speakers to "Line Out", the Rear Speakers to select "SoundMAX Control Panel" or "Preferences". ...Appendix STEP 2 : After you install the audio driver, you will find the "SoundMAX Control Panel" icon in the status area on the SoundMAX menu. Right-click the icon to "Line...
..."Listening Environment" tab. In the "Speaker Setup" box, click "Multi-drive" and then click "Apply". This completes the 4-channel audio configuration. - 61 - English 4 Channel Audio Setup STEP 1 : Connect the Front Speakers to "Line Out", the Rear Speakers to select "SoundMAX Control Panel" or "Preferences". ...Appendix STEP 2 : After you install the audio driver, you will find the "SoundMAX Control Panel" icon in the status area on the SoundMAX menu. Right-click the icon to "Line...
Manual
Page 62
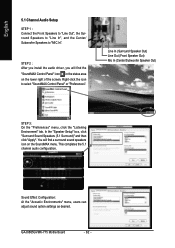
In the "Speaker Setup" box, click "Surround Sound Speakers (5.1 Surround)" and then click "Apply". This completes the 5.1 channel audio configuration. Line In (Surround Speaker Out) Line Out (Front Speaker Out) Mic In (Center/Subwoofer Speaker Out) STEP 3: On the "Preferences...select "SoundMAX Control Panel" or "Preferences". You will find a surround sound speakers icon on the lower right of the screen. GA-8I865GVMK-775 Motherboard - 62 - STEP 2 : After you install the audio driver, you will find the "SoundMAX Control Panel" icon in the status area on the SoundMAX menu.
In the "Speaker Setup" box, click "Surround Sound Speakers (5.1 Surround)" and then click "Apply". This completes the 5.1 channel audio configuration. Line In (Surround Speaker Out) Line Out (Front Speaker Out) Mic In (Center/Subwoofer Speaker Out) STEP 3: On the "Preferences...select "SoundMAX Control Panel" or "Preferences". You will find a surround sound speakers icon on the lower right of the screen. GA-8I865GVMK-775 Motherboard - 62 - STEP 2 : After you install the audio driver, you will find the "SoundMAX Control Panel" icon in the status area on the SoundMAX menu.


