Use and Care Manual
Page 1
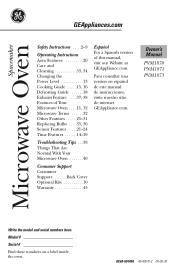
Para consultar una version en español de este manual de instrucciones, visite nuestro sitio de internet GEAppliance.com. Owner's Manual PVM1870 PNM1871 PVM1873 Write the model and serial numbers here: Model Serial Find these numbers on a label inside the oven. Microwave Spacemaker Oven GEAppliances.com ... Normal With Your Microwave Oven 40 Consumer Support Consumer Support Back Cover Optional Kits 10 Warranty 43 Español For a Spanish version of this manual, visit our Website at GEAppliance.com. DE68-03448A 49-40570-2 04-09 JR
Para consultar una version en español de este manual de instrucciones, visite nuestro sitio de internet GEAppliance.com. Owner's Manual PVM1870 PNM1871 PVM1873 Write the model and serial numbers here: Model Serial Find these numbers on a label inside the oven. Microwave Spacemaker Oven GEAppliances.com ... Normal With Your Microwave Oven 40 Consumer Support Consumer Support Back Cover Optional Kits 10 Warranty 43 Español For a Spanish version of this manual, visit our Website at GEAppliance.com. DE68-03448A 49-40570-2 04-09 JR
Use and Care Manual
Page 3
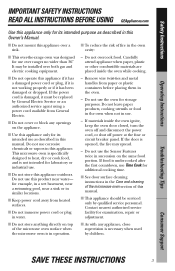
...36″. It may spread. - Do not use . - Do not leave paper products, cooking utensils or food in the oven when not in use this manual. ■ This appliance should be installed over a sink. ■ To reduce the risk of the microwave oven surface when the microwave oven is opened, the...oven. - If the door is in operation. ■ As with any openings on the same food portion. Do not use as described in this Owner's Manual. ■ Do not mount this manual. Do not use the Sensor Features twice in this appliance over both gas and electric cooking equipment. -
...36″. It may spread. - Do not use . - Do not leave paper products, cooking utensils or food in the oven when not in use this manual. ■ This appliance should be installed over a sink. ■ To reduce the risk of the microwave oven surface when the microwave oven is opened, the...oven. - If the door is in operation. ■ As with any openings on the same food portion. Do not use as described in this Owner's Manual. ■ Do not mount this manual. Do not use the Sensor Features twice in this appliance over both gas and electric cooking equipment. -

Use and Care Manual
Page 7
.... When cooking with containers tightly covered with the cookware manufacturer's recommendations. 2 Do not microwave empty containers. 3 Do not permit children to use them in this manual. When using foil in injury. Plastic cookware designed for microwave cooking is very useful, but should be used carefully. In longer exposures to overcooking, the...
.... When cooking with containers tightly covered with the cookware manufacturer's recommendations. 2 Do not microwave empty containers. 3 Do not permit children to use them in this manual. When using foil in injury. Plastic cookware designed for microwave cooking is very useful, but should be used carefully. In longer exposures to overcooking, the...
Use and Care Manual
Page 11
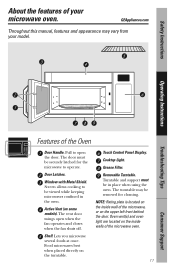
Screen allows cooking to be securely latched for cleaning. Touch Control Panel Display. GEAppliances.com Throughout this manual, features and appearance may be in the oven. Window with Metal Shield. The vent door swings open the door. Shelf. Food microwaves best when placed ...
Screen allows cooking to be securely latched for cleaning. Touch Control Panel Display. GEAppliances.com Throughout this manual, features and appearance may be in the oven. Window with Metal Shield. The vent door swings open the door. Shelf. Food microwaves best when placed ...
Use and Care Manual
Page 44
... need assistance with disabilities, check out our Website today. Extended Warranties GEAppliances.com Purchase a GE extended warranty and learn about special discounts that can now download Owner's Manuals, order parts or even schedule service on -line anytime, or call 800.626.2224 during...-at your service at 800.626.2002 during normal business hours. Consumer Support. Schedule Service GEAppliances.com Expert GE repair service is still in this manual cover procedures to qualified service personnel. Or call 800.TDD.GEAC (800.833.4322). Instructions contained in effect...
... need assistance with disabilities, check out our Website today. Extended Warranties GEAppliances.com Purchase a GE extended warranty and learn about special discounts that can now download Owner's Manuals, order parts or even schedule service on -line anytime, or call 800.626.2224 during...-at your service at 800.626.2002 during normal business hours. Consumer Support. Schedule Service GEAppliances.com Expert GE repair service is still in this manual cover procedures to qualified service personnel. Or call 800.TDD.GEAC (800.833.4322). Instructions contained in effect...
Installation Instructions
Page 1
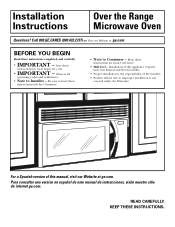
...of the installer. • Product failure due to Installer - Para consultar una version en español de este manual de instrucciones, visite nuestro sitio de internet ge.com. Installation Instructions Over the Range Microwave Oven Questions? Observe all governing codes and ordinances. • Note to improper.... Installation of this appliance requires basic mechanical and electrical skills. • Proper installation is the responsibility of this manual, visit our Website at : ge.com BEFORE YOU BEGIN Read these instructions for future reference. • Skill level -
...of the installer. • Product failure due to Installer - Para consultar una version en español de este manual de instrucciones, visite nuestro sitio de internet ge.com. Installation Instructions Over the Range Microwave Oven Questions? Observe all governing codes and ordinances. • Note to improper.... Installation of this appliance requires basic mechanical and electrical skills. • Proper installation is the responsibility of this manual, visit our Website at : ge.com BEFORE YOU BEGIN Read these instructions for future reference. • Skill level -

Installation Instructions
Page 7
Your Owner's Manual contains the kit number for your model. • This microwave oven is greater than 30″, a Filler Panel Kit may be used to fill in ...
Your Owner's Manual contains the kit number for your model. • This microwave oven is greater than 30″, a Filler Panel Kit may be used to fill in ...

Installation Instructions
Page 11
...) NOTE: This microwave is required for the nonvented exhaust. (See your installation and proceed to the following three types of ventilation required for your Owner's Manual for the kit number.) Installation Instructions 2 INSTALLATION TYPES (Choose A, B or C) This microwave oven is designed for adaptation to that section.
...) NOTE: This microwave is required for the nonvented exhaust. (See your installation and proceed to the following three types of ventilation required for your Owner's Manual for the kit number.) Installation Instructions 2 INSTALLATION TYPES (Choose A, B or C) This microwave oven is designed for adaptation to that section.
Installation Instructions
Page 14
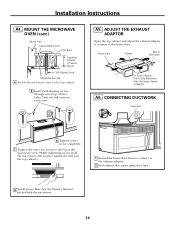
... Screw Microwave Oven Top 4 Attach the microwave oven to the exhaust adaptor. 2 Seal exhaust duct joints using duct tape. 8 Install grease filter. See the Owner's Manual packed with the microwave. 14 A5. Installation Instructions A4.
... Screw Microwave Oven Top 4 Attach the microwave oven to the exhaust adaptor. 2 Seal exhaust duct joints using duct tape. 8 Install grease filter. See the Owner's Manual packed with the microwave. 14 A5. Installation Instructions A4.
Installation Instructions
Page 18
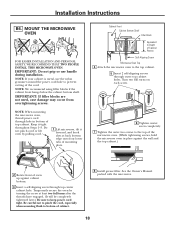
... full turns on each screw. 6 Tighten center screw completely. 7 Tighten the outer two screws to prevent cutting of cabinet. 8 Install grease filter. See the Owner's Manual packed with the microwave. 18 Be careful not to pinch the cord, especially when mounting flush to bottom of the cord.
... full turns on each screw. 6 Tighten center screw completely. 7 Tighten the outer two screws to prevent cutting of cabinet. 8 Install grease filter. See the Owner's Manual packed with the microwave. 18 Be careful not to pinch the cord, especially when mounting flush to bottom of the cord.

Installation Instructions
Page 22
See the Owner's Manual packed with the microwave. INSTALLING THE CHARCOAL FILTER 1 On 1400 and 1600 Series models, remove screws on top front of grille using a #2 Phillips screwdriver. 2 Open ...
See the Owner's Manual packed with the microwave. INSTALLING THE CHARCOAL FILTER 1 On 1400 and 1600 Series models, remove screws on top front of grille using a #2 Phillips screwdriver. 2 Open ...
Installation Instructions
Page 23
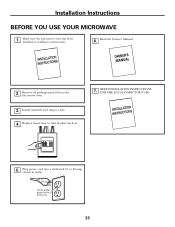
KEEP INSTALLATION INSTRUCTIONS FOR THE LOCAL INSPECTOR'S USE. 5. Ensure proper ground exists before use 23 Installation Instructions BEFORE YOU USE YOUR MICROWAVE 1. Install turntable and ring in cavity. 4. Read the Owner's Manual. 2. Remove all packing material from the microwave oven. 3. Plug power cord into a dedicated 15- Replace house fuse or turn breaker back on. 7. to instructions. 6. Make sure the microwave oven has been installed according to 20-amp electrical outlet.
KEEP INSTALLATION INSTRUCTIONS FOR THE LOCAL INSPECTOR'S USE. 5. Ensure proper ground exists before use 23 Installation Instructions BEFORE YOU USE YOUR MICROWAVE 1. Install turntable and ring in cavity. 4. Read the Owner's Manual. 2. Remove all packing material from the microwave oven. 3. Plug power cord into a dedicated 15- Replace house fuse or turn breaker back on. 7. to instructions. 6. Make sure the microwave oven has been installed according to 20-amp electrical outlet.


