
Installation Instructions
Page 2
...Installation 6 Parts Included 6 Tools You Will Need 7 Mounting Space 7 C Recirculating 19-22 Attach Mounting Plate to Wall 19 Preparation of Top Cabinet 19 Check Microwave Assembly 20 Adapting Microwave Blower for Recirculation 20, 21 Mount the Microwave Oven ..........21, 22 Installing the Charcoal Filter...-step installation guide Placement of Mounting Plate 8-10 Removing the Mounting Plate 8 Finding the Wall Studs 8 Determining Wall Plate Location 9 Aligning the Wall Plate 10 Installation Types 11-22 A Outside Top Exhaust 12-14 Attach Mounting Plate to Wall 12 Preparation of ...
...Installation 6 Parts Included 6 Tools You Will Need 7 Mounting Space 7 C Recirculating 19-22 Attach Mounting Plate to Wall 19 Preparation of Top Cabinet 19 Check Microwave Assembly 20 Adapting Microwave Blower for Recirculation 20, 21 Mount the Microwave Oven ..........21, 22 Installing the Charcoal Filter...-step installation guide Placement of Mounting Plate 8-10 Removing the Mounting Plate 8 Finding the Wall Studs 8 Determining Wall Plate Location 9 Aligning the Wall Plate 10 Installation Types 11-22 A Outside Top Exhaust 12-14 Attach Mounting Plate to Wall 12 Preparation of ...

Installation Instructions
Page 8
... finder - Do not remove the Styrofoam protecting the front of the studs. REMOVING THE MICROWAVE OVEN FROM THE CARTON/ REMOVING THE MOUNTING PLATE 1 Remove the installation instructions, filters, glass tray and the small hardware bag. This will be resting in the Styrofoam. a magnetic device which locates nails. OR B.... FINDING THE WALL STUDS Wall Studs Center Carton Styrofoam 3 Pull the carton up and off the oven. 4 Remove and properly discard plastic bags. Screws Mounting Plate 1 Find the studs, using one of the stud. Use a hammer to tap lightly across the...
... finder - Do not remove the Styrofoam protecting the front of the studs. REMOVING THE MICROWAVE OVEN FROM THE CARTON/ REMOVING THE MOUNTING PLATE 1 Remove the installation instructions, filters, glass tray and the small hardware bag. This will be resting in the Styrofoam. a magnetic device which locates nails. OR B.... FINDING THE WALL STUDS Wall Studs Center Carton Styrofoam 3 Pull the carton up and off the oven. 4 Remove and properly discard plastic bags. Screws Mounting Plate 1 Find the studs, using one of the stud. Use a hammer to tap lightly across the...

Installation Instructions
Page 9
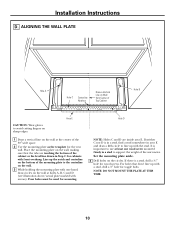
...make sure the cabinet bottom is level. beneath flat bottom cabinet Plate position - THE MICROWAVE MUST BE LEVEL. If the cabinets have decorative trim that interferes with no back or side frame, install the mounting plate down the same distance as the front overhang depth. beneath framed... recessed cabinet bottom Mounting Plate Tabs Touching the Cabinet Bottom Mounting Plate Tabs Touching the Back Frame At least 30″, up to ...
...make sure the cabinet bottom is level. beneath flat bottom cabinet Plate position - THE MICROWAVE MUST BE LEVEL. If the cabinets have decorative trim that interferes with no back or side frame, install the mounting plate down the same distance as the front overhang depth. beneath framed... recessed cabinet bottom Mounting Plate Tabs Touching the Cabinet Bottom Mounting Plate Tabs Touching the Back Frame At least 30″, up to ...
Installation Instructions
Page 10
... CAUTION: Wear gloves to support the weight of the 30″ wide space. 2 Use the mounting plate as the template for the rear wall. Four holes must be used for wood screws. NOTE: DO NOT MOUNT THE PLATE AT THIS TIME. 10 For holes that the tabs are inside area E. Line up with a ... the wall, making sure that don't line up the notch and centerline on Wall from Center of the mounting plate to line up with front overhang. Set the mounting plate aside. 4 Drill holes on sharp edges. Hole D NOTE: Holes C and D are touching the bottom of the cabinet or the level line drawn in ...
... CAUTION: Wear gloves to support the weight of the 30″ wide space. 2 Use the mounting plate as the template for the rear wall. Four holes must be used for wood screws. NOTE: DO NOT MOUNT THE PLATE AT THIS TIME. 10 For holes that the tabs are inside area E. Line up with a ... the wall, making sure that don't line up the notch and centerline on Wall from Center of the mounting plate to line up with front overhang. Set the mounting plate aside. 4 Drill holes on sharp edges. Hole D NOTE: Holes C and D are touching the bottom of the cabinet or the level line drawn in ...
Installation Instructions
Page 12
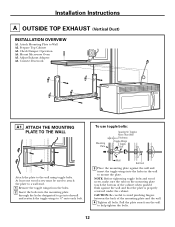
... Ductwork A1. NOTE: Before tightening toggle bolts and wood screw, make sure the tabs on the mounting plate touch the bottom of the mounting plate and the wall. 4 Tighten all bolts. Attach Mounting Plate to the wall using toggle bolts. At least one wood screw must be used to attach the... the toggle wings from the wall to 3⁄4″ onto each bolt. CAUTION: Be careful to mount the plate. Pull the plate away from the bolts. 2 Insert the bolts into the mounting plate through the holes designated to go into the holes in the wall to avoid pinching fingers between the ...
... Ductwork A1. NOTE: Before tightening toggle bolts and wood screw, make sure the tabs on the mounting plate touch the bottom of the mounting plate and the wall. 4 Tighten all bolts. Attach Mounting Plate to the wall using toggle bolts. At least one wood screw must be used to attach the... the toggle wings from the wall to 3⁄4″ onto each bolt. CAUTION: Be careful to mount the plate. Pull the plate away from the bolts. 2 Insert the bolts into the mounting plate through the holes designated to go into the holes in the wall to avoid pinching fingers between the ...
Installation Instructions
Page 13
... NOTE: When mounting the microwave oven, thread power cord through top center cabinet hole. A3. IMPORTANT: Do not grip or use the nylon grommet around the power cord hole to bottom of the cord. Back of Microwave • Place the microwave in bottom of mounting plate. Be careful not... to pinch the cord, especially when mounting flush to prevent cutting of cabinet. 13 CAUTION: Wear safety goggles when drilling holes in the cabinet bottom. ...
... NOTE: When mounting the microwave oven, thread power cord through top center cabinet hole. A3. IMPORTANT: Do not grip or use the nylon grommet around the power cord hole to bottom of the cord. Back of Microwave • Place the microwave in bottom of mounting plate. Be careful not... to pinch the cord, especially when mounting flush to prevent cutting of cabinet. 13 CAUTION: Wear safety goggles when drilling holes in the cabinet bottom. ...
Installation Instructions
Page 14
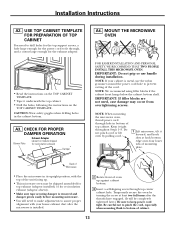
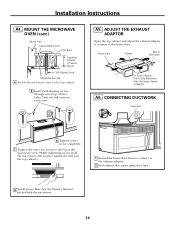
... exhaust adaptor. 2 Seal exhaust duct joints using duct tape. 8 Install grease filter. Turn two full turns on each screw. A5. Blower Plate Damper Back of Cabinet Recess Self-Aligning Screw Microwave Oven Top 4 Attach the microwave oven to -Side Adjustment, Slide the Exhaust Adaptor as Needed... A6. Installation Instructions A4. MOUNT THE MICROWAVE OVEN (cont.) Cabinet Front Cabinet Bottom Shelf Filler Block Equivalent to Depth of Microwave For Front-to-Back or Side-to the...
... exhaust adaptor. 2 Seal exhaust duct joints using duct tape. 8 Install grease filter. Turn two full turns on each screw. A5. Blower Plate Damper Back of Cabinet Recess Self-Aligning Screw Microwave Oven Top 4 Attach the microwave oven to -Side Adjustment, Slide the Exhaust Adaptor as Needed... A6. Installation Instructions A4. MOUNT THE MICROWAVE OVEN (cont.) Cabinet Front Cabinet Bottom Shelf Filler Block Equivalent to Depth of Microwave For Front-to-Back or Side-to the...
Installation Instructions
Page 15
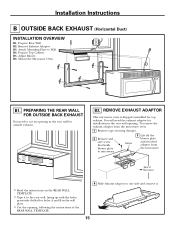
... on the REAR WALL TEMPLATE. • Tape it . 15 Adjust Blower B6. Prepare Rear Wall B2. Prepare Top Cabinet B5. Attach Mounting Plate to microwave. You will need to the rear wall, lining up with the holes previously drilled for outside exhaust. B2. Damper 3 Lift...: 1 Remove tape securing damper. 2 Remove and save screw that holds blower plate to Wall B4. Remove Exhaust Adaptor B3. Installation Instructions B OUTSIDE BACK EXHAUST (Horizontal Duct) INSTALLATION OVERVIEW B1. Mount the Microwave Oven B1. REMOVE EXHAUST ADAPTOR This microwave oven is shipped assembled for...
... on the REAR WALL TEMPLATE. • Tape it . 15 Adjust Blower B6. Prepare Rear Wall B2. Prepare Top Cabinet B5. Attach Mounting Plate to microwave. You will need to the rear wall, lining up with the holes previously drilled for outside exhaust. B2. Damper 3 Lift...: 1 Remove tape securing damper. 2 Remove and save screw that holds blower plate to Wall B4. Remove Exhaust Adaptor B3. Installation Instructions B OUTSIDE BACK EXHAUST (Horizontal Duct) INSTALLATION OVERVIEW B1. Mount the Microwave Oven B1. REMOVE EXHAUST ADAPTOR This microwave oven is shipped assembled for...
Installation Instructions
Page 16
... instructions on the TOP CABINET TEMPLATE. • Tape it underneath the top cabinet. • Drill the holes, following the instructions on the mounting plate touch the bottom of the cabinet when pushed flush against the wall and insert the toggle wings into drywall and reattach the toggle wings to... top support screws and a hole large enough for Toggles More Than Wall Thickness Toggle Wings Toggle Bolt Wall Bolt End 3 Place the mounting plate against the wall and that holds blower motor to avoid pinching fingers between the back of Microwave Blower Motor Screw 2 Carefully pull out ...
... instructions on the TOP CABINET TEMPLATE. • Tape it underneath the top cabinet. • Drill the holes, following the instructions on the mounting plate touch the bottom of the cabinet when pushed flush against the wall and insert the toggle wings into drywall and reattach the toggle wings to... top support screws and a hole large enough for Toggles More Than Wall Thickness Toggle Wings Toggle Bolt Wall Bolt End 3 Place the mounting plate against the wall and that holds blower motor to avoid pinching fingers between the back of Microwave Blower Motor Screw 2 Carefully pull out ...
Installation Instructions
Page 18
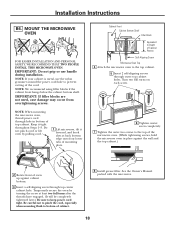
...Manual packed with the microwave. 18 Temporarily secure the oven by pulling cord. 1 Lift microwave, tilt it tight throughout Steps 1-3. MOUNT THE MICROWAVE OVEN FOR EASIER INSTALLATION AND PERSONAL SAFETY, WE RECOMMEND THAT TWO PEOPLE INSTALL THIS MICROWAVE OVEN. Cabinet Front Cabinet Bottom ... self-aligning screws through hole in place against the wall and the top cabinet.) 2 Rotate front of mounting plate. Be careful not to pinch the cord, especially when mounting flush to keep power cord tight. Installation Instructions B6. Keep it forward, and hook slots at least ...
...Manual packed with the microwave. 18 Temporarily secure the oven by pulling cord. 1 Lift microwave, tilt it tight throughout Steps 1-3. MOUNT THE MICROWAVE OVEN FOR EASIER INSTALLATION AND PERSONAL SAFETY, WE RECOMMEND THAT TWO PEOPLE INSTALL THIS MICROWAVE OVEN. Cabinet Front Cabinet Bottom ... self-aligning screws through hole in place against the wall and the top cabinet.) 2 Rotate front of mounting plate. Be careful not to pinch the cord, especially when mounting flush to keep power cord tight. Installation Instructions B6. Keep it forward, and hook slots at least ...

Installation Instructions
Page 19
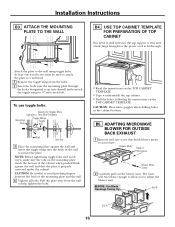
...it underneath the top cabinet. • Drill the holes, following the instructions on the mounting plate touch the bottom of the mounting plate and the wall. 4 Tighten all bolts. To use toggle bolts: Mounting Plate Spacing for the power cord to go into the holes in the cabinet bottom. 19 ... for Toggles More Than Wall Thickness Toggle Wings Toggle Bolt Wall Bolt End C2. ATTACH THE MOUNTING PLATE TO THE WALL 3 Place the mounting plate against the wall and that the plate is properly centered under the cabinet. Prepare Top Cabinet C3. USE TOP CABINET TEMPLATE FOR PREPARATION...
...it underneath the top cabinet. • Drill the holes, following the instructions on the mounting plate touch the bottom of the mounting plate and the wall. 4 Tighten all bolts. To use toggle bolts: Mounting Plate Spacing for the power cord to go into the holes in the cabinet bottom. 19 ... for Toggles More Than Wall Thickness Toggle Wings Toggle Bolt Wall Bolt End C2. ATTACH THE MOUNTING PLATE TO THE WALL 3 Place the mounting plate against the wall and that the plate is properly centered under the cabinet. Prepare Top Cabinet C3. USE TOP CABINET TEMPLATE FOR PREPARATION...
Installation Instructions
Page 21
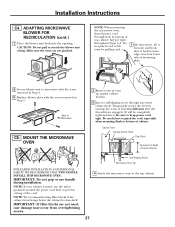
...Back of top cabinet. Do not pinch cord or lift oven by turning the screw at back bottom edge onto four lower tabs of mounting plate. 8 Secure blower unit to prevent cutting of Cabinet Recess FOR EASIER INSTALLATION AND PERSONAL SAFETY, WE RECOMMEND THAT TWO PEOPLE INSTALL THIS.... Cabinet Front Cabinet Bottom Shelf Filler Block Equivalent to the top cabinet. 21 IMPORTANT: If filler blocks are not pinched. Installation Instructions C4. MOUNT THE MICROWAVE OVEN 2 Rotate front of oven up against cabinet bottom. 3 Insert a self-aligning screw through hole in Step 1. Make sure...
...Back of top cabinet. Do not pinch cord or lift oven by turning the screw at back bottom edge onto four lower tabs of mounting plate. 8 Secure blower unit to prevent cutting of Cabinet Recess FOR EASIER INSTALLATION AND PERSONAL SAFETY, WE RECOMMEND THAT TWO PEOPLE INSTALL THIS.... Cabinet Front Cabinet Bottom Shelf Filler Block Equivalent to the top cabinet. 21 IMPORTANT: If filler blocks are not pinched. Installation Instructions C4. MOUNT THE MICROWAVE OVEN 2 Rotate front of oven up against cabinet bottom. 3 Insert a self-aligning screw through hole in Step 1. Make sure...


