GE JNM3161RFSS Support and Manuals
Get Help and Manuals for this General Electric item
View All Support Options Below
Free GE JNM3161RFSS manuals!
Problems with GE JNM3161RFSS?
Ask a Question
Free GE JNM3161RFSS manuals!
Problems with GE JNM3161RFSS?
Ask a Question
Popular GE JNM3161RFSS Manual Pages
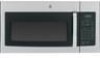
Quick Specs - Page 1

...
(without obstruction)
29-7/8"
30" MIN.
Listed by Underwriters Laboratories
Specification Revised 7/13
340171 Complete detailed, easy-to the following three types of light covers. Ventilation Options: The Spacemaker microwave ovens are designed for adaptation to -follow installation instructions and convenient full-size templates are packed with product/kit for removal of ventilation...
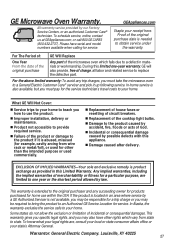
Use and Care Manual - Page 27
...:
„ Service trips to a General Electric Customer Care® servicer and pick it is needed to a defect in materials or workmanship. For the above limited warranty: To avoid any trip charges, you how to use the product.
„ Improper installation, delivery or maintenance.
„ Product not accessible to provide required service.
„ Failure of the microwave oven...
Use and Care Manual - Page 28

Try the GE Appliances Website 24 hours a day, any day of Experts™" your convenience! You can now download Owner's Manuals, order parts, catalogs, or even schedule service on-line....from GE, contact us on our Website with your convenience any user.
Schedule Service
GEAppliances.com
Expert GE repair service is still in China For greater convenience and faster service, you...
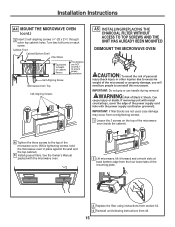
Installation Instructions - Page 1

...OHYHO - Be sure to Consumer - Keep these instructions completely and carefully.
‡ IMPORTANT -
Throughout this appliance requires basic mechanical and electrical skills.
‡ Proper installation is not covered under the warranty. Installation Instructions
2YHUWKH5DQJH 0LFURZDYH2YHQ
AVM4160, JNM3161, and JVM3160
Questions? Call 800.GE.CARES (800.432.2737) or Visit our...
Installation Instructions - Page 2

Installation Instructions
CONTENTS
General information
Important Safety Instructions 3 Electrical Requirements 3 Tools You Will Need 4 Hood Exhaust 5,6 'DPDJH²6KLSPHQW,QVWDOODWLRQ 7 Parts Included 7 0RXQWLQJ6SDFH 8
C Outside Back Exhaust 20-23
Installation Overview 20 Preparing Rear Wall for Outside Back Exhaust 20 Attach Mounting Plate to Wall .......... 20, 21 Preparation of...
Installation Instructions - Page 3

... QHHGWZRSHRSOHWRLQVWDOOWKLVPLFURZDYH
ELECTRICAL REQUIREMENTS
120 V Models
This product requires a three-prong grounded outlet. The power supply cord and plug should be brought to a separate 15 to the National Electrical Code or the prevailing local code.
3 The outlet box and supply circuit should be installed by a qualified electrician and conform to 20...
Installation Instructions - Page 7

...2
Power Cord Strap (plastic)
1
You will find the installation hardware contained in a packet with the unit. PARTS INCLUDED
ADDITIONAL PARTS
PART
QUANTITY
Top Cabinet Template
1
≤ ≤
≤
Rear Wall Template
1
IINNSSTTRALULCATTIIOONNSMOAWNUNAELRS
Installation
Instructions
1
and
Owners
1
Manual
Grease Filters
2
Exhaust Adaptor
1
Tray
1
Turntable Ring
1
7
Installation Instructions - Page 8
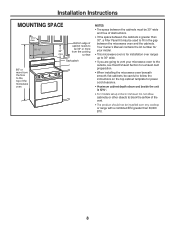
... Owner's Manual contains the kit number for your model.
‡ This microwave oven is for installation over ranges up to 36s wide.
‡ If you are going to vent your microwave oven to the outside, see Hood Exhaust Section for exhaust duct preparation.
‡When installing the microwave oven beneath smooth, flat cabinets, be careful to follow the instructions...
Installation Instructions - Page 9

... carton sides. Do not remove the foam protecting the front of the following items from this mark.
3 Draw a line down the center of the
microwave oven. Then place a mark halfway between the edges. IMPORTANT: The microwave must be used as the rear wall template and for mounting the microwave oven to at least one of the...
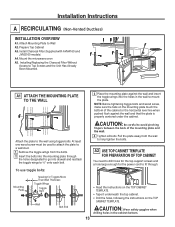
Installation Instructions - Page 11

...the wall at the center of the 30s wide space.
2 Use the mounting plate as the template for the rear wall....support the weight of the microwave oven. 6HWWKHPRXQWLQJSODWHDVLGH
WARNING:5LVNRIHOHFWULFVKRFN&DQFDXVH
LQMXU\RUGHDWK7DNHFDUHWRQRWGULOOLQWRHOHFWULFDOZLULQJ inside area E. Installation Instructions
D ALIGNING THE MOUNTING PLATE
30"
Hole A
Draw a Vertical Line on Wall...
Installation Instructions - Page 13
... plate.
Install Charcoal Filter (Supplied with AVM4160 and JVM3160 models)
A4.
Prepare Top Cabinet
A3.
A2 USE TOP CABINET TEMPLATE FOR PREPARATION OF TOP CABINET
You need to drill holes for the top support screws and a hole large enough for Toggles More Than Wall Thickness
Toggle Wings
Toggle Bolt
Wall Bolt End
‡ Read the instructions on...
Installation Instructions - Page 15
... Sec.
6 Turntable
78
Power Level
0
9 Surface Light
Set Clock Vent
Cancel Off
Start Pause
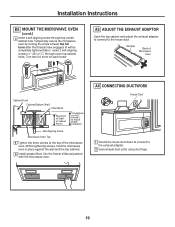
3 Replace the filter using instructions from section A3. 4 Reinstall unit following instructions from the four lower tabs of the microwave oven. (While tightening screws, hold the microwave oven in place against the wall and the top cabinet.)
5 Install grease filters. WARNING: 5LVNRI(OHFWULF6KRFN...
Installation Instructions - Page 16
... the bolts into the mounting plate through
the holes designated to go into the holes in the wall and place the mounting plate against the wall and that the plate is properly centered under the cabinet. Install Exhaust Adaptor B5. Attach Mounting Plate to Wall B2. Adjust Blower Motor B4. Installation Instructions
B OUTSIDE TOP EXHAUST
9HUWLFDO'XFW...
Installation Instructions - Page 19
... can NOT exceed 2" to ensure proper installation
Self-Aligning Screw
Microwave Oven Top
4 Tighten the three screws to the house duct. Turntable Surface Light
Vent
Cancel Off
Start Pause
1 Extend the house duct down to connect to the exhaust adaptor.
2 Seal exhaust duct joints using duct tape.
19
See the Owner's Manual packed with the...
Installation Instructions - Page 20
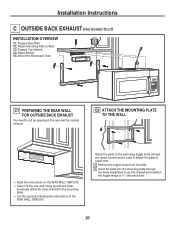
... to Wall C3. Attach Mounting Plate to 3ø4s onto each bolt.
20 Adjust Blower C5. Installation Instructions
C OUTSIDE BACK EXHAUST
+RUL]RQWDO'XFW
INSTALLATION OVERVIEW
C1. Turntable Surface Light
Vent
Cancel Off
Start Pause
C1 PREPARING THE REAR WALL FOR OUTSIDE BACK EXHAUST
You need to cut an opening , following the instructions of the REAR WALL TEMPLATE. Prepare Rear Wall C2...
GE JNM3161RFSS Reviews
We have not received any reviews for GE yet.