Quick Specs
Page 1
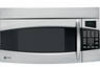
Ft. Installation Information: This information is not intended to your Monogram,® GE Profile™ or GE® appliance questions, visit our website at ge.com or call GE Answer Center® service, 800.626.2000. PNM1871SM GE Profile™ Spacemaker® 1.8 Cu. No additional wiring, venting or cabinet rebuilding necessary in cabinet above Spacemaker microwave oven...
Ft. Installation Information: This information is not intended to your Monogram,® GE Profile™ or GE® appliance questions, visit our website at ge.com or call GE Answer Center® service, 800.626.2000. PNM1871SM GE Profile™ Spacemaker® 1.8 Cu. No additional wiring, venting or cabinet rebuilding necessary in cabinet above Spacemaker microwave oven...
Use and Care Manual
Page 2
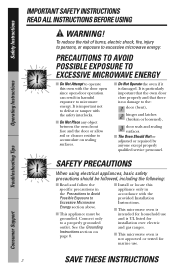
... loosened), 3 door seals and sealing surfaces. ■ The Oven Should Not be grounded. Connect only to accumulate on page 8. ■ Install or locate this oven with the safety interlocks. ■ Do Not Place any object between the oven front face and the door or allow...oven is important not to defeat or tamper with the door open since open-door operation can result in accordance with the provided Installation Instructions. ■ This microwave oven is intended for household use . Safety Instructions Operating Instructions IMPORTANT SAFETY INSTRUCTIONS READ ALL INSTRUCTIONS ...
... loosened), 3 door seals and sealing surfaces. ■ The Oven Should Not be grounded. Connect only to accumulate on page 8. ■ Install or locate this oven with the safety interlocks. ■ Do Not Place any object between the oven front face and the door or allow...oven is important not to defeat or tamper with the door open since open-door operation can result in accordance with the provided Installation Instructions. ■ This microwave oven is intended for household use . Safety Instructions Operating Instructions IMPORTANT SAFETY INSTRUCTIONS READ ALL INSTRUCTIONS ...
Use and Care Manual
Page 3
... at the fuse or circuit breaker panel. If materials inside the oven while cooking. ■ Do not operate this manual. ■ This appliance should be installed over both gas and electric cooking equipment. - This microwave oven is specifically designed to heat, dry or cook food, and is not intended for laboratory...
... at the fuse or circuit breaker panel. If materials inside the oven while cooking. ■ Do not operate this manual. ■ This appliance should be installed over both gas and electric cooking equipment. - This microwave oven is specifically designed to heat, dry or cook food, and is not intended for laboratory...
Use and Care Manual
Page 4
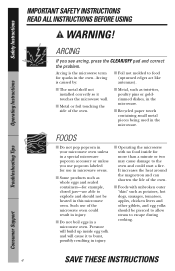
... THESE INSTRUCTIONS Arcing is the microwave term for example, closed jars-are able to food (upturned edges act like antennas). ■ The metal shelf not installed correctly so it to burst, possibly resulting in the oven. Such use in microwave ovens. ■ Some products such as whole eggs and sealed containers...
... THESE INSTRUCTIONS Arcing is the microwave term for example, closed jars-are able to food (upturned edges act like antennas). ■ The metal shelf not installed correctly so it to burst, possibly resulting in the oven. Such use in microwave ovens. ■ Some products such as whole eggs and sealed containers...
Use and Care Manual
Page 8
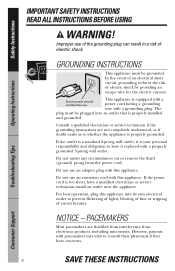
...to have it replaced with pacemakers may wish to consult their physicians if they have a qualified electrician or service technician install an outlet near the appliance. PACEMAKERS Most pacemakers are not completely understood, or if doubt exists as to prevent flickering ...outlet that is equipped with a power cord having a grounding wire with this appliance. Improper use . This appliance is properly installed and grounded. Do not use an extension cord with this appliance. Safety Instructions Operating Instructions IMPORTANT SAFETY INSTRUCTIONS READ ALL INSTRUCTIONS BEFORE...
...to have it replaced with pacemakers may wish to consult their physicians if they have a qualified electrician or service technician install an outlet near the appliance. PACEMAKERS Most pacemakers are not completely understood, or if doubt exists as to prevent flickering ...outlet that is equipped with a power cord having a grounding wire with this appliance. Improper use . This appliance is properly installed and grounded. Do not use an extension cord with this appliance. Safety Instructions Operating Instructions IMPORTANT SAFETY INSTRUCTIONS READ ALL INSTRUCTIONS BEFORE...
Use and Care Manual
Page 10
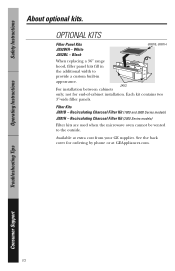
...are used when the microwave oven cannot be vented to provide a custom built-in appearance. See the back cover for end-of-cabinet installation. Safety Instructions About optional kits. White JX52BL - OPTIONAL KITS Filler Panel Kits JX52WH - Recirculating Charcoal Filter Kit (1800 and 3600 ...Series models) JX81H - not for ordering by phone or at extra cost from your GE supplier. Operating Instructions Troubleshooting Tips Consumer Support 10 Black JX81B, JX81H When replacing a 36″ range hood, filler panel kits fill...
...are used when the microwave oven cannot be vented to provide a custom built-in appearance. See the back cover for end-of-cabinet installation. Safety Instructions About optional kits. White JX52BL - OPTIONAL KITS Filler Panel Kits JX52WH - Recirculating Charcoal Filter Kit (1800 and 3600 ...Series models) JX81H - not for ordering by phone or at extra cost from your GE supplier. Operating Instructions Troubleshooting Tips Consumer Support 10 Black JX81B, JX81H When replacing a 36″ range hood, filler panel kits fill...
Use and Care Manual
Page 32
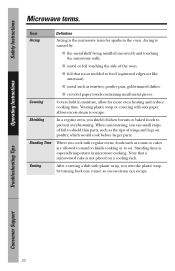
..., allow for sparks in the oven. Standing Time When you cook with plastic wrap, you vent the plastic wrap by : ■ the metal shelf being installed incorrectly and touching the microwave walls. ■ metal or foil touching the side of wings and legs on a cooling rack. When microwaving, you shield chicken...
..., allow for sparks in the oven. Standing Time When you cook with plastic wrap, you vent the plastic wrap by : ■ the metal shelf being installed incorrectly and touching the microwave walls. ■ metal or foil touching the side of wings and legs on a cooling rack. When microwaving, you shield chicken...
Use and Care Manual
Page 38
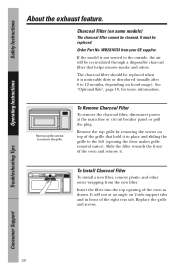
... of the oven as shown. Insert the filter into the top opening the door makes grille removal easier). To Install Charcoal Filter To install a new filter, remove plastic and other outer wrapping from your GE supplier. To Remove Charcoal Filter To remove the charcoal filter, disconnect power at an angle on top of...
... of the oven as shown. Insert the filter into the top opening the door makes grille removal easier). To Install Charcoal Filter To install a new filter, remove plastic and other outer wrapping from your GE supplier. To Remove Charcoal Filter To remove the charcoal filter, disconnect power at an angle on top of...
Use and Care Manual
Page 43
... by our Factory Service Centers, or an authorized Customer Care® technician. Louisville, KY 40225 43 For The Period Of: GE Will Replace: For GE and GE Profile Models: One Year From the date of the original purchase Any part of the microwave oven which vary from wire rack ...law. Please have other than the intended purpose or used for any succeeding owner for products purchased for home use the product. ■ Improper installation, delivery or maintenance. ■ Product not accessible to provide required service. ■ Failure of the product or damage to the product if it...
... by our Factory Service Centers, or an authorized Customer Care® technician. Louisville, KY 40225 43 For The Period Of: GE Will Replace: For GE and GE Profile Models: One Year From the date of the original purchase Any part of the microwave oven which vary from wire rack ...law. Please have other than the intended purpose or used for any succeeding owner for products purchased for home use the product. ■ Improper installation, delivery or maintenance. ■ Product not accessible to provide required service. ■ Failure of the product or damage to the product if it...
Installation Instructions
Page 1
... READ CAREFULLY. Observe all governing codes and ordinances. • Note to improper installation is not covered under the Warranty. Call 800.GE.CARES (800.432.2737) or Visit our Website at ge.com. Save these instructions with the Consumer. • Note to leave these ...Consumer - For a Spanish version of the installer. • Product failure due to Installer - KEEP THESE INSTRUCTIONS. Para consultar una version en español de este manual de instrucciones, visite nuestro sitio de internet ge.com. Installation Instructions Over the Range Microwave Oven Questions?
... READ CAREFULLY. Observe all governing codes and ordinances. • Note to improper installation is not covered under the Warranty. Call 800.GE.CARES (800.432.2737) or Visit our Website at ge.com. Save these instructions with the Consumer. • Note to leave these ...Consumer - For a Spanish version of the installer. • Product failure due to Installer - KEEP THESE INSTRUCTIONS. Para consultar una version en español de este manual de instrucciones, visite nuestro sitio de internet ge.com. Installation Instructions Over the Range Microwave Oven Questions?

Installation Instructions
Page 2
...Microwave Assembly 20 Adapting Microwave Blower for Recirculation 20, 21 Mount the Microwave Oven ..........21, 22 Installing the Charcoal Filter 22 Before You Use Your Microwave 23 Step-by-step installation guide Placement of Mounting Plate 8-10 Removing the Mounting Plate 8 Finding the Wall Studs 8 Determining... Wall Plate Location 9 Aligning the Wall Plate 10 Installation Types 11-22 A Outside Top Exhaust 12-14 Attach Mounting Plate to Wall 12 Preparation of Top Cabinet 13 Checking for Proper...
...Microwave Assembly 20 Adapting Microwave Blower for Recirculation 20, 21 Mount the Microwave Oven ..........21, 22 Installing the Charcoal Filter 22 Before You Use Your Microwave 23 Step-by-step installation guide Placement of Mounting Plate 8-10 Removing the Mounting Plate 8 Finding the Wall Studs 8 Determining... Wall Plate Location 9 Aligning the Wall Plate 10 Installation Types 11-22 A Outside Top Exhaust 12-14 Attach Mounting Plate to Wall 12 Preparation of Top Cabinet 13 Checking for Proper...

Installation Instructions
Page 3
...is recommended that the outlet box is equipped with a three-prong (grounding) plug which mates with a properly grounded three-prong wall receptacle, installed by a qualified electrician and conform to BOTH a top cabinet AND a wall. IMPORTANT - to the requirements of supporting the cabinet load,... PERSONAL SAFETY, THIS APPLIANCE MUST BE PROPERLY GROUNDED TO AVOID SEVERE OR FATAL SHOCK. Ensure proper ground exists before beginning installation to correct any deficiencies. The power cord of the proper voltage and frequency. You should be capable of the National Electrical...
...is recommended that the outlet box is equipped with a three-prong (grounding) plug which mates with a properly grounded three-prong wall receptacle, installed by a qualified electrician and conform to BOTH a top cabinet AND a wall. IMPORTANT - to the requirements of supporting the cabinet load,... PERSONAL SAFETY, THIS APPLIANCE MUST BE PROPERLY GROUNDED TO AVOID SEVERE OR FATAL SHOCK. Ensure proper ground exists before beginning installation to correct any deficiencies. The power cord of the proper voltage and frequency. You should be capable of the National Electrical...
Installation Instructions
Page 4
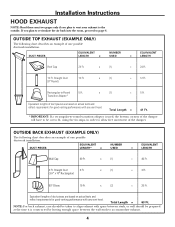
.... Total Length = 41 Ft. * IMPORTANT: If a rectangular-to-round transition adaptor is used, the bottom corners of one possible ductwork installation. OUTSIDE BACK EXHAUST (EXAMPLE ONLY) The following chart describes an example of the damper will have to be prepared at the time it is...reflect requirements for good venting performance with any vent hood. Transition Adaptor* x (1) = 5 Ft. x (1) = 40 Ft. 3 Ft. Installation Instructions HOOD EXHAUST NOTE: Read these next two pages only if you plan to recirculate the air back into the room, proceed to page 6. If...
.... Total Length = 41 Ft. * IMPORTANT: If a rectangular-to-round transition adaptor is used, the bottom corners of one possible ductwork installation. OUTSIDE BACK EXHAUST (EXAMPLE ONLY) The following chart describes an example of the damper will have to be prepared at the time it is...reflect requirements for good venting performance with any vent hood. Transition Adaptor* x (1) = 5 Ft. x (1) = 40 Ft. 3 Ft. Installation Instructions HOOD EXHAUST NOTE: Read these next two pages only if you plan to recirculate the air back into the room, proceed to page 6. If...

Installation Instructions
Page 5
...the approximate feet of equivalent length of the damper. 5 Total Ductwork = Ft. x ( ) = Ft. 45° Elbow 5 Ft. Installation Instructions NOTE: If you how to -Round 5 Ft. Transition Adaptor* Wall Cap 40 Ft. Outside ventilation requires a HOOD EXHAUST DUCT. Exhaust connection...: The hood exhaust has been designed to install ducts, note that venting be installed using the tin snips, in order to allow free movement of some typical ducts. Elbows, transitions, wall and...
...the approximate feet of equivalent length of the damper. 5 Total Ductwork = Ft. x ( ) = Ft. 45° Elbow 5 Ft. Installation Instructions NOTE: If you how to -Round 5 Ft. Transition Adaptor* Wall Cap 40 Ft. Outside ventilation requires a HOOD EXHAUST DUCT. Exhaust connection...: The hood exhaust has been designed to install ducts, note that venting be installed using the tin snips, in order to allow free movement of some typical ducts. Elbows, transitions, wall and...
Installation Instructions
Page 6
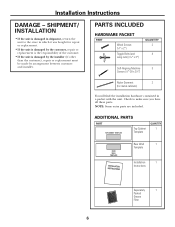
.... ADDITIONAL PARTS PART Top Cabinet Template QUANTITY 1 Rear Wall 1 Template Installation 1 Instructions Separately 1 Packed Grease Filter 6 Installation Instructions DAMAGE - Check to the store in which it was bought for metal cabinets) You will find the installation hardware contained in shipment, return the unit to make sure you have... by the customer, repair or replacement is the responsibility of the customer. • If the unit is damaged by the installer (if other than the customer), repair or replacement must be made by arrangement between customer and...
.... ADDITIONAL PARTS PART Top Cabinet Template QUANTITY 1 Rear Wall 1 Template Installation 1 Instructions Separately 1 Packed Grease Filter 6 Installation Instructions DAMAGE - Check to the store in which it was bought for metal cabinets) You will find the installation hardware contained in shipment, return the unit to make sure you have... by the customer, repair or replacement is the responsibility of the customer. • If the unit is damaged by the installer (if other than the customer), repair or replacement must be made by arrangement between customer and...

Installation Instructions
Page 7
...clearance. • Models with 3⁄16″, 1⁄2″ and 5⁄8″ drill bits Filler blocks or scrap wood pieces, if needed for installation over ranges up to 36″ wide. • If you are going to vent your model. • This microwave oven is greater than 30...″, a Filler Panel Kit may be used on recessed bottom cabinet installations only) Saw (saber, hole or keyhole) Stud finder or Hammer (optional) Safety goggles Level Duct and masking tape MOUNTING SPACE 161⁄2″ ...
...clearance. • Models with 3⁄16″, 1⁄2″ and 5⁄8″ drill bits Filler blocks or scrap wood pieces, if needed for installation over ranges up to 36″ wide. • If you are going to vent your model. • This microwave oven is greater than 30...″, a Filler Panel Kit may be used on recessed bottom cabinet installations only) Saw (saber, hole or keyhole) Stud finder or Hammer (optional) Safety goggles Level Duct and masking tape MOUNTING SPACE 161⁄2″ ...

Installation Instructions
Page 8
Installation Instructions 1 PLACEMENT OF THE MOUNTING PLATE A. Screws Mounting Plate 1 Find the studs, using one of the studs. OR B. Use a hammer to tap lightly across the ... studs should be used as the rear wall template and for mounting. REMOVING THE MICROWAVE OVEN FROM THE CARTON/ REMOVING THE MOUNTING PLATE 1 Remove the installation instructions, filters, glass tray and the small hardware bag. B. a magnetic device which locates nails. Then place a mark halfway between the edges. Stud finder - FINDING THE...
Installation Instructions 1 PLACEMENT OF THE MOUNTING PLATE A. Screws Mounting Plate 1 Find the studs, using one of the studs. OR B. Use a hammer to tap lightly across the ... studs should be used as the rear wall template and for mounting. REMOVING THE MICROWAVE OVEN FROM THE CARTON/ REMOVING THE MOUNTING PLATE 1 Remove the installation instructions, filters, glass tray and the small hardware bag. B. a magnetic device which locates nails. Then place a mark halfway between the edges. Stud finder - FINDING THE...

Installation Instructions
Page 9
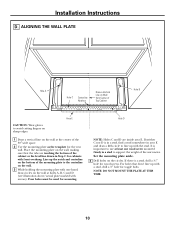
... bottom is level. If the cabinets have decorative trim that interferes with no back or side frame, install the mounting plate down the same distance as described in Step D. 9 Installation Instructions C. Use a level to Cooktop Plate position - beneath framed recessed cabinet bottom Mounting Plate Tabs ...on the back wall an equal distance below the cabinet bottom as the inside depth of the front overhang. 3 For this type of installation with front overhang only, align the mounting tabs with this horizontal line, not touching the cabinet bottom as the front overhang depth. ...
... bottom is level. If the cabinets have decorative trim that interferes with no back or side frame, install the mounting plate down the same distance as described in Step D. 9 Installation Instructions C. Use a level to Cooktop Plate position - beneath framed recessed cabinet bottom Mounting Plate Tabs ...on the back wall an equal distance below the cabinet bottom as the inside depth of the front overhang. 3 For this type of installation with front overhang only, align the mounting tabs with this horizontal line, not touching the cabinet bottom as the front overhang depth. ...
Installation Instructions
Page 10
... on Wall from Center of the cabinet or the level line drawn in area E and draw a fifth circle to avoid cutting fingers on sharp edges. Installation Instructions D.
... on Wall from Center of the cabinet or the level line drawn in area E and draw a fifth circle to avoid cutting fingers on sharp edges. Installation Instructions D.

Installation Instructions
Page 11
Select the type of ventilation: A. Installation Instructions 2 INSTALLATION TYPES (Choose A, B or C) This microwave oven is designed for adaptation to that section. Recirculating (Non-Vented Ductless) NOTE: This microwave is required for non-...NON-VENTED DUCTLESS) See page 19 11 A Charcoal Filter Accessory Kit is shipped assembled for Outside Top Exhaust (except for the nonvented exhaust. (See your installation and proceed to the following three types of ventilation required for your Owner's Manual for the kit number.) Outside Back Exhaust (Horizontal Duct) C. Outside Top...
Select the type of ventilation: A. Installation Instructions 2 INSTALLATION TYPES (Choose A, B or C) This microwave oven is designed for adaptation to that section. Recirculating (Non-Vented Ductless) NOTE: This microwave is required for non-...NON-VENTED DUCTLESS) See page 19 11 A Charcoal Filter Accessory Kit is shipped assembled for Outside Top Exhaust (except for the nonvented exhaust. (See your installation and proceed to the following three types of ventilation required for your Owner's Manual for the kit number.) Outside Back Exhaust (Horizontal Duct) C. Outside Top...


