Quick Specs
Page 2
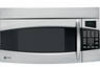
... automatically calculates and adjusts cooking times and power levels for a sophisticated, easy-to six plates or three 9" x 13" casserole dishes • Model PNM1871SMSS - Ft. Stainless steel PVM1870SM Specification Created 7/07 240267 PNM1871SM GE Profile™ Spacemaker® 1.8 Cu. Provides a built-in sensor in a fraction of sight when not in use, the oven vent...
... automatically calculates and adjusts cooking times and power levels for a sophisticated, easy-to six plates or three 9" x 13" casserole dishes • Model PNM1871SMSS - Ft. Stainless steel PVM1870SM Specification Created 7/07 240267 PNM1871SM GE Profile™ Spacemaker® 1.8 Cu. Provides a built-in sensor in a fraction of sight when not in use, the oven vent...
Use and Care Manual
Page 1
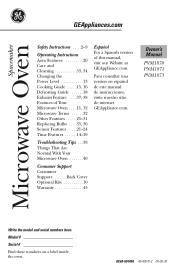
Owner's Manual PVM1870 PNM1871 PVM1873 Write the model and serial numbers here: Model Serial Find these numbers on a label inside the oven. Para consultar una version en español de este manual de instrucciones, visite nuestro sitio ...
Owner's Manual PVM1870 PNM1871 PVM1873 Write the model and serial numbers here: Model Serial Find these numbers on a label inside the oven. Para consultar una version en español de este manual de instrucciones, visite nuestro sitio ...
Use and Care Manual
Page 10
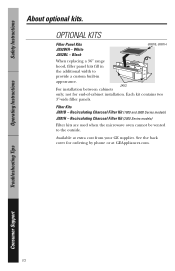
Recirculating Charcoal Filter Kit (1800 and 3600 Series models) JX81H - Operating Instructions Troubleshooting Tips Consumer Support 10 Black JX81B, JX81H When replacing a 36″ range hood, filler panel kits fill in appearance. Filter Kits .... Each kit contains two 3″-wide filler panels. JX52 For installation between cabinets only; not for ordering by phone or at extra cost from your GE supplier. See the back cover for end-of-cabinet installation. OPTIONAL KITS Filler Panel Kits JX52WH - Recirculating Charcoal Filter Kit (2000 Series...
Recirculating Charcoal Filter Kit (1800 and 3600 Series models) JX81H - Operating Instructions Troubleshooting Tips Consumer Support 10 Black JX81B, JX81H When replacing a 36″ range hood, filler panel kits fill in appearance. Filter Kits .... Each kit contains two 3″-wide filler panels. JX52 For installation between cabinets only; not for ordering by phone or at extra cost from your GE supplier. See the back cover for end-of-cabinet installation. OPTIONAL KITS Filler Panel Kits JX52WH - Recirculating Charcoal Filter Kit (2000 Series...
Use and Care Manual
Page 11
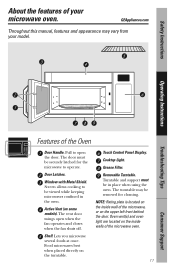
... located on the turntable. Pull to operate. Door Latches. Shelf. Turntable and support must be in the oven. Safety Instructions About the features of your model. Window with Metal Shield. Screen allows cooking to be removed for the microwave to open when the fan operates and closes when the fan shuts... off. Food microwaves best when placed directly on the inside wall of the microwave, or on some models). The turntable may vary from your microwave oven. The vent door swings open the door. Touch Control Panel Display.
... located on the turntable. Pull to operate. Door Latches. Shelf. Turntable and support must be in the oven. Safety Instructions About the features of your model. Window with Metal Shield. Screen allows cooking to be removed for the microwave to open when the fan operates and closes when the fan shuts... off. Food microwaves best when placed directly on the inside wall of the microwave, or on some models). The turntable may vary from your microwave oven. The vent door swings open the door. Touch Control Panel Display.
Use and Care Manual
Page 12
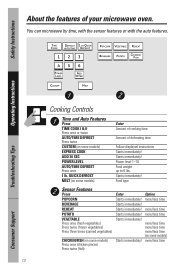
...Press POPCORN BEVERAGE REHEAT POTATO VEGETABLE Press once (fresh vegetables) Press twice (frozen vegetables) Press three times (canned vegetables) CHICKEN/FISH (on some models) Press once (chicken pieces) Press twice (fish) Enter Starts immediately! Operating Instructions Troubleshooting Tips Cooking Controls Time and Auto Features Press TIME COOK ...I & II Press once or twice AUTO/TIME DEFROST Press twice CUSTOM (on some models) EXPRESS COOK ADD 30 SEC POWER LEVEL AUTO/TIME DEFROST Press once 1 lb. Starts immediately! QUICK DEFROST MELT (on some...
...Press POPCORN BEVERAGE REHEAT POTATO VEGETABLE Press once (fresh vegetables) Press twice (frozen vegetables) Press three times (canned vegetables) CHICKEN/FISH (on some models) Press once (chicken pieces) Press twice (fish) Enter Starts immediately! Operating Instructions Troubleshooting Tips Cooking Controls Time and Auto Features Press TIME COOK ...I & II Press once or twice AUTO/TIME DEFROST Press twice CUSTOM (on some models) EXPRESS COOK ADD 30 SEC POWER LEVEL AUTO/TIME DEFROST Press once 1 lb. Starts immediately! QUICK DEFROST MELT (on some...
Use and Care Manual
Page 20
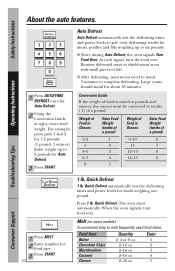
... 8 oz 2-16 oz 2-16 oz 2-16 oz 2-32 oz Enter 1 2 3 4 5 For example, press pads 1 and 2 for food type. 3 Press START. 20 1 lb. Melt (on some models) A convenient way to complete defrosting. Safety Instructions Operating Instructions Auto Defrost Auto Defrost automatically sets the defrosting times and power levels to give even defrosting...
... 8 oz 2-16 oz 2-16 oz 2-16 oz 2-32 oz Enter 1 2 3 4 5 For example, press pads 1 and 2 for food type. 3 Press START. 20 1 lb. Melt (on some models) A convenient way to complete defrosting. Safety Instructions Operating Instructions Auto Defrost Auto Defrost automatically sets the defrosting times and power levels to give even defrosting...
Use and Care Manual
Page 24
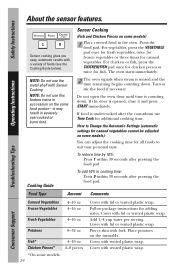
...fresh vegetables, twice for frozen vegetables or three times for adding water. NOTE: Do not use this feature twice in succession on some models 24 4-16 oz 2-8 pieces Cover with Sensor Cooking. How to Change the Automatic Settings (automatic settings for additional cooking time. Follow ...Type Amount Comments Canned Vegetables Frozen Vegetables 4-16 oz 4-16 oz Fresh Vegetables 4-16 oz Potatoes 8-32 oz Fish* Chicken Pieces* *On some models): You can adjust the cooking time for fish. Add 1/4 cup water per serving. Cover with vented plastic wrap. If the door is counting...
...fresh vegetables, twice for frozen vegetables or three times for adding water. NOTE: Do not use this feature twice in succession on some models 24 4-16 oz 2-8 pieces Cover with Sensor Cooking. How to Change the Automatic Settings (automatic settings for additional cooking time. Follow ...Type Amount Comments Canned Vegetables Frozen Vegetables 4-16 oz 4-16 oz Fresh Vegetables 4-16 oz Potatoes 8-32 oz Fish* Chicken Pieces* *On some models): You can adjust the cooking time for fish. Add 1/4 cup water per serving. Cover with vented plastic wrap. If the door is counting...
Use and Care Manual
Page 25
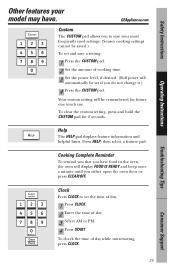
... HELP; Help The HELP pad displays feature information and helpful hints. Your custom setting will be remembered for 2 seconds. Clock Press CLOCK to save your model may have food in the oven, the oven will display FOOD IS READY and beep once a minute until you do not change it.) 4 Press the...
... HELP; Help The HELP pad displays feature information and helpful hints. Your custom setting will be remembered for 2 seconds. Clock Press CLOCK to save your model may have food in the oven, the oven will display FOOD IS READY and beep once a minute until you do not change it.) 4 Press the...
Use and Care Manual
Page 26
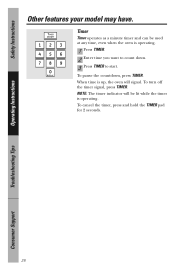
Timer Timer operates as a minute timer and can be lit while the timer is operating. To pause the countdown, press TIMER. When time is operating. 1 Press TIMER. 2 Enter time you want to count down. 3 Press TIMER to start. To turn off the timer signal, press TIMER. To cancel the timer, press and hold the TIMER pad for 2 seconds. 26 Troubleshooting Tips Consumer Support NOTE: The timer indicator will be used at any time, even when the oven is up, the oven will signal. Safety Instructions Operating Instructions Other features your model may have.
Timer Timer operates as a minute timer and can be lit while the timer is operating. To pause the countdown, press TIMER. When time is operating. 1 Press TIMER. 2 Enter time you want to count down. 3 Press TIMER to start. To turn off the timer signal, press TIMER. To cancel the timer, press and hold the TIMER pad for 2 seconds. 26 Troubleshooting Tips Consumer Support NOTE: The timer indicator will be used at any time, even when the oven is up, the oven will signal. Safety Instructions Operating Instructions Other features your model may have.
Use and Care Manual
Page 28
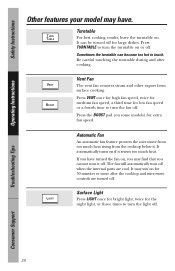
...heat rising from surface cooking. Press the BOOST pad (on for the night light, or three times to touch. It may stay on some models) for low fan speed or a fourth time to turn the turntable on . Press TURNTABLE to turn off when the internal parts are turned... off. Sometimes the turntable can be turned off . 28 Troubleshooting Tips Consumer Support Safety Instructions Operating Instructions Other features your model may find that you cannot turn it off. The fan will automatically turn the fan off . Turntable For best cooking results, leave the...
...heat rising from surface cooking. Press the BOOST pad (on for the night light, or three times to touch. It may stay on some models) for low fan speed or a fourth time to turn the turntable on . Press TURNTABLE to turn off when the internal parts are turned... off. Sometimes the turntable can be turned off . 28 Troubleshooting Tips Consumer Support Safety Instructions Operating Instructions Other features your model may find that you cannot turn it off. The fan will automatically turn the fan off . Turntable For best cooking results, leave the...
Use and Care Manual
Page 29
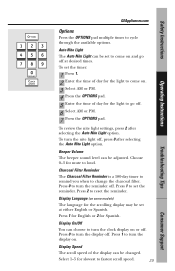
Press 1 to set at desired times. Display Language (on some models) The language for mute to cycle through the available options. Press 1 for English or 2 for the light to reset the reminder. To turn the nite ...
Press 1 to set at desired times. Display Language (on some models) The language for mute to cycle through the available options. Press 1 for English or 2 for the light to reset the reminder. To turn the nite ...
Use and Care Manual
Page 30
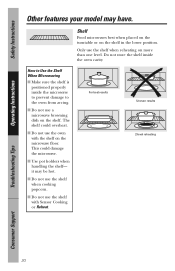
... microwave floor. This could overheat. ■ Do not use the shelf when reheating on more than one level. Safety Instructions Operating Instructions Other features your model may be hot. ■ Do not use the shelf when cooking popcorn. ■ Do not use a microwave browning dish on the shelf. Do not store...
... microwave floor. This could overheat. ■ Do not use the shelf when reheating on more than one level. Safety Instructions Operating Instructions Other features your model may be hot. ■ Do not use the shelf when cooking popcorn. ■ Do not use a microwave browning dish on the shelf. Do not store...
Use and Care Manual
Page 31
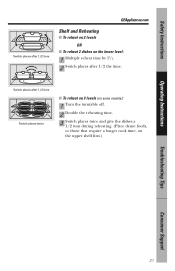
Safety Instructions Switch places after 1/2 the time. Switch places after 1/2 time Switch places twice ■ To reheat on 3 levels (on some models): 1 Turn the turntable off. 2 Double the reheating time. 3 Switch places twice and give the dishes a 1/2 turn during reheating. (Place dense foods, or those that require a ...
Safety Instructions Switch places after 1/2 the time. Switch places after 1/2 time Switch places twice ■ To reheat on 3 levels (on some models): 1 Turn the turntable off. 2 Double the reheating time. 3 Switch places twice and give the dishes a 1/2 turn during reheating. (Place dense foods, or those that require a ...
Use and Care Manual
Page 33
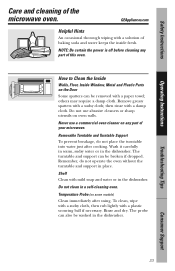
How to Clean the Inside Walls, Floor, Inside Window, Metal and Plastic Parts on some models) Clean immediately after cooking. others may require a damp cloth. then rinse with a plastic scouring ball if necessary. Remember, do not place the turntable into water ...
How to Clean the Inside Walls, Floor, Inside Window, Metal and Plastic Parts on some models) Clean immediately after cooking. others may require a damp cloth. then rinse with a plastic scouring ball if necessary. Remember, do not place the turntable into water ...
Use and Care Manual
Page 34
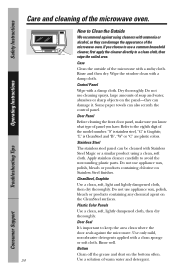
... Panel Before cleaning the front door panel, make sure you know what type of panel you choose to use cleaning sprays, large amounts of the model number. Case Clean the outside of the microwave oven. Refer to Clean the Outside We recommend against the microwave. "S" is stainless steel, "G" is Graphite, "L" is...
... Panel Before cleaning the front door panel, make sure you know what type of panel you choose to use cleaning sprays, large amounts of the model number. Case Clean the outside of the microwave oven. Refer to Clean the Outside We recommend against the microwave. "S" is stainless steel, "G" is Graphite, "L" is...
Use and Care Manual
Page 36
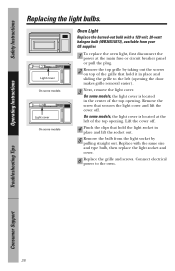
...light socket in place and lift the socket out. 5 Remove the bulb from your GE supplier. 1 To replace the oven light, first disconnect the power at the left (opening . Light cover On some models Light cover On some models, the light cover is located at the main fuse or circuit breaker panel or... out. Connect electrical power to the left of the top opening the door makes grille removal easier). 3 Next, remove the light cover. On some models Oven Light Replace the burned-out bulb with the same size and type bulb, then replace the light socket and cover. 6 Replace the grille and...
...light socket in place and lift the socket out. 5 Remove the bulb from your GE supplier. 1 To replace the oven light, first disconnect the power at the left (opening . Light cover On some models Light cover On some models, the light cover is located at the main fuse or circuit breaker panel or... out. Connect electrical power to the left of the top opening the door makes grille removal easier). 3 Next, remove the light cover. On some models Oven Light Replace the burned-out bulb with the same size and type bulb, then replace the light socket and cover. 6 Replace the grille and...

Use and Care Manual
Page 37
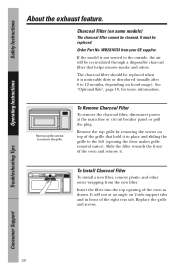
... down and out. To replace, slide the filter in hot water and detergent. Reusable Grease Filter (on all models) Reusable Grease Filter The reusable grease filter traps grease released by foods on some models) The Vent Fan The vent fan has a metal reusable grease filter. Removing and Cleaning the Filter To remove..., the filter must ALWAYS be cleaned once a month, or as needed. Pull it dry before replacing. Don't use a charcoal filter. Troubleshooting Tips Consumer Support 37 Models that recirculate air back into place.
... down and out. To replace, slide the filter in hot water and detergent. Reusable Grease Filter (on all models) Reusable Grease Filter The reusable grease filter traps grease released by foods on some models) The Vent Fan The vent fan has a metal reusable grease filter. Removing and Cleaning the Filter To remove..., the filter must ALWAYS be cleaned once a month, or as needed. Pull it dry before replacing. Don't use a charcoal filter. Troubleshooting Tips Consumer Support 37 Models that recirculate air back into place.
Use and Care Manual
Page 38
Remove grille screws to 12 months, depending on some models) The charcoal filter cannot be replaced. Replace the grille and screws. WB2X10733 from the new filter. It will rest at the main fuse or circuit ... opening the door makes grille removal easier). Troubleshooting Tips Consumer Support 38 Safety Instructions Operating Instructions About the exhaust feature. Order Part No. If the model is noticeably dirty or discolored (usually after 6 to remove the grille. To Install Charcoal Filter To install a new filter, remove plastic and other outer wrapping...
Remove grille screws to 12 months, depending on some models) The charcoal filter cannot be replaced. Replace the grille and screws. WB2X10733 from the new filter. It will rest at the main fuse or circuit ... opening the door makes grille removal easier). Troubleshooting Tips Consumer Support 38 Safety Instructions Operating Instructions About the exhaust feature. Order Part No. If the model is noticeably dirty or discolored (usually after 6 to remove the grille. To Install Charcoal Filter To install a new filter, remove plastic and other outer wrapping...
Use and Care Manual
Page 40
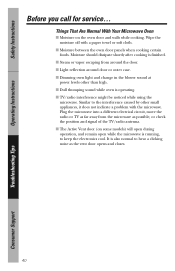
.... ■ The Active Vent door (on the oven door and walls while cooking. Things That Are Normal With Your Microwave Oven ■ Moisture on some models) will open during operation, and remain open while the microwave is also normal to the interference caused by other than high. ■ Dull thumping sound...
.... ■ The Active Vent door (on the oven door and walls while cooking. Things That Are Normal With Your Microwave Oven ■ Moisture on some models) will open during operation, and remain open while the microwave is also normal to the interference caused by other than high. ■ Dull thumping sound...
Use and Care Manual
Page 43
...This warranty is extended to state. This warranty gives you specific legal rights, and you may also have serial and model numbers available when calling for service. What GE Will Not Cover: ■ Service trips to your home. If the product is located in materials or workmanship....obtain service under the warranty. Proof of merchantability or fitness for home use within the USA. For The Period Of: GE Will Replace: For GE and GE Profile Models: One Year From the date of the original purchase Any part of incidental or consequential damages. Troubleshooting Tips EXCLUSION OF...
...This warranty is extended to state. This warranty gives you specific legal rights, and you may also have serial and model numbers available when calling for service. What GE Will Not Cover: ■ Service trips to your home. If the product is located in materials or workmanship....obtain service under the warranty. Proof of merchantability or fitness for home use within the USA. For The Period Of: GE Will Replace: For GE and GE Profile Models: One Year From the date of the original purchase Any part of incidental or consequential damages. Troubleshooting Tips EXCLUSION OF...


