Use and Care Manual
Page 9
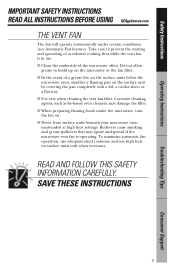
...BEFORE USING GEAppliances.com THE VENT FAN The fan will operate automatically under the microwave, turn the fan on the microwave or the fan filter. ■ In the event of accidental cooking fires while the vent fan is operating. Boilovers cause smoking and greasy spillovers that may damage ...the filter. ■ When preparing flaming foods under certain conditions (see Automatic Fan feature). Take care to build up on . ■ Never leave surface units...
...BEFORE USING GEAppliances.com THE VENT FAN The fan will operate automatically under the microwave, turn the fan on the microwave or the fan filter. ■ In the event of accidental cooking fires while the vent fan is operating. Boilovers cause smoking and greasy spillovers that may damage ...the filter. ■ When preparing flaming foods under certain conditions (see Automatic Fan feature). Take care to build up on . ■ Never leave surface units...
Use and Care Manual
Page 10
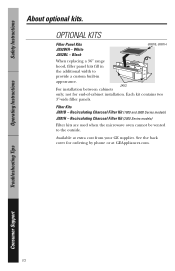
...- See the back cover for end-of-cabinet installation. not for ordering by phone or at extra cost from your GE supplier. Available at GEAppliances.com. Operating Instructions Troubleshooting Tips Consumer Support 10 Safety Instructions About optional kits. Each kit contains... two 3″-wide filler panels. Filter Kits JX81B - JX52 For installation between cabinets only; Black JX81B, JX81H When replacing a 36″ range hood, filler ...
...- See the back cover for end-of-cabinet installation. not for ordering by phone or at extra cost from your GE supplier. Available at GEAppliances.com. Operating Instructions Troubleshooting Tips Consumer Support 10 Safety Instructions About optional kits. Each kit contains... two 3″-wide filler panels. Filter Kits JX81B - JX52 For installation between cabinets only; Black JX81B, JX81H When replacing a 36″ range hood, filler ...
Use and Care Manual
Page 11
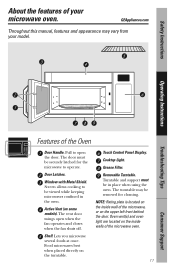
... the upper left front behind the door. Cooktop Light. Window with Metal Shield. The vent door swings open the door. Touch Control Panel Display. Grease Filter. GEAppliances.com Throughout this manual, features and appearance may be removed for the microwave to be securely latched for cleaning. The turntable may vary from...
... the upper left front behind the door. Cooktop Light. Window with Metal Shield. The vent door swings open the door. Touch Control Panel Display. Grease Filter. GEAppliances.com Throughout this manual, features and appearance may be removed for the microwave to be securely latched for cleaning. The turntable may vary from...
Use and Care Manual
Page 29
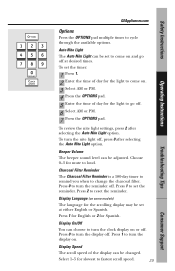
To review the nite light settings, press 2 after selecting the Auto Nite Light option. Charcoal Filter Reminder The Charcoal Filter Reminder is a 180-day timer to remind you when to cycle through the available options. Press 1 to go off , press ...Nite Light option. Select 1-5 for Spanish. Safety Instructions GEAppliances.com Operating Instructions Options Press the OPTIONS pad multiple times to change the charcoal filter. To set at desired times. Display Language (on some models) The language for mute to fastest scroll speed. 29 Troubleshooting Tips Consumer ...
To review the nite light settings, press 2 after selecting the Auto Nite Light option. Charcoal Filter Reminder The Charcoal Filter Reminder is a 180-day timer to remind you when to cycle through the available options. Press 1 to go off , press ...Nite Light option. Select 1-5 for Spanish. Safety Instructions GEAppliances.com Operating Instructions Options Press the OPTIONS pad multiple times to change the charcoal filter. To set at desired times. Display Language (on some models) The language for mute to fastest scroll speed. 29 Troubleshooting Tips Consumer ...

Use and Care Manual
Page 37
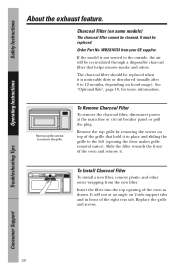
... remove, slide it around in place when the hood is used to the side using the tab. GEAppliances.com Charcoal Filter (on the cooktop. To clean the grease filter, soak it and then swish it to remove embedded dirt. Pull up and in the frame slot at the side of the microwave.... For this reason, the filter must ALWAYS be in hot water and detergent. Pull it dry before replacing. Models that recirculate air back into place. Rinse, shake and let it...
... remove, slide it around in place when the hood is used to the side using the tab. GEAppliances.com Charcoal Filter (on the cooktop. To clean the grease filter, soak it and then swish it to remove embedded dirt. Pull up and in the frame slot at the side of the microwave.... For this reason, the filter must ALWAYS be in hot water and detergent. Pull it dry before replacing. Models that recirculate air back into place. Rinse, shake and let it...
Use and Care Manual
Page 38
...not vented to the left (opening of the right rear tab. Remove grille screws to 12 months, depending on some models) The charcoal filter cannot be replaced. Remove the top grille by removing the screws on 2 side support tabs and in place and sliding the grille to... front of the oven as shown. Troubleshooting Tips Consumer Support 38 WB2X10733 from the new filter. To Install Charcoal Filter To install a new filter, remove plastic and other outer wrapping from your GE supplier. Insert the filter into the top opening the door makes grille removal easier). See "Optional Kits", page ...
...not vented to the left (opening of the right rear tab. Remove grille screws to 12 months, depending on some models) The charcoal filter cannot be replaced. Remove the top grille by removing the screws on 2 side support tabs and in place and sliding the grille to... front of the oven as shown. Troubleshooting Tips Consumer Support 38 WB2X10733 from the new filter. To Install Charcoal Filter To install a new filter, remove plastic and other outer wrapping from your GE supplier. Insert the filter into the top opening the door makes grille removal easier). See "Optional Kits", page ...

Installation Instructions
Page 2
... Preparation of Top Cabinet 19 Check Microwave Assembly 20 Adapting Microwave Blower for Recirculation 20, 21 Mount the Microwave Oven ..........21, 22 Installing the Charcoal Filter 22 Before You Use Your Microwave 23 Step-by-step installation guide Placement of Mounting Plate 8-10 Removing the Mounting Plate 8 Finding the Wall Studs...
... Preparation of Top Cabinet 19 Check Microwave Assembly 20 Adapting Microwave Blower for Recirculation 20, 21 Mount the Microwave Oven ..........21, 22 Installing the Charcoal Filter 22 Before You Use Your Microwave 23 Step-by-step installation guide Placement of Mounting Plate 8-10 Removing the Mounting Plate 8 Finding the Wall Studs...
Installation Instructions
Page 6
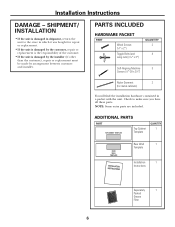
... the unit to make sure you have all these parts. ADDITIONAL PARTS PART Top Cabinet Template QUANTITY 1 Rear Wall 1 Template Installation 1 Instructions Separately 1 Packed Grease Filter 6 Installation Instructions DAMAGE - SHIPMENT/ INSTALLATION • If the unit is damaged in a packet with the unit.
... the unit to make sure you have all these parts. ADDITIONAL PARTS PART Top Cabinet Template QUANTITY 1 Rear Wall 1 Template Installation 1 Instructions Separately 1 Packed Grease Filter 6 Installation Instructions DAMAGE - SHIPMENT/ INSTALLATION • If the unit is damaged in a packet with the unit.

Installation Instructions
Page 8
... be 16″ or 24″ from the mounting plate. REMOVING THE MICROWAVE OVEN FROM THE CARTON/ REMOVING THE MOUNTING PLATE 1 Remove the installation instructions, filters, glass tray and the small hardware bag. Then carefully roll the oven and carton over onto the top side. Screws Mounting Plate 1 Find the studs...
... be 16″ or 24″ from the mounting plate. REMOVING THE MICROWAVE OVEN FROM THE CARTON/ REMOVING THE MOUNTING PLATE 1 Remove the installation instructions, filters, glass tray and the small hardware bag. Then carefully roll the oven and carton over onto the top side. Screws Mounting Plate 1 Find the studs...

Installation Instructions
Page 11
... Place for Outside Top Exhaust B OUTSIDE BACK EXHAUST (HORIZONTAL DUCT) See page 12 See page 15 C RECIRCULATING (NON-VENTED DUCTLESS) See page 19 11 A Charcoal Filter Accessory Kit is shipped assembled for Outside Top Exhaust (except for non-vented models). Outside Back Exhaust (Horizontal Duct) C. Select the type of ventilation: A. Outside...
... Place for Outside Top Exhaust B OUTSIDE BACK EXHAUST (HORIZONTAL DUCT) See page 12 See page 15 C RECIRCULATING (NON-VENTED DUCTLESS) See page 19 11 A Charcoal Filter Accessory Kit is shipped assembled for Outside Top Exhaust (except for non-vented models). Outside Back Exhaust (Horizontal Duct) C. Select the type of ventilation: A. Outside...
Installation Instructions
Page 14
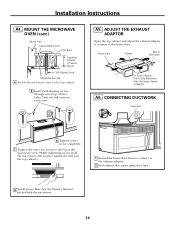
... Cabinet Recess Self-Aligning Screw Microwave Oven Top 4 Attach the microwave oven to the exhaust adaptor. 2 Seal exhaust duct joints using duct tape. 8 Install grease filter. CONNECTING DUCTWORK House Duct 6 Tighten center screw completely. 7 Tighten the outer two screws to the top of Microwave For Front-to-Back or Side-to...
... Cabinet Recess Self-Aligning Screw Microwave Oven Top 4 Attach the microwave oven to the exhaust adaptor. 2 Seal exhaust duct joints using duct tape. 8 Install grease filter. CONNECTING DUCTWORK House Duct 6 Tighten center screw completely. 7 Tighten the outer two screws to the top of Microwave For Front-to-Back or Side-to...
Installation Instructions
Page 18
... packed with the microwave. 18 IMPORTANT: Do not grip or use the nylon grommet around the power cord hole to bottom of cabinet. 8 Install grease filter. Do not pinch cord or lift oven by turning the screw at back bottom edge onto four lower tabs of the cord. Be careful not...
... packed with the microwave. 18 IMPORTANT: Do not grip or use the nylon grommet around the power cord hole to bottom of cabinet. 8 Install grease filter. Do not pinch cord or lift oven by turning the screw at back bottom edge onto four lower tabs of the cord. Be careful not...

Installation Instructions
Page 19
... toggle bolts: Mounting Plate Spacing for the power cord to 3⁄4″ onto each bolt. Attach Mounting Plate to help tighten the bolts. Install Charcoal Filter C1. Pull the plate away from the bolts. 2 Insert the bolts into the mounting plate through the holes designated to go into drywall and reattach...
... toggle bolts: Mounting Plate Spacing for the power cord to 3⁄4″ onto each bolt. Attach Mounting Plate to help tighten the bolts. Install Charcoal Filter C1. Pull the plate away from the bolts. 2 Insert the bolts into the mounting plate through the holes designated to go into drywall and reattach...

Installation Instructions
Page 22
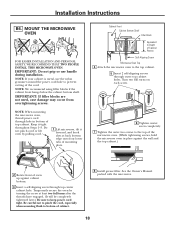
... grille and the screws. 6 Close the door. On 1400 and 1600 Series models, pull the grille straight off . Charcoal Filter 4 Install the charcoal filter. INSTALLING THE CHARCOAL FILTER 1 On 1400 and 1600 Series models, remove screws on top front of the microwave oven. (While tightening screws, hold the... microwave oven in place against the wall and the top cabinet.) 8 Install grease filter. MOUNT THE MICROWAVE OVEN (cont.) 5 Insert 2 self-aligning screws through outer top cabinet holes. On 1800 Series models, slide the grille...
... grille and the screws. 6 Close the door. On 1400 and 1600 Series models, pull the grille straight off . Charcoal Filter 4 Install the charcoal filter. INSTALLING THE CHARCOAL FILTER 1 On 1400 and 1600 Series models, remove screws on top front of the microwave oven. (While tightening screws, hold the... microwave oven in place against the wall and the top cabinet.) 8 Install grease filter. MOUNT THE MICROWAVE OVEN (cont.) 5 Insert 2 self-aligning screws through outer top cabinet holes. On 1800 Series models, slide the grille...


