Technical Specifications (C1033 Spec Sheets)
Page 2
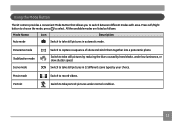
... Automatically makes it easy to stitch three images together, giving you closer to change without notice. camera features C1033 / C1233 face detection Automatically focuses and optimizes exposure for clearer pictures. red-eye removal Remove red-eye immediately while viewing images on CIPA Standards) Temperature: 32 ~ 104 F / 0... Black Red Silver SKU# DSC-C1033-BK-US-1 DSC-C1033-RD-US-1 DSC-C1033-SL-US-1 DSC-C1233-BK-US-1 DSC-C1233-RD-US-1 DSC-C1233-SL-US-1 UPC 810027015891 810027015983 810027015976 810027015990 810027016010 810027016003 GIFT BOX WEIGHT (lbs) 0.961 0.961 0.961 ...
... Automatically makes it easy to stitch three images together, giving you closer to change without notice. camera features C1033 / C1233 face detection Automatically focuses and optimizes exposure for clearer pictures. red-eye removal Remove red-eye immediately while viewing images on CIPA Standards) Temperature: 32 ~ 104 F / 0... Black Red Silver SKU# DSC-C1033-BK-US-1 DSC-C1033-RD-US-1 DSC-C1033-SL-US-1 DSC-C1233-BK-US-1 DSC-C1233-RD-US-1 DSC-C1233-SL-US-1 UPC 810027015891 810027015983 810027015976 810027015990 810027016010 810027016003 GIFT BOX WEIGHT (lbs) 0.961 0.961 0.961 ...
User Manual (English (4.39 MB))
Page 3
... the card with your PC, as this camera are not taken by this model of camera, as this may make it impossible to recognize the picture when the camera is subject to high temperature, e.g. Please do not store photos that are stored in the autogenerated folder in SD card. near motors...
... the card with your PC, as this camera are not taken by this model of camera, as this may make it impossible to recognize the picture when the camera is subject to high temperature, e.g. Please do not store photos that are stored in the autogenerated folder in SD card. near motors...
User Manual (English (4.39 MB))
Page 5
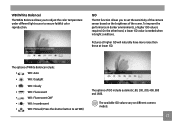
...clean the camera. Indicates precautions to know. Every effort has been made to ensure that the contents of time. • Do not use your GE digital camera. Symbols used in this manual Throughout this manual, the following symbols are accurate, however General Imaging Company reserves the right to make ...changes without notice. • Do not expose the lens to direct sunlight for extended periods. • Download all pictures and remove the batteries from the camera if you are going to store the camera for long periods of this manual are used to help...
...clean the camera. Indicates precautions to know. Every effort has been made to ensure that the contents of time. • Do not use your GE digital camera. Symbols used in this manual Throughout this manual, the following symbols are accurate, however General Imaging Company reserves the right to make ...changes without notice. • Do not expose the lens to direct sunlight for extended periods. • Download all pictures and remove the batteries from the camera if you are going to store the camera for long periods of this manual are used to help...

User Manual (English (4.39 MB))
Page 7
Size 22 Color 23 USING THE MODES 24 LCD Screen Display 24 Still Picture Mode Display 24 Video Shooting Mode Display 26 Playback Mode Display 27 Panorama mode 28 Scene mode 29 Sport 29 Indoor 29 Snow 30 Fireworks ... Night Portrait 30 Stabilization mode 31 Face Detection 32 PLAYBACK 33 Viewing Photos and Videos 33 Thumbnail View 34 Using Zoom on Playback (for still pictures only 35 Using the Delete Button 36 USING THE MENUS 37 Still Menu 37 AF Mode (Auto-Focus mode 38 Continuous AF 38 Expo Metering...
Size 22 Color 23 USING THE MODES 24 LCD Screen Display 24 Still Picture Mode Display 24 Video Shooting Mode Display 26 Playback Mode Display 27 Panorama mode 28 Scene mode 29 Sport 29 Indoor 29 Snow 30 Fireworks ... Night Portrait 30 Stabilization mode 31 Face Detection 32 PLAYBACK 33 Viewing Photos and Videos 33 Thumbnail View 34 Using Zoom on Playback (for still pictures only 35 Using the Delete Button 36 USING THE MENUS 37 Still Menu 37 AF Mode (Auto-Focus mode 38 Continuous AF 38 Expo Metering...
User Manual (English (4.39 MB))
Page 16
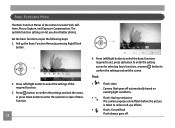
...Switch to record videos. Movie mode Switch to take still pictures in automatic mode. Switch to take still pictures in 12 different scene types by hand shake, under normal condition. 13 Switch to take portrait pictures under low luminance, or slow shutter speed. Panorama mode Stabilization... pictures by reducing the blurs caused by your choice. Portrait Switch to capture a sequence of shots and stitch them together into a panoramic photo. Press Left/Right button to choose the mode, press to switch between different modes with ease. Using the Mode Button The GE ...
...Switch to record videos. Movie mode Switch to take still pictures in automatic mode. Switch to take still pictures in 12 different scene types by hand shake, under normal condition. 13 Switch to take portrait pictures under low luminance, or slow shutter speed. Panorama mode Stabilization... pictures by reducing the blurs caused by your choice. Portrait Switch to capture a sequence of shots and stitch them together into a panoramic photo. Press Left/Right button to choose the mode, press to switch between different modes with ease. Using the Mode Button The GE ...
User Manual (English (4.39 MB))
Page 20
... green focus frame after the Zoom button is equipped with two types of the camera to zoom in this mode, the camera automatically optimizes your picture on the LCD screen and press the Shutter button halfway to turn the camera on the subject. 4. Zoom indicator is hidden after the subject is... the easiest mode to capture the image. Zoom button Zoom indicator (See "Digital Zoom" on the subject while taking pictures. Using the Zoom Function Your camera is released. Press the Zoom button of zoom functions: optical zoom and digital zoom.
... green focus frame after the Zoom button is equipped with two types of the camera to zoom in this mode, the camera automatically optimizes your picture on the LCD screen and press the Shutter button halfway to turn the camera on the subject. 4. Zoom indicator is hidden after the subject is... the easiest mode to capture the image. Zoom button Zoom indicator (See "Digital Zoom" on the subject while taking pictures. Using the Zoom Function Your camera is released. Press the Zoom button of zoom functions: optical zoom and digital zoom.
User Manual (English (4.39 MB))
Page 21
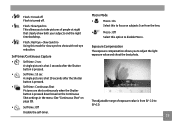
...; Flash : Forced flash Flash always goes off automatically based on existing light conditions. • Flash : Red-eye reduction The camera exposes a brief flash before the picture is taken to confirm the settings and exit the screen. The suitable function setting can let you shoot better photos. Press Left/Right button to...
...; Flash : Forced flash Flash always goes off automatically based on existing light conditions. • Flash : Red-eye reduction The camera exposes a brief flash before the picture is taken to confirm the settings and exit the screen. The suitable function setting can let you shoot better photos. Press Left/Right button to...
User Manual (English (4.39 MB))
Page 22
... Self-time : Off Disable the self-timer. Self-timer/Continuous Capture • Self-time : 2 sec A single picture is shot 2 seconds after the Shutter button is pressed. • Self-time : 10 sec A single picture is shot 10 seconds after the Shutter button is pressed. • Self-time : Continuous Shot...button is pressed down based on the Continuous Shot settings in the menu. (See "Continuous Shot" on subjects 5cm from EV -2.0 to take pictures of people at night that clearly show both your subjects and the night time backdrop. • Flash : Red-Eye + Slow Synchro Using...
... Self-time : Off Disable the self-timer. Self-timer/Continuous Capture • Self-time : 2 sec A single picture is shot 2 seconds after the Shutter button is pressed. • Self-time : 10 sec A single picture is shot 10 seconds after the Shutter button is pressed. • Self-time : Continuous Shot...button is pressed down based on the Continuous Shot settings in the menu. (See "Continuous Shot" on subjects 5cm from EV -2.0 to take pictures of people at night that clearly show both your subjects and the night time backdrop. • Flash : Red-Eye + Slow Synchro Using...
User Manual (English (4.39 MB))
Page 24
... conditions. WB (White Balance) The White Balance allows you to set WB) The options of ISO include automatic, 80, 100, 200, 400, 800 and 1600. Pictures at higher ISO will naturally have more noise than those at lower ISO. The options of White Balance include: • WB : Auto • WB : Daylight...
... conditions. WB (White Balance) The White Balance allows you to set WB) The options of ISO include automatic, 80, 100, 200, 400, 800 and 1600. Pictures at higher ISO will naturally have more noise than those at lower ISO. The options of White Balance include: • WB : Auto • WB : Daylight...

User Manual (English (4.39 MB))
Page 25
Size The size setting refers to record more memory space. The picture quality of image has totally three options: • Quality : Best • Quality : Fine • Quality : Normal 22 The bigger the number of the images. As ...
Size The size setting refers to record more memory space. The picture quality of image has totally three options: • Quality : Best • Quality : Fine • Quality : Normal 22 The bigger the number of the images. As ...
User Manual (English (4.39 MB))
Page 26
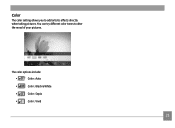
You can try different color tones to add artistic effects directly when taking pictures. Color The color setting allows you to alter the mood of your pictures. The color options include: • Color : Auto • Color : Black & White • Color : Sepia • Color : Vivid 23
You can try different color tones to add artistic effects directly when taking pictures. Color The color setting allows you to alter the mood of your pictures. The color options include: • Color : Auto • Color : Black & White • Color : Sepia • Color : Vivid 23

User Manual (English (4.39 MB))
Page 27
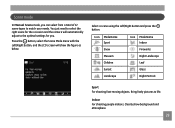
USING THE MODES LCD Screen Display Still Picture Mode Display Mode: 1 2 3 45 6 78 16 9 15 10 14 11 13 12 17 18 19 20 21 24 1 Shooting Mode Icons Auto mode Stabilization mode Panorama mode 2 AF Mode Single-AF Multi-AF 3 Expo Metering Spot Center AiAE 4 Image Size 5 Image Quality Scene mode Portrait
USING THE MODES LCD Screen Display Still Picture Mode Display Mode: 1 2 3 45 6 78 16 9 15 10 14 11 13 12 17 18 19 20 21 24 1 Shooting Mode Icons Auto mode Stabilization mode Panorama mode 2 AF Mode Single-AF Multi-AF 3 Expo Metering Spot Center AiAE 4 Image Size 5 Image Quality Scene mode Portrait

User Manual (English (4.39 MB))
Page 28
6 Remaining number of pictures 7 Memory card/built-in memory 8 Battery Status 9 WT Ratio (Displayed only when zoom is activated) 10 Zoom 11 Exposure 12 ISO Value 13 Histogram 14 Focus Frame 15 Continuous Shot 16 Face Detection 17 Picture Color 18 White Balance 19 Macro Mode 20 Self-timer Self-time : 2-sec Self-time : 10-sec 21 Flash Mode Flash : Auto Flash : Red-eye reduction Flash : Forced flash Flash : Forced off Flash : Slow Synchro Flash : Red-Eye + Slow Synchro 25
6 Remaining number of pictures 7 Memory card/built-in memory 8 Battery Status 9 WT Ratio (Displayed only when zoom is activated) 10 Zoom 11 Exposure 12 ISO Value 13 Histogram 14 Focus Frame 15 Continuous Shot 16 Face Detection 17 Picture Color 18 White Balance 19 Macro Mode 20 Self-timer Self-time : 2-sec Self-time : 10-sec 21 Flash Mode Flash : Auto Flash : Red-eye reduction Flash : Forced flash Flash : Forced off Flash : Slow Synchro Flash : Red-Eye + Slow Synchro 25
User Manual (English (4.39 MB))
Page 29
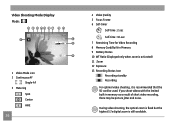
..., there may be used. During video shooting, the optical zoom is fixed but the highest 5.7x digital zoom is recommended that the SD card be picture jitter and noise. If you shoot videos with the limited built-in Memory 9 Battery Status 10 WT Ratio (Displayed only when zoom is activated) 11...
..., there may be used. During video shooting, the optical zoom is fixed but the highest 5.7x digital zoom is recommended that the SD card be picture jitter and noise. If you shoot videos with the limited built-in Memory 9 Battery Status 10 WT Ratio (Displayed only when zoom is activated) 11...

User Manual (English (4.39 MB))
Page 30
Affecting regional 10. Playback mode display Mode: 1 23 12 4 56 7 8 9 11 10 1. Image Zoom 8. Memory Space (this picture/Total number of pictures) 11. File protection 4. Picture Number 5. Picture File 3. The current display area 9. Recording Date and Time 12. Play Mode icon 2. Battery Status 7. DPOF file 27 Memory Card/Built-in Memory 6.
Affecting regional 10. Playback mode display Mode: 1 23 12 4 56 7 8 9 11 10 1. Image Zoom 8. Memory Space (this picture/Total number of pictures) 11. File protection 4. Picture Number 5. Picture File 3. The current display area 9. Recording Date and Time 12. Play Mode icon 2. Battery Status 7. DPOF file 27 Memory Card/Built-in Memory 6.
User Manual (English (4.39 MB))
Page 31
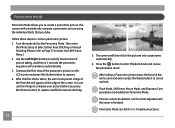
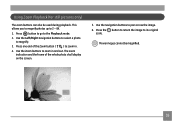
... be deleted, nor the zoom adjusted until the series is taken, the semi-transparent image of the first shot will then stitch the pictures into a panorama automatically. 6. Compose the first view of the screen. Panorama Mode can use this image to capture and finish manual stitching. 28... 5. The camera will commence automatically. 3. Turn the mode dial to create a panoramic picture: 1. Then enter the Photo Setup to Select either Auto Stitching or Manual Stitching (Please refer to Page 37 to enter Playback mode and review the...
... be deleted, nor the zoom adjusted until the series is taken, the semi-transparent image of the first shot will then stitch the pictures into a panorama automatically. 6. Compose the first view of the screen. Panorama Mode can use this image to capture and finish manual stitching. 28... 5. The camera will commence automatically. 3. Turn the mode dial to create a panoramic picture: 1. Then enter the Photo Setup to Select either Auto Stitching or Manual Stitching (Please refer to Page 37 to enter Playback mode and review the...
User Manual (English (4.39 MB))
Page 32
... Sport Snow Museum Children Sunset Landscape Icon Mode Name Indoor Fireworks Night Landscape Leaf Glass Night Portrait Sport For shooting fast-moving objects. Bring lively pictures to the optimal settings for the occasion and the camera will show background and atmosphere. 29 Press the button, select the Scene Mode menu with...
... Sport Snow Museum Children Sunset Landscape Icon Mode Name Indoor Fireworks Night Landscape Leaf Glass Night Portrait Sport For shooting fast-moving objects. Bring lively pictures to the optimal settings for the occasion and the camera will show background and atmosphere. 29 Press the button, select the Scene Mode menu with...
User Manual (English (4.39 MB))
Page 35
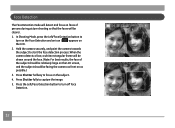
... the Face Detection and an icon ( ) appears on the LCD. 2. Face Detection The Face Detection mode will detect and focus on faces of persons during picture shooting so that the faces will be drawn around the face. (Note: For best results, the face of the subject should be relatively large on...
... the Face Detection and an icon ( ) appears on the LCD. 2. Face Detection The Face Detection mode will detect and focus on faces of persons during picture shooting so that the faces will be drawn around the face. (Note: For best results, the face of the subject should be relatively large on...
User Manual (English (4.39 MB))
Page 38
... select a photo to 2 ~ 8X. 1. Use the Zoom buttons to zoom in . 4. This allows you to magnify photos up to magnify. 3. Using Zoom Playback (for still pictures only) The zoom buttons can also be magnified. 35 The zoom indication and the frame of the Zoom button ( ) to the Playback mode. 2. Movie images...
... select a photo to 2 ~ 8X. 1. Use the Zoom buttons to zoom in . 4. This allows you to magnify photos up to magnify. 3. Using Zoom Playback (for still pictures only) The zoom buttons can also be magnified. 35 The zoom indication and the frame of the Zoom button ( ) to the Playback mode. 2. Movie images...

User Manual (English (4.39 MB))
Page 39
Press the Down/Delete button and the delete screen appears. 4. To delete pictures or videos: 1. Press button to go to the Playback Mode. 2. Select a picture or video clip you can press the Down/Delete button to delete pictures or videos. Please refer to page 45 for confirmation. Erased photos/video clips cannot be recovered. Select Yes or Back with the Left/Right button. 3. Using the Delete Button In Playback Mode, you want to delete with Up/Down button and press the button for instructions on the Delete Menu options. 36
Press the Down/Delete button and the delete screen appears. 4. To delete pictures or videos: 1. Press button to go to the Playback Mode. 2. Select a picture or video clip you can press the Down/Delete button to delete pictures or videos. Please refer to page 45 for confirmation. Erased photos/video clips cannot be recovered. Select Yes or Back with the Left/Right button. 3. Using the Delete Button In Playback Mode, you want to delete with Up/Down button and press the button for instructions on the Delete Menu options. 36


