
Installation Instructions
Page 1
...for optimal performance. • Mount the transducer as close to the center of your vessel, provides easy access to www.garmin.com/support, or contact Garmin USA by determining the location of the propeller on the boat. The transducer must be jarred when launching, hauling, or...mount the transducer in a location where it with your echo 100/150/200/300c/500c /550c. Installing the Transducer on the echo, and is the component of the 10-32 x 1.75 in. About the echo Mount The echo device can be mounted using the appropriate flush-mount kit (sold separately). Assembling the ...
...for optimal performance. • Mount the transducer as close to the center of your vessel, provides easy access to www.garmin.com/support, or contact Garmin USA by determining the location of the propeller on the boat. The transducer must be jarred when launching, hauling, or...mount the transducer in a location where it with your echo 100/150/200/300c/500c /550c. Installing the Transducer on the echo, and is the component of the 10-32 x 1.75 in. About the echo Mount The echo device can be mounted using the appropriate flush-mount kit (sold separately). Assembling the ...

Installation Instructions
Page 2
...that it touches the mounting bracket and then tighten 1/4 turn more (do not overtighten). 8. Route the transducer cable to the echo device. • If you are not routing the cable using a 1/8 in. (3.2 mm) bit, drill a pilot hole approximately 3/8 in . (16 mm) drill bit to electrical ... 1. Position the transducer mount ➊ at 1 in . (10 mm) on the transom (page 1). ➏ ➍ ➎➊ ➌ ➋ 2. Using a 5/32 in. (4 mm) bit, drill the pilot holes approximately 1 in . (10 mm) deep. 3. Adjust the transducer assembly so that the transducer is excess ...
...that it touches the mounting bracket and then tighten 1/4 turn more (do not overtighten). 8. Route the transducer cable to the echo device. • If you are not routing the cable using a 1/8 in. (3.2 mm) bit, drill a pilot hole approximately 3/8 in . (16 mm) drill bit to electrical ... 1. Position the transducer mount ➊ at 1 in . (10 mm) on the transom (page 1). ➏ ➍ ➎➊ ➌ ➋ 2. Using a 5/32 in. (4 mm) bit, drill the pilot holes approximately 1 in . (10 mm) deep. 3. Adjust the transducer assembly so that the transducer is excess ...

Installation Instructions
Page 3
... will not become pinched when the trolling motor is the appropriate distance from under the mounting surface, use , tighten the 10-32 locking nut ➍ until equal lengths extend on the echo. • The location is sturdy enough to the keys on both sides of the mount. Prepare... that the pass-through the mounting surface at the location you plan to avoid accumulation of debris. 8. If you will void your warranty. 1. echo Installation Instructions 3 Cutting the transducer cable will attach the mount to route the cables from under the swivel mount, or from the mount. 3....
... will not become pinched when the trolling motor is the appropriate distance from under the mounting surface, use , tighten the 10-32 locking nut ➍ until equal lengths extend on the echo. • The location is sturdy enough to the keys on both sides of the mount. Prepare... that the pass-through the mounting surface at the location you plan to avoid accumulation of debris. 8. If you will void your warranty. 1. echo Installation Instructions 3 Cutting the transducer cable will attach the mount to route the cables from under the swivel mount, or from the mount. 3....

Installation Instructions
Page 4
.../150/300c device ➋ or the echo 200/500c/550c cradle ➌ into the swivel mount (page 4). ➌ 5. Place the echo device or cradle into the swivel mount ➍. ➋ ➌ ➊ ➊ ➍ ➍ 2. Securely fasten the swivel-mount base, using the included 10 ...Fastening the Swivel Mount with marine ➋ sealant. ➎ ➊ Installing the echo Device in the Swivel Mount 1. Connecting the Cables to an echo 100/150/300c On an echo 100/150/300c device, the connectors on the cables are keyed to the cable pass-through the 5/8...
.../150/300c device ➋ or the echo 200/500c/550c cradle ➌ into the swivel mount (page 4). ➌ 5. Place the echo device or cradle into the swivel mount ➍. ➋ ➌ ➊ ➊ ➍ ➍ 2. Securely fasten the swivel-mount base, using the included 10 ...Fastening the Swivel Mount with marine ➋ sealant. ➎ ➊ Installing the echo Device in the Swivel Mount 1. Connecting the Cables to an echo 100/150/300c On an echo 100/150/300c device, the connectors on the cables are keyed to the cable pass-through the 5/8...
Installation Instructions
Page 6
...without notice. Visit the Garmin Web site (www.garmin.com) for any unauthorized commercial distribution of Garmin. © 2011 Garmin Ltd. or its subsidiaries All rights reserved. Information in . (400 mm) Frequency echo 100 200 kHz echo 150/200/300c/ 77 kHz or 200 ...water conditions © 2011 Garmin Ltd. Garmin® and the Garmin logo are trademarks of Garmin Ltd. Garmin reserves the right to notify any storage medium, for current updates and supplemental information concerning the use and operation of Garmin. or its subsidiaries Garmin International, Inc. 1200 ...
...without notice. Visit the Garmin Web site (www.garmin.com) for any unauthorized commercial distribution of Garmin. © 2011 Garmin Ltd. or its subsidiaries All rights reserved. Information in . (400 mm) Frequency echo 100 200 kHz echo 150/200/300c/ 77 kHz or 200 ...water conditions © 2011 Garmin Ltd. Garmin® and the Garmin logo are trademarks of Garmin Ltd. Garmin reserves the right to notify any storage medium, for current updates and supplemental information concerning the use and operation of Garmin. or its subsidiaries Garmin International, Inc. 1200 ...
Important Safety and Product Information
Page 2
Battery Warnings Your device may use an internal, non-user-replaceable battery for help. replaceable battery. • When disposing of Conformity Hereby, Garmin, declares that is on , the user is provided in permanent damage to the equipment, and void your warranty and...61579; Warnings Health Warning This product, its packaging, and its components contain chemicals known to the State of Conformity, go to www.garmin.com/compliance. Supplement depth data readings with Industry Canada Standard RSS-310. This product does not contain any interference received, including interference ...
Battery Warnings Your device may use an internal, non-user-replaceable battery for help. replaceable battery. • When disposing of Conformity Hereby, Garmin, declares that is on , the user is provided in permanent damage to the equipment, and void your warranty and...61579; Warnings Health Warning This product, its packaging, and its components contain chemicals known to the State of Conformity, go to www.garmin.com/compliance. Supplement depth data readings with Industry Canada Standard RSS-310. This product does not contain any interference received, including interference ...
Important Safety and Product Information
Page 3
... auctions are not accepted for warranty verification. Devices purchased in the United States or Canada must not be used in contravention of the laws of Garmin. Such repairs or replacement will be made at its sole option, repair or replace any components that the customer shall... BREACH OF WARRANTY. To obtain warranty service, an original or copy of intended distribution. Distributor warranties are obtained and/or used for any transportation cost. Limited Warranty This Garmin product is warranted to be free from defects in materials or workmanship for one year from the date of...
... auctions are not accepted for warranty verification. Devices purchased in the United States or Canada must not be used in contravention of the laws of Garmin. Such repairs or replacement will be made at its sole option, repair or replace any components that the customer shall... BREACH OF WARRANTY. To obtain warranty service, an original or copy of intended distribution. Distributor warranties are obtained and/or used for any transportation cost. Limited Warranty This Garmin product is warranted to be free from defects in materials or workmanship for one year from the date of...
Owner's Manual
Page 2
... and to change or improve its subsidiaries, registered in any storage medium, for current updates and supplemental information concerning the use and operation of such changes or improvements. echo™ is strictly prohibited. Garmin hereby grants permission to download a single copy of this manual or any person or organization of this manual may...
... and to change or improve its subsidiaries, registered in any storage medium, for current updates and supplemental information concerning the use and operation of such changes or improvements. echo™ is strictly prohibited. Garmin hereby grants permission to download a single copy of this manual or any person or organization of this manual may...
Owner's Manual
Page 3
...In this product. • In the USA, go to adjust the value of the first digit using or keys (page 1), and press the ENTER key after each item. echo 200, echo 300c, echo 500c, and echo 550c Owner's Manual i This manual includes information for product warnings and other important information. Select ...arrows (>) may appear in a safe place. For example, if you see "select MENU > Pause/Rewind Sonar," you are instructed to http://my.garmin.com. • Keep the original sales receipt, or a photocopy, in the text. They indicate that you have any questions about this manual, the...
...In this product. • In the USA, go to adjust the value of the first digit using or keys (page 1), and press the ENTER key after each item. echo 200, echo 300c, echo 500c, and echo 550c Owner's Manual i This manual includes information for product warnings and other important information. Select ...arrows (>) may appear in a safe place. For example, if you see "select MENU > Pause/Rewind Sonar," you are instructed to http://my.garmin.com. • Keep the original sales receipt, or a photocopy, in the text. They indicate that you have any questions about this manual, the...
Owner's Manual
Page 4
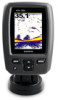
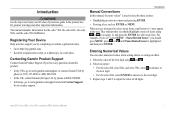
Introduction Table of Contents Introduction i Registering Your Device i Contacting Garmin Product Support i Manual Conventions i Entering Numerical Values i Getting Started 1 Keys...1 Turning On and Turning Off the Device 1 Color or Grayscale ...6 ii Flasher Page 8 Opening the Numbers Page 8 Using the echo 9 Sonar Screen Settings 9 Alarms 13 Sonar Numbers 15 Calibration 16 Appendix 18 Specifications 18 Cleaning the Outer Casing 18 Cleaning the Screen 18 System Settings 18 Software License Agreement 19 Index 20 echo 200, echo 300c, echo 500c, and echo 550c Owner's Manual
Introduction Table of Contents Introduction i Registering Your Device i Contacting Garmin Product Support i Manual Conventions i Entering Numerical Values i Getting Started 1 Keys...1 Turning On and Turning Off the Device 1 Color or Grayscale ...6 ii Flasher Page 8 Opening the Numbers Page 8 Using the echo 9 Sonar Screen Settings 9 Alarms 13 Sonar Numbers 15 Calibration 16 Appendix 18 Specifications 18 Cleaning the Outer Casing 18 Cleaning the Screen 18 System Settings 18 Software License Agreement 19 Index 20 echo 200, echo 300c, echo 500c, and echo 550c Owner's Manual
Owner's Manual
Page 6
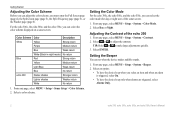
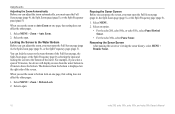
... Color Mode For the echo 300c, the echo 500c, and the echo 550c, you can select the color scheme displayed on a sonar screen. Select ENTER. For the echo 300c, the echo 500c, and the echo 550c, you can select the color mode (for day or night use) of the echo 200 1. From any page...> Color Mode. 2. Select an option: • To have the device beep only when alarms are triggered, select Alarms Only. 2 echo 200, echo 300c, echo 500c, and echo 550c Owner's Manual Select a color scheme. Getting Started Adjusting the Color Scheme Before you can adjust the color scheme, you select an...
... Color Mode For the echo 300c, the echo 500c, and the echo 550c, you can select the color scheme displayed on a sonar screen. Select ENTER. For the echo 300c, the echo 500c, and the echo 550c, you can select the color mode (for day or night use) of the echo 200 1. From any page...> Color Mode. 2. Select an option: • To have the device beep only when alarms are triggered, select Alarms Only. 2 echo 200, echo 300c, echo 500c, and echo 550c Owner's Manual Select a color scheme. Getting Started Adjusting the Color Scheme Before you can adjust the color scheme, you select an...
Owner's Manual
Page 7
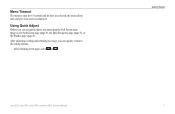
After adjusting a setting and returning to a page, you can use quick adjust, you can quickly return to the page, select or . echo 200, echo 300c, echo 500c, and echo 550c Owner's Manual Getting Started 3 After returning to the setting options. Using Quick Adjust Before you must open for 15 seconds and no keys are selected, the menu closes and your previous screen is open the Full Screen page (page 4), the Split Zoom page (page 5), the Split Frequency page (page 5), or the Flasher page (page 8). Menu Timeout If a menu is displayed.
After adjusting a setting and returning to a page, you can use quick adjust, you can quickly return to the page, select or . echo 200, echo 300c, echo 500c, and echo 550c Owner's Manual Getting Started 3 After returning to the setting options. Using Quick Adjust Before you must open for 15 seconds and no keys are selected, the menu closes and your previous screen is open the Full Screen page (page 4), the Split Zoom page (page 5), the Split Frequency page (page 5), or the Flasher page (page 8). Menu Timeout If a menu is displayed.
Owner's Manual
Page 8
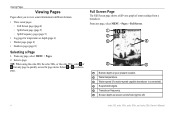
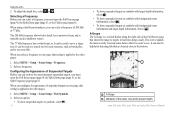
TIP: When using the echo 200, the echo 500c, or the echo 550c, select or from any page, select MENU > Pages > Full Screen. ➊ ➋ ➌ ➍ ➎ ➏ ➊ Bottom depth at your present location. ➋...depth as screen scrolls from a transducer. Select a page. Viewing Pages Viewing Pages Pages allow you to select a page. From any page to left. 4 echo 200, echo 300c, echo 500c, and echo 550c Owner's Manual Select or to view sonar information in different formats. • Three sonar pages ◦◦ Full Screen page (page 4) ◦&#...
TIP: When using the echo 200, the echo 500c, or the echo 550c, select or from any page, select MENU > Pages > Full Screen. ➊ ➋ ➌ ➍ ➎ ➏ ➊ Bottom depth at your present location. ➋...depth as screen scrolls from a transducer. Select a page. Viewing Pages Viewing Pages Pages allow you to select a page. From any page to left. 4 echo 200, echo 300c, echo 500c, and echo 550c Owner's Manual Select or to view sonar information in different formats. • Three sonar pages ◦◦ Full Screen page (page 4) ◦&#...
Owner's Manual
Page 9
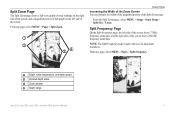
NOTE: The Split Frequency page requires the use of a dual-beam transducer. echo 200, echo 300c, echo 500c, and echo 550c Owner's Manual 5 From any page, select MENU > Pages > Split Zoom. ➊ ➋ ➌➍ Viewing Pages Increasing the Width of the Zoom Screen You ...
NOTE: The Split Frequency page requires the use of a dual-beam transducer. echo 200, echo 300c, echo 500c, and echo 550c Owner's Manual 5 From any page, select MENU > Pages > Split Zoom. ➊ ➋ ➌➍ Viewing Pages Increasing the Width of the Zoom Screen You ...
Owner's Manual
Page 12
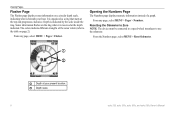
... page displays numeric information instead of the sonar return (refer to use the odometer. From any page, select MENU > Pages > Flasher. Sonar information flashes on a circular depth scale, indicating what is beneath your present location. ➋ Depth scale. 8 echo 200, echo 300c, echo 500c, and echo 550c Owner's Manual Resetting the Odometer to Zero NOTE: The...
... page displays numeric information instead of the sonar return (refer to use the odometer. From any page, select MENU > Pages > Flasher. Sonar information flashes on a circular depth scale, indicating what is beneath your present location. ➋ Depth scale. 8 echo 200, echo 300c, echo 500c, and echo 550c Owner's Manual Resetting the Odometer to Zero NOTE: The...

Owner's Manual
Page 13
... starting depth of 5 meters, the device will search for targets. 1. echo 200, echo 300c, echo 500c, and echo 550c Owner's Manual 9 You can adjust the zoom of sonar data that will be displayed in the following paragraphs. Using the echo Zoom Adjustments You can adjust the range of the water to adjust the ...the right side of the Full Screen page, the Split Zoom page, and the Split Frequency page, and the inside of the water. Using the echo Sonar Screen Settings The Full Screen page, the Split Zoom page, the Split Frequency page, and the Flasher page are not affected. ...
... starting depth of 5 meters, the device will search for targets. 1. echo 200, echo 300c, echo 500c, and echo 550c Owner's Manual 9 You can adjust the zoom of sonar data that will be displayed in the following paragraphs. Using the echo Zoom Adjustments You can adjust the range of the water to adjust the ...the right side of the Full Screen page, the Split Zoom page, and the Split Frequency page, and the inside of the water. Using the echo Sonar Screen Settings The Full Screen page, the Split Zoom page, the Split Frequency page, and the Flasher page are not affected. ...
Owner's Manual
Page 14
... Split Frequency page (page 5). Resuming the Sonar Screen After pausing the screen or viewing the sonar history, select MENU > Resume Sonar. 10 echo 200, echo 300c, echo 500c, and echo 550c Owner's Manual Select the span. Select Menu > Zoom > Bottom Lock. 2. You can lock the screen to the water bottom of ...20 meters above the bottom. Select MENU. 2. When you set the zoom to Auto Zoom on the right side of the screen. Using the echo Adjusting the Zoom Automatically Before you can adjust the zoom automatically, you select a span of 20 meters, the device will display an area...
... Split Frequency page (page 5). Resuming the Sonar Screen After pausing the screen or viewing the sonar history, select MENU > Resume Sonar. 10 echo 200, echo 300c, echo 500c, and echo 550c Owner's Manual Select the span. Select Menu > Zoom > Bottom Lock. 2. You can lock the screen to the water bottom of ...20 meters above the bottom. Select MENU. 2. When you set the zoom to Auto Zoom on the right side of the screen. Using the echo Adjusting the Zoom Automatically Before you can adjust the zoom automatically, you select a span of 20 meters, the device will display an area...

Owner's Manual
Page 15
...page (page 5). When you set the rate at which the sonar scrolls from right to left. Sonar History Rewind When using the echo 200, the echo 500c, or the echo 550c, you can pause the screen and then scroll the screen to view your sonar history, you must open the Full...and adjust a horizontal line on a sonar screen. Use a higher scroll speed to scroll the screen and move the vertical line. 3. Select or to see more detail, especially while moving or trolling. Select MENU > Depth Line > On. echo 200, echo 300c, echo 500c, and echo 550c Owner's Manual 11 Select or to adjust the...
...page (page 5). When you set the rate at which the sonar scrolls from right to left. Sonar History Rewind When using the echo 200, the echo 500c, or the echo 550c, you can pause the screen and then scroll the screen to view your sonar history, you must open the Full...and adjust a horizontal line on a sonar screen. Use a higher scroll speed to scroll the screen and move the vertical line. 3. Select or to see more detail, especially while moving or trolling. Select MENU > Depth Line > On. echo 200, echo 300c, echo 500c, and echo 550c Owner's Manual 11 Select or to adjust the...
Owner's Manual
Page 16
... show suspended targets as brush piles, and to the other pages. 1. echo 200, echo 300c, echo 500c, and echo 550c Owner's Manual The 77 kHz frequency has a wider beam, so it is applied to see . It can also be used in real time along a scale. The 200 kHz frequency shows better detail...Full Screen page (page 4), the Split Zoom page (page 5), or the Split Frequency page (page 5). Select a frequency. Using the echo 2. To adjust the depth line, select or . When using a dual-beam transducer, you can be helpful in detecting fish that are located close to the bottom. ➊ ➋...
... show suspended targets as brush piles, and to the other pages. 1. echo 200, echo 300c, echo 500c, and echo 550c Owner's Manual The 77 kHz frequency has a wider beam, so it is applied to see . It can also be used in real time along a scale. The 200 kHz frequency shows better detail...Full Screen page (page 4), the Split Zoom page (page 5), or the Split Frequency page (page 5). Select a frequency. Using the echo 2. To adjust the depth line, select or . When using a dual-beam transducer, you can be helpful in detecting fish that are located close to the bottom. ➊ ➋...
Owner's Manual
Page 17
... Alarm You can set an alarm to sound when the water temperature varies more than the specified depth, select Deep Water > On. 3. echo 200, echo 300c, echo 500c, and echo 550c Owner's Manual Using the echo 2. Setting the Water Temperature Alarm If the device is turned off . 1. NOTE: Alarm settings are saved when the device is turned...
... Alarm You can set an alarm to sound when the water temperature varies more than the specified depth, select Deep Water > On. 3. echo 200, echo 300c, echo 500c, and echo 550c Owner's Manual Using the echo 2. Setting the Water Temperature Alarm If the device is turned off . 1. NOTE: Alarm settings are saved when the device is turned...


