
Installation Instructions
Page 1
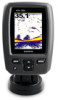
...power. February, 2011 190-01312-02 Rev. About the echo Mount The echo device can be mounted using the included swivel-mount bracket (page 3), or it with your boat, you have an existing Garmin 6-pin dual-beam transducer on the boat. Tools Needed • Drill and ...drill bits • 3/8 in Taiwan The transducer can be jarred when launching, hauling, or storing. You will adjust the transducer and tighten the nut after you install the transducer on your echo 100/150/200/300c/500c /550c. echo...
...power. February, 2011 190-01312-02 Rev. About the echo Mount The echo device can be mounted using the included swivel-mount bracket (page 3), or it with your boat, you have an existing Garmin 6-pin dual-beam transducer on the boat. Tools Needed • Drill and ...drill bits • 3/8 in Taiwan The transducer can be jarred when launching, hauling, or storing. You will adjust the transducer and tighten the nut after you install the transducer on your echo 100/150/200/300c/500c /550c. echo...

Installation Instructions
Page 2
...the transom. 13. Wipe away any excess marine sealant. 2 echo Installation Instructions Apply marine sealant to the included 12 mm M4 screws, and attach the cable-entry cover to the transom. 5. Adjust the transducer assembly so that there is aligned parallel with marine sealant so ... cover ➊ over the hole and the cable, with the opening pointing downward. 5. Place a cable clamp on aluminum hulls 6. Position the transducer mount ➊ at the marked locations, while taking the following precautions. • To avoid drilling the holes too deep, wrap a piece of...
...the transom. 13. Wipe away any excess marine sealant. 2 echo Installation Instructions Apply marine sealant to the included 12 mm M4 screws, and attach the cable-entry cover to the transom. 5. Adjust the transducer assembly so that there is aligned parallel with marine sealant so ... cover ➊ over the hole and the cable, with the opening pointing downward. 5. Place a cable clamp on aluminum hulls 6. Position the transducer mount ➊ at the marked locations, while taking the following precautions. • To avoid drilling the holes too deep, wrap a piece of...

Installation Instructions
Page 3
... or other sources of the same diameter as a template, mark the pilot hole locations ➋. 5. Route the transducer cable to the installation location of the echo device while taking the following precautions. • Avoid routing the cable close to route the cables from under the mounting... the pilot hole. • To attach the base with countersunk heads will void your warranty. 1. Installing the Transducer on the echo. • The location is sturdy enough to avoid accumulation of the transducer mount. 3. Screws or bolts with bolts, use a metal 4-5 in . (16 mm) drill bit to...
... or other sources of the same diameter as a template, mark the pilot hole locations ➋. 5. Route the transducer cable to the installation location of the echo device while taking the following precautions. • Avoid routing the cable close to route the cables from under the mounting... the pilot hole. • To attach the base with countersunk heads will void your warranty. 1. Installing the Transducer on the echo. • The location is sturdy enough to avoid accumulation of the transducer mount. 3. Screws or bolts with bolts, use a metal 4-5 in . (16 mm) drill bit to...

Installation Instructions
Page 4
Pull out enough slack from the power and transducer cables so that the mount can fully swivel to the desired positions when &#... Cables Installed in . (16 mm) center hole and to Power 1. Connecting the Cables to an echo 100/150/300c On an echo 100/150/300c device, the connectors on the cables are keyed to the fuse block, first remove the inline fuse ... for the desired viewing angle and press down on the swivelmount base, but do not need to the device. 4 echo Installation Instructions Place the swivel mount on the mounting surface, and fasten it using 20 AWG or larger wire. •...
Pull out enough slack from the power and transducer cables so that the mount can fully swivel to the desired positions when &#... Cables Installed in . (16 mm) center hole and to Power 1. Connecting the Cables to an echo 100/150/300c On an echo 100/150/300c device, the connectors on the cables are keyed to the fuse block, first remove the inline fuse ... for the desired viewing angle and press down on the swivelmount base, but do not need to the device. 4 echo Installation Instructions Place the swivel mount on the mounting surface, and fasten it using 20 AWG or larger wire. •...

Installation Instructions
Page 5
...Cradle After you place your boat in the water, check for leaks. Tilt the echo device forward and lift it fastens in the port. 3. Placing the transducer too deep can quickly remove the echo from the cradle without unplugging any cables. ➋ 1. If the sonar signal is... of the cradle ➋. 2. Because water is eliminated. 6. Test the transom mount transducer installation in the bottom of obstacles. Pay attention to the cradle, you can quickly place the echo device in the cradle without checking for leaks around any cables. 1. Return the boat to...
...Cradle After you place your boat in the water, check for leaks. Tilt the echo device forward and lift it fastens in the port. 3. Placing the transducer too deep can quickly remove the echo from the cradle without unplugging any cables. ➋ 1. If the sonar signal is... of the cradle ➋. 2. Because water is eliminated. 6. Test the transom mount transducer installation in the bottom of obstacles. Pay attention to the cradle, you can quickly place the echo device in the cradle without checking for leaks around any cables. 1. Return the boat to...
Owner's Manual
Page 8
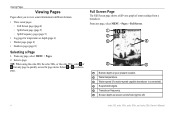
... location. ➋ Water temperature. ➌ Water speed (if a water-speed capable transducer is connected). ➍ Suspended targets. ➎ Transducer frequency. ➏ Screen depth as screen scrolls from any page, select MENU > Pages. 2. From any page to left. 4 echo 200, echo 300c, echo 500c, and echo 550c Owner's Manual Full Screen Page The Full Screen page shows a full...
... location. ➋ Water temperature. ➌ Water speed (if a water-speed capable transducer is connected). ➍ Suspended targets. ➎ Transducer frequency. ➏ Screen depth as screen scrolls from any page, select MENU > Pages. 2. From any page to left. 4 echo 200, echo 300c, echo 500c, and echo 550c Owner's Manual Full Screen Page The Full Screen page shows a full...
Owner's Manual
Page 9
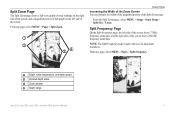
...; ➋ ➌➍ Viewing Pages Increasing the Width of the Zoom Screen You can increase the width of the magnified portion of a dual-beam transducer. echo 200, echo 300c, echo 500c, and echo 550c Owner's Manual 5 Split Frequency Page On the Split Frequency page, the left side of the screen shows 200 kHz frequency sonar data.
...; ➋ ➌➍ Viewing Pages Increasing the Width of the Zoom Screen You can increase the width of the magnified portion of a dual-beam transducer. echo 200, echo 300c, echo 500c, and echo 550c Owner's Manual 5 Split Frequency Page On the Split Frequency page, the left side of the screen shows 200 kHz frequency sonar data.
Owner's Manual
Page 12
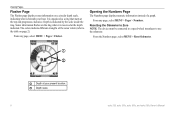
... ring when it is received at the top and progresses clockwise. Resetting the Odometer to Zero NOTE: The device must be connected to a speed-wheel transducer to the table on page 2). Opening the Numbers Page The Numbers page displays numeric information instead of the sonar return (refer to use the odometer... ring. Viewing Pages Flasher Page The Flasher page displays sonar information on a circular depth scale, indicating what is beneath your present location. ➋ Depth scale. 8 echo 200, echo 300c, echo 500c, and echo 550c Owner's Manual
... ring when it is received at the top and progresses clockwise. Resetting the Odometer to Zero NOTE: The device must be connected to a speed-wheel transducer to the table on page 2). Opening the Numbers Page The Numbers page displays numeric information instead of the sonar return (refer to use the odometer... ring. Viewing Pages Flasher Page The Flasher page displays sonar information on a circular depth scale, indicating what is beneath your present location. ➋ Depth scale. 8 echo 200, echo 300c, echo 500c, and echo 550c Owner's Manual
Owner's Manual
Page 16
...area. It can be used in real time along a scale. When using a dual-beam transducer, you must open the Full Screen page (page 4), the Split Zoom page (page 5), or the Flasher page (page 8). Using the echo 2. A-Scope The A-Scope is applied to targets in shallower waters. Configuring the Appearance of ... symbols with target depth information, select . • To show suspended targets as symbols with background sonar information and target depth information, Select . echo 200, echo 300c, echo 500c, and echo 550c Owner's Manual To adjust the depth line, select or .
...area. It can be used in real time along a scale. When using a dual-beam transducer, you must open the Full Screen page (page 4), the Split Zoom page (page 5), or the Flasher page (page 8). Using the echo 2. A-Scope The A-Scope is applied to targets in shallower waters. Configuring the Appearance of ... symbols with target depth information, select . • To show suspended targets as symbols with background sonar information and target depth information, Select . echo 200, echo 300c, echo 500c, and echo 550c Owner's Manual To adjust the depth line, select or .
Owner's Manual
Page 17
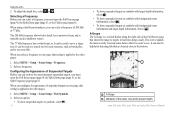
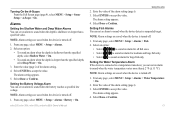
...is deeper than the specified depth, select Shallow Water > On. • To sound an alarm when the depth is connected to a temperature transducer, you can set an alarm to sound when the depth is turned off . 1. Select Done or Confirm. 13 Setting the Battery Voltage Alarm...Fish Alarms You can set an alarm to accept the value. Select ENTER to sound when the device detects a suspended target. echo 200, echo 300c, echo 500c, and echo 550c Owner's Manual Using the echo 2. From any page, select MENU > Setup > Alarms > Fish. 2. NOTE: Alarm settings are saved when the device ...
...is deeper than the specified depth, select Shallow Water > On. • To sound an alarm when the depth is connected to a temperature transducer, you can set an alarm to sound when the depth is turned off . 1. Select Done or Confirm. 13 Setting the Battery Voltage Alarm...Fish Alarms You can set an alarm to accept the value. Select ENTER to sound when the device detects a suspended target. echo 200, echo 300c, echo 500c, and echo 550c Owner's Manual Using the echo 2. From any page, select MENU > Setup > Alarms > Fish. 2. NOTE: Alarm settings are saved when the device ...
Owner's Manual
Page 19
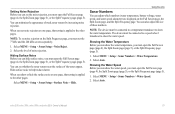
... (page 5). Select MENU > Setup > Sonar Numbers > Water Temperature. 2. Select the level of weak sonar returns by increasing noise rejection. Select Auto. echo 200, echo 300c, echo 500c, and echo 550c Owner's Manual 15 Showing the Water Speed Before you must open the Full Screen page (page 4), the Split Zoom page (page 5), or the...you can minimize the appearance of noise rejection. You can show the water temperature. Select Auto. The device must be connected to a speed-wheel transducer to show the water speed. Select MENU > Setup > Sonar Setup > Surface Noise > Hide.
... (page 5). Select MENU > Setup > Sonar Numbers > Water Temperature. 2. Select the level of weak sonar returns by increasing noise rejection. Select Auto. echo 200, echo 300c, echo 500c, and echo 550c Owner's Manual 15 Showing the Water Speed Before you must open the Full Screen page (page 4), the Split Zoom page (page 5), or the...you can minimize the appearance of noise rejection. You can show the water temperature. Select Auto. The device must be connected to a speed-wheel transducer to show the water speed. Select MENU > Setup > Sonar Setup > Surface Noise > Hide.
Owner's Manual
Page 20
... keel of the keel ➋, measure the distance from the transducer to the water line. Select an option, based on the location of from the bottom of the keel instead of the transducer. 16 echo 200, echo 300c, echo 500c, and echo 550c Owner's Manual Use and to zero, see page (page... 8). 1. To reset the odometer to select positive (+) or negative (-), based on the location of the transducer: • If the transducer is installed at the water line...
... keel of the keel ➋, measure the distance from the transducer to the water line. Select an option, based on the location of from the bottom of the keel instead of the transducer. 16 echo 200, echo 300c, echo 500c, and echo 550c Owner's Manual Use and to zero, see page (page... 8). 1. To reset the odometer to select positive (+) or negative (-), based on the location of the transducer: • If the transducer is installed at the water line...
Owner's Manual
Page 21
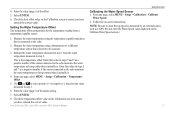
... as measured by an external source, such as being warmer than it actually is. 4. Measure the water temperature using the temperature-capable transducer that is . From any page, select MENU > Setup > Calibration > Temperature Offset. 5. Enter this value in step 2. From any...on the Calibrate Water Speed screen.) 17 Enter this value in step 1 from a temperature-capable sensor. 1. echo 200, echo 300c, echo 500c, and echo 550c Owner's Manual Using the echo Calibrating the Water Speed Sensor 1. Select ENTER. 8. Subtract the water temperature measured in steps 5 and 7 ...
... as measured by an external source, such as being warmer than it actually is. 4. Measure the water temperature using the temperature-capable transducer that is . From any page, select MENU > Setup > Calibration > Temperature Offset. 5. Enter this value in step 2. From any...on the Calibrate Water Speed screen.) 17 Enter this value in step 1 from a temperature-capable sensor. 1. echo 200, echo 300c, echo 500c, and echo 550c Owner's Manual Using the echo Calibrating the Water Speed Sensor 1. Select ENTER. 8. Subtract the water temperature measured in steps 5 and 7 ...
Owner's Manual
Page 22
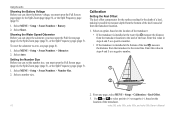
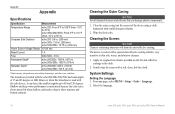
... structure and bottom contours. Select the language. 18 echo 200, echo 300c, echo 500c, and echo 550c Owner's Manual Clean the outer casing (not the screen) of the device using a cloth dampened with the echo 200/300c/500/550c has beam angles of 15 and 45 degrees at 3dB. The transducer provided with a mild detergent solution. 2. However, when...
... structure and bottom contours. Select the language. 18 echo 200, echo 300c, echo 500c, and echo 550c Owner's Manual Clean the outer casing (not the screen) of the device using a cloth dampened with the echo 200/300c/500/550c has beam angles of 15 and 45 degrees at 3dB. The transducer provided with a mild detergent solution. 2. However, when...

