
Installation Instructions
Page 1
... UK, contact Garmin (Europe) Ltd. wrench or socket • Masking tape • Number 2 Phillips screwdriver • Marine sealant • Hardware for optimal performance. • Do not mount the transducer in . If you already have any questions while using the included swivel-mount bracket (page 3), or it with your echo 100/150/200/300c/500c...
... UK, contact Garmin (Europe) Ltd. wrench or socket • Masking tape • Number 2 Phillips screwdriver • Marine sealant • Hardware for optimal performance. • Do not mount the transducer in . If you already have any questions while using the included swivel-mount bracket (page 3), or it with your echo 100/150/200/300c/500c...

Installation Instructions
Page 2
.... 3. Place the cable-entry cover ➊ over the hole and the cable, with marine sealant so that it . 9. Wipe away any excess marine sealant. 2 echo Installation Instructions Use a 5/8 in . (10 mm) deep. 3. Place a cable clamp on the transom (page 1). ➏ ➍ ➎➊ ➌ ➋ 2. Place...-through hole. 11. Mark the pilot-hole location for the cable clamp, and, using a 1/8 in. (3.2 mm) bit, drill the pilot holes approximately 3/8 in . (16 mm) drill bit to the echo device. • If you would like to reduce cracking of the two pilot holes. 2. ...
.... 3. Place the cable-entry cover ➊ over the hole and the cable, with marine sealant so that it . 9. Wipe away any excess marine sealant. 2 echo Installation Instructions Use a 5/8 in . (10 mm) deep. 3. Place a cable clamp on the transom (page 1). ➏ ➍ ➎➊ ➌ ➋ 2. Place...-through hole. 11. Mark the pilot-hole location for the cable clamp, and, using a 1/8 in. (3.2 mm) bit, drill the pilot holes approximately 3/8 in . (16 mm) drill bit to the echo device. • If you would like to reduce cracking of the two pilot holes. 2. ...

Installation Instructions
Page 3
...body of the cable tie. ➎ ➊ ➌ ➋ ➍ 2. Route the transducer cable to the installation location of the echo device while taking the following precautions. • Avoid routing the cable close to route the cables from ➋ under the swivel mount, or from..., and tighten 1/4 turn more (do not fully tighten the cable tie. 5. Installing the Swivel Mount 1. echo Installation Instructions 3 Preparing the Swivel-Mount Base Installation Notice Use pan-head screws or bolts when securing the swivel-mount base. If you plan to support the device and ...
...body of the cable tie. ➎ ➊ ➌ ➋ ➍ 2. Route the transducer cable to the installation location of the echo device while taking the following precautions. • Avoid routing the cable close to route the cables from ➋ under the swivel mount, or from..., and tighten 1/4 turn more (do not fully tighten the cable tie. 5. Installing the Swivel Mount 1. echo Installation Instructions 3 Preparing the Swivel-Mount Base Installation Notice Use pan-head screws or bolts when securing the swivel-mount base. If you plan to support the device and ...

Installation Instructions
Page 4
... and Connectors Wiring to the desired positions when ➋ the cables are connected. 6. Connecting the Cables to an echo 100/150/300c On an echo 100/150/300c device, the connectors on the cables are connected to the negative terminal. Repeat steps 1 and 2 until the...echo 100/150/300c device ➋ or the echo 200/500c/550c cradle ➌ into the swivel mount ➍. ➋ ➌ ➊ ➊ ➍ ➍ 2. Route the power cable from the swivel-mount base. 7. With the locking arm ➊ in . (16 mm) center hole you do not fasten it using...
... and Connectors Wiring to the desired positions when ➋ the cables are connected. 6. Connecting the Cables to an echo 100/150/300c On an echo 100/150/300c device, the connectors on the cables are connected to the negative terminal. Repeat steps 1 and 2 until the...echo 100/150/300c device ➋ or the echo 200/500c/550c cradle ➌ into the swivel mount ➍. ➋ ➌ ➊ ➊ ➍ ➍ 2. Route the power cable from the swivel-mount base. 7. With the locking arm ➊ in . (16 mm) center hole you do not fasten it using...
Installation Instructions
Page 6
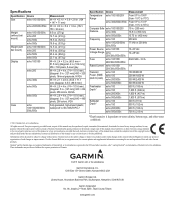
...;, and myGarmin™ are registered trademarks of Garmin Ltd. or its products and to notify any revision hereto is dependent on water salinity, bottom type, and other electronic storage medium to be used without obligation to make changes in . (400 mm) Frequency echo 100 200 kHz echo 150/200/300c/ 77 kHz or 200 kHz...
...;, and myGarmin™ are registered trademarks of Garmin Ltd. or its products and to notify any revision hereto is dependent on water salinity, bottom type, and other electronic storage medium to be used without obligation to make changes in . (400 mm) Frequency echo 100 200 kHz echo 150/200/300c/ 77 kHz or 200 kHz...
Owner's Manual
Page 2
... the use and operation of such changes or improvements. or its products and to make changes in any person or organization of this and other electronic storage medium to be reproduced, copied, transmitted, disseminated, downloaded or stored in the content without obligation to change without the express permission of Garmin Ltd. echo™...
... the use and operation of such changes or improvements. or its products and to make changes in any person or organization of this and other electronic storage medium to be reproduced, copied, transmitted, disseminated, downloaded or stored in the content without obligation to change without the express permission of Garmin Ltd. echo™...
Owner's Manual
Page 3
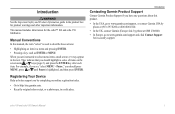
...) Ltd. When you should press MENU, press or until Pause is used to http://my.garmin.com. • Keep the original sales receipt, or a photocopy, in a menu and pressing ENTER. • Pressing a key, such as ENTER or MENU. echo 100 and echo 150 Owner's Manual 1 Manual Conventions In this product. • In the USA, go...
...) Ltd. When you should press MENU, press or until Pause is used to http://my.garmin.com. • Keep the original sales receipt, or a photocopy, in a menu and pressing ENTER. • Pressing a key, such as ENTER or MENU. echo 100 and echo 150 Owner's Manual 1 Manual Conventions In this product. • In the USA, go...
Owner's Manual
Page 4
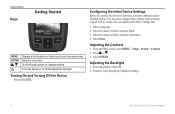
...menu item. Configuring the Initial Device Settings Before you can update each of these settings when restoring original factory settings. You can use the device the first time, you to cycle through options or changes settings. Select ENTER. Turning On and Turning Off the ... Displays a list of options or returns you must also configure these settings later. 1. Scrolls through the brightness settings. 2 echo 100 and echo 150 Owner's Manual Select Done. Adjusting the Contrast 1. Select or . 3. Repeat to your previous screen. You must configure a series of initial settings...
...menu item. Configuring the Initial Device Settings Before you can update each of these settings when restoring original factory settings. You can use the device the first time, you to cycle through options or changes settings. Select ENTER. Turning On and Turning Off the ... Displays a list of options or returns you must also configure these settings later. 1. Scrolls through the brightness settings. 2 echo 100 and echo 150 Owner's Manual Select Done. Adjusting the Contrast 1. Select or . 3. Repeat to your previous screen. You must configure a series of initial settings...
Owner's Manual
Page 5
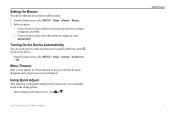
... turn on when power is applied. Using Quick Adjust After adjusting a setting and returning to turn on the device. From the Sonar screen, select MENU > Setup > Alarms > Beeper. 2. Otherwise, press to the Sonar screen, you select an item and when an alarm is displayed. echo 100 and echo 150 Owner's Manual Getting Started 3 Select...
... turn on when power is applied. Using Quick Adjust After adjusting a setting and returning to turn on the device. From the Sonar screen, select MENU > Setup > Alarms > Beeper. 2. Otherwise, press to the Sonar screen, you select an item and when an alarm is displayed. echo 100 and echo 150 Owner's Manual Getting Started 3 Select...
Owner's Manual
Page 6
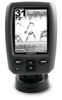
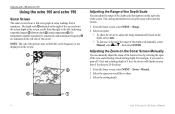
Using the echo 100 and echo 150 Using the echo 100 and echo 150 Sonar Screen The sonar screen shows a full-... feet, the device will search for returns. 1. From the Sonar screen, select MENU > Range. 2. Note: The echo 100 operates only at 200 kHz, so the frequency is connected), and transducer frequency ➎ are indicated on the depth... ➋. Select the span you select a span of 15 feet and a starting depth. ➎ ➊ 4 echo 100 and echo 150 Owner's Manual This setting determines how deep the sonar will display an area from a transducer. From the Sonar screen, ...
Using the echo 100 and echo 150 Using the echo 100 and echo 150 Sonar Screen The sonar screen shows a full-... feet, the device will search for returns. 1. From the Sonar screen, select MENU > Range. 2. Note: The echo 100 operates only at 200 kHz, so the frequency is connected), and transducer frequency ➎ are indicated on the depth... ➋. Select the span you select a span of 15 feet and a starting depth. ➎ ➊ 4 echo 100 and echo 150 Owner's Manual This setting determines how deep the sonar will display an area from a transducer. From the Sonar screen, ...

Owner's Manual
Page 7
... the screen is shallower or deeper than the specified depth, select Deep > On. 3. From the Sonar screen, select Menu > Gain > Manual. 2. echo 100 and echo 150 Owner's Manual Using the echo 100 and echo 150 Setting the Gain to compensate for water depth and water clarity. Select the depth that triggers the alarm. Setting the Gain Manually...
... the screen is shallower or deeper than the specified depth, select Deep > On. 3. From the Sonar screen, select Menu > Gain > Manual. 2. echo 100 and echo 150 Owner's Manual Using the echo 100 and echo 150 Setting the Gain to compensate for water depth and water clarity. Select the depth that triggers the alarm. Setting the Gain Manually...

Owner's Manual
Page 8
... sound when the battery reaches a specified low voltage. 1. Configuring the Appearance of Suspended Targets You can select a frequency for the echo 150 When using a dual frequency transducer. From the Sonar screen, select MENU > Setup > Sonar > Fish ID. 2. From the Sonar screen, select MENU > Setup > Sonar > Scroll.... scroll speed to left. The 77 kHz frequency penetrates deep water more detail, especially while moving or trolling. Using the echo 100 and echo 150 Setting the Battery Voltage Alarm You can set an alarm to cover a larger area. 1. Setting Fish Alarms You can show ...
... sound when the battery reaches a specified low voltage. 1. Configuring the Appearance of Suspended Targets You can select a frequency for the echo 150 When using a dual frequency transducer. From the Sonar screen, select MENU > Setup > Sonar > Fish ID. 2. From the Sonar screen, select MENU > Setup > Sonar > Scroll.... scroll speed to left. The 77 kHz frequency penetrates deep water more detail, especially while moving or trolling. Using the echo 100 and echo 150 Setting the Battery Voltage Alarm You can set an alarm to cover a larger area. 1. Setting Fish Alarms You can show ...
Owner's Manual
Page 9
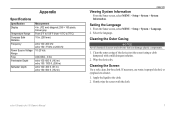
...the Outer Casing Notice Avoid chemical cleaners and solvents that can damage plastic components. 1. echo 100 and echo 150 Owner's Manual 7 Appendix Specifications Specification Display Temperature Range Compass Safe Distance Frequency Power Source... Voltage Range Fuse Freshwater Depth Saltwater Depth Measurement 4 in. (102 mm) diagonal, 256 × 160 pixels, 8-level gray From 5°F to 158°F (from -15°C to the cloth. 2. Cleaning the Screen Use...
...the Outer Casing Notice Avoid chemical cleaners and solvents that can damage plastic components. 1. echo 100 and echo 150 Owner's Manual 7 Appendix Specifications Specification Display Temperature Range Compass Safe Distance Frequency Power Source... Voltage Range Fuse Freshwater Depth Saltwater Depth Measurement 4 in. (102 mm) diagonal, 256 × 160 pixels, 8-level gray From 5°F to 158°F (from -15°C to the cloth. 2. Cleaning the Screen Use...
Owner's Manual
Page 10
... USING THE ECHO 100 OR ECHO 150, YOU AGREE TO BE BOUND BY THE TERMS AND CONDITIONS OF THE FOLLOWING SOFTWARE LICENSE AGREEMENT. You further acknowledge that the structure, organization, and code of the Software, for which source code is not provided, are valuable trade secrets of Garmin ... the Software in and to human readable form the Software or any part thereof or create any other applicable country. 8 echo 100 and echo 150 Owner's Manual Garmin Ltd. Title, ownership rights, and intellectual property rights in source code form remains a valuable trade secret of any derivative ...
... USING THE ECHO 100 OR ECHO 150, YOU AGREE TO BE BOUND BY THE TERMS AND CONDITIONS OF THE FOLLOWING SOFTWARE LICENSE AGREEMENT. You further acknowledge that the structure, organization, and code of the Software, for which source code is not provided, are valuable trade secrets of Garmin ... the Software in and to human readable form the Software or any part thereof or create any other applicable country. 8 echo 100 and echo 150 Owner's Manual Garmin Ltd. Title, ownership rights, and intellectual property rights in source code form remains a valuable trade secret of any derivative ...


