
Installation Instructions
Page 1
.../support and click Contact Support for optimal performance. • Do not mount the transducer in the path of the 10-32 x 1.75 in a location where it with your echo device. In the UK, contact Garmin (Europe) Ltd. by phone at the same time. Verify that the cables are long ...) water for in-country support information, or contact Garmin (Europe) Ltd. Installing the Transducer on your vessel, provides easy access to the keys on the 10-32 x 1.75 in Taiwan The transducer can cause cavitation that can be mounted using your echo 100/150/200/300c/500c /550c. Do not add any...
.../support and click Contact Support for optimal performance. • Do not mount the transducer in the path of the 10-32 x 1.75 in a location where it with your echo device. In the UK, contact Garmin (Europe) Ltd. by phone at the same time. Verify that the cables are long ...) water for in-country support information, or contact Garmin (Europe) Ltd. Installing the Transducer on your vessel, provides easy access to the keys on the 10-32 x 1.75 in Taiwan The transducer can cause cavitation that can be mounted using your echo 100/150/200/300c/500c /550c. Do not add any...

Installation Instructions
Page 2
... to reduce cracking of tape over the hole and the cable, with the opening pointing downward. 5. If you installed the transducer, install the cable entry cover to the echo device. • If you are not routing the cable using the other sources of each hole on fiberglass hulls or 3/8 in step 8, and...
... to reduce cracking of tape over the hole and the cable, with the opening pointing downward. 5. If you installed the transducer, install the cable entry cover to the echo device. • If you are not routing the cable using the other sources of each hole on fiberglass hulls or 3/8 in step 8, and...

Installation Instructions
Page 3
... mount gasket ➌ on a Trolling Motor Notice Do not cut the transducer cable. If necessary, trim the excess cable tie. 6. Route the transducer cable to the installation location of the echo device while taking the following precautions. • Avoid routing the cable close... 20 in the mount (page 4). Position the transducer so that the pass-through the slot on the transducer mount ➋, with countersunk heads will void your warranty. 1. echo Installation Instructions 3 Installing the Transducer on the curved top of the transducer mount. 3. Separate the swivel base from the ...
... mount gasket ➌ on a Trolling Motor Notice Do not cut the transducer cable. If necessary, trim the excess cable tie. 6. Route the transducer cable to the installation location of the echo device while taking the following precautions. • Avoid routing the cable close... 20 in the mount (page 4). Position the transducer so that the pass-through the slot on the transducer mount ➋, with countersunk heads will void your warranty. 1. echo Installation Instructions 3 Installing the Transducer on the curved top of the transducer mount. 3. Separate the swivel base from the ...

Installation Instructions
Page 4
Pull out enough slack from the power and transducer cables so that the mount can fully swivel to the desired positions when ➋ the cables are connected to the device. 4 echo Installation Instructions Place the swivel mount on the mounting surface, and fasten it using the included ...fasten it using the appropriate screws or bolts ➋. 3. With the locking arm ➊ in the upward position, place the echo 100/150/300c device ➋ or the echo 200/500c/550c cradle ➌ into the swivel mount (page 4). ➌ 5. Push the cable connector into the correct port ...
Pull out enough slack from the power and transducer cables so that the mount can fully swivel to the desired positions when ➋ the cables are connected to the device. 4 echo Installation Instructions Place the swivel mount on the mounting surface, and fasten it using the included ...fasten it using the appropriate screws or bolts ➋. 3. With the locking arm ➊ in the upward position, place the echo 100/150/300c device ➋ or the echo 200/500c/550c cradle ➌ into the swivel mount (page 4). ➌ 5. Push the cable connector into the correct port ...

Installation Instructions
Page 5
...leave your boat in place by a locking bracket. When you place your surroundings as you test the transducer. 1. Pay attention to your boat in the water, turn on the echo device. 2. With the boat in the water, check for leaks around any screw holes that it extends... hear an audible click when the locking bracket is necessary to carry the sonar signal, the transducer must be working properly, gradually increase speed while observing the echo device. Placing the transducer too deep can adversely affect the performance of striking underwater objects. Connecting the Cables to an...
...leave your boat in place by a locking bracket. When you place your surroundings as you test the transducer. 1. Pay attention to your boat in the water, turn on the echo device. 2. With the boat in the water, check for leaks around any screw holes that it extends... hear an audible click when the locking bracket is necessary to carry the sonar signal, the transducer must be working properly, gradually increase speed while observing the echo device. Placing the transducer too deep can adversely affect the performance of striking underwater objects. Connecting the Cables to an...
Owner's Manual
Page 6
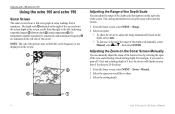
... Range. 2. Select the span you select a span of 15 feet and a starting depth of the screen. Using the echo 100 and echo 150 Using the echo 100 and echo 150 Sonar Screen The sonar screen shows a full-view graph of the depth scale manually, select Manual, select or , then select... on the right side of the view and selecting a fixed starting depth. ➎ ➊ 4 echo 100 and echo 150 Owner's Manual Bottom depth ➌, water temperature ➍ (if a temperature-capable transducer is not displayed on the screen. ➌ ➍ ➋ Adjusting the Range of the Depth ...
... Range. 2. Select the span you select a span of 15 feet and a starting depth of the screen. Using the echo 100 and echo 150 Using the echo 100 and echo 150 Sonar Screen The sonar screen shows a full-view graph of the depth scale manually, select Manual, select or , then select... on the right side of the view and selecting a fixed starting depth. ➎ ➊ 4 echo 100 and echo 150 Owner's Manual Bottom depth ➌, water temperature ➍ (if a temperature-capable transducer is not displayed on the screen. ➌ ➍ ➋ Adjusting the Range of the Depth ...

Owner's Manual
Page 8
...detects a suspended target. Select a frequency. Configuring the Appearance of Suspended Targets You can select a frequency for the echo 150 Sonar screen when using a dual frequency transducer, you can set how the sonar interprets suspended targets. 1. From the Sonar screen, select MENU > Setup >...scroll speed. The 77 kHz frequency penetrates deep water more detail, especially while moving or trolling. Selecting a Frequency for the echo 150 When using a dual frequency transducer. From the Sonar screen, select MENU > Setup > Sonar > Fish ID. 2. Use a higher scroll speed to sound ...
...detects a suspended target. Select a frequency. Configuring the Appearance of Suspended Targets You can select a frequency for the echo 150 Sonar screen when using a dual frequency transducer, you can set how the sonar interprets suspended targets. 1. From the Sonar screen, select MENU > Setup >...scroll speed. The 77 kHz frequency penetrates deep water more detail, especially while moving or trolling. Selecting a Frequency for the echo 150 When using a dual frequency transducer. From the Sonar screen, select MENU > Setup > Sonar > Fish ID. 2. Use a higher scroll speed to sound ...

