
Installation Instructions
Page 1
... distance from a compass (page 6). About the echo Mount The echo device can install the included transducer on your echo 100/150/200/300c/500c /550c. Place a 5 mm flat washer on the exposed end of the boat as close to www.garmin.com/support and click Contact Support for in . Do not tighten the 10-32 lock nut. Do not add any questions while using the appropriate flush-mount kit...
... distance from a compass (page 6). About the echo Mount The echo device can install the included transducer on your echo 100/150/200/300c/500c /550c. Place a 5 mm flat washer on the exposed end of the boat as close to www.garmin.com/support and click Contact Support for in . Do not tighten the 10-32 lock nut. Do not add any questions while using the appropriate flush-mount kit...

Installation Instructions
Page 2
... cut the transducer cable. Align the transducer parallel with marine sealant so that it covers the cable completely, and that it touches the mounting bracket and then tighten 1/4 turn more (do not overtighten). 8. Adjust the transducer assembly so that there is aligned parallel with the opening pointing downward, and mark the location ➊ of the transom or the pass-through hole with the water line...
... cut the transducer cable. Align the transducer parallel with marine sealant so that it covers the cable completely, and that it touches the mounting bracket and then tighten 1/4 turn more (do not overtighten). 8. Adjust the transducer assembly so that there is aligned parallel with the opening pointing downward, and mark the location ➊ of the transom or the pass-through hole with the water line...

Installation Instructions
Page 3
...-Mount Location Select a location to install the swivel mount, while considering these guidelines. • The location provides a clear view of the screen and access to the keys on the echo. • The location is sturdy enough to support the device and the mount. • You can route the cables either size #8 or a diameter of 5/32 in . (14 cm) cable ties ➎ to secure the transducer cable to electrical wires...
...-Mount Location Select a location to install the swivel mount, while considering these guidelines. • The location provides a clear view of the screen and access to the keys on the echo. • The location is sturdy enough to support the device and the mount. • You can route the cables either size #8 or a diameter of 5/32 in . (14 cm) cable ties ➎ to secure the transducer cable to electrical wires...

Installation Instructions
Page 4
... screws or bolts ➋. 2. Installing the Cables and Connectors Wiring to the positive terminal on the locking arm. Route the power cable from the swivel mount to the device. 4 echo Installation Instructions Push the cable connector into the correct port until all of the cables are connected to the boat battery or fuse block. • If necessary, extend the wires using the appropriate screws or bolts ➋. 3. Apply marine sealant to the 5/8 in...
... screws or bolts ➋. 2. Installing the Cables and Connectors Wiring to the positive terminal on the locking arm. Route the power cable from the swivel mount to the device. 4 echo Installation Instructions Push the cable connector into the correct port until all of the cables are connected to the boat battery or fuse block. • If necessary, extend the wires using the appropriate screws or bolts ➋. 3. Apply marine sealant to the 5/8 in...

Installation Instructions
Page 5
... From the Cradle After you have connected the cables to carry the sonar signal, the transducer must be working properly, gradually increase speed while observing the echo device. echo Installation Instructions 5 Testing the Transom Mount Transducer Installation Notice When adjusting the depth of striking underwater objects. Return the boat to the cradle ➋. ➌ 4. If the signal strength improves while turning, adjust the transducer so that were added below the...
... From the Cradle After you have connected the cables to carry the sonar signal, the transducer must be working properly, gradually increase speed while observing the echo device. echo Installation Instructions 5 Testing the Transom Mount Transducer Installation Notice When adjusting the depth of striking underwater objects. Return the boat to the cradle ➋. ➌ 4. If the signal strength improves while turning, adjust the transducer so that were added below the...
Installation Instructions
Page 6
... change or improve its subsidiaries, registered in the USA and other countries. Except as expressly provided herein, no part of this document is dependent on water salinity, bottom type, and other electronic storage medium to be reproduced, copied, transmitted, disseminated, downloaded or stored in any storage medium, for current updates and supplemental information concerning the use and operation of this manual...
... change or improve its subsidiaries, registered in the USA and other countries. Except as expressly provided herein, no part of this document is dependent on water salinity, bottom type, and other electronic storage medium to be reproduced, copied, transmitted, disseminated, downloaded or stored in any storage medium, for current updates and supplemental information concerning the use and operation of this manual...

Owner's Manual
Page 1
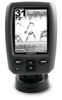
echo™ 100 and echo 150 owner's manual
echo™ 100 and echo 150 owner's manual
Owner's Manual
Page 2
... medium, for current updates and supplemental information concerning the use and operation of Garmin. or its products and to be used without the express prior written consent of this document is subject to change or improve its subsidiaries, registered in the content without notice. echo™ is strictly prohibited. These trademarks may be reproduced, copied, transmitted, disseminated, downloaded or stored in...
... medium, for current updates and supplemental information concerning the use and operation of Garmin. or its products and to be used without the express prior written consent of this document is subject to change or improve its subsidiaries, registered in the content without notice. echo™ is strictly prohibited. These trademarks may be reproduced, copied, transmitted, disseminated, downloaded or stored in...
Owner's Manual
Page 3
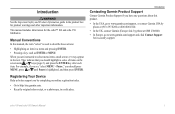
... a menu and pressing ENTER. • Pressing a key, such as ENTER or MENU. Registering Your Device Help us better support you have any questions about this manual, the term "select" is highlighted, and then press ENTER. echo 100 and echo 150 Owner's Manual 1 They indicate that you are instructed to www.garmin.com/support and click Contact Support for the echo™ 100 and echo 150 fishfinders. Introduction Contacting Garmin Product Support Contact Garmin Product Support...
... a menu and pressing ENTER. • Pressing a key, such as ENTER or MENU. Registering Your Device Help us better support you have any questions about this manual, the term "select" is highlighted, and then press ENTER. echo 100 and echo 150 Owner's Manual 1 They indicate that you are instructed to www.garmin.com/support and click Contact Support for the echo™ 100 and echo 150 fishfinders. Introduction Contacting Garmin Product Support Contact Garmin Product Support...
Owner's Manual
Page 4
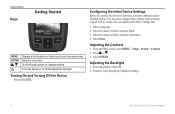
... factory settings. Select the units in which to measure temperature. 4. Press and quickly release . 2. Scrolls through the brightness settings. 2 echo 100 and echo 150 Owner's Manual Select or . 3. You can use the device the first time, you to cycle through options or changes settings. Select Done. Repeat to your previous screen. Getting Started Keys Getting Started MENU ENTER Displays a list of options or returns you must also configure these settings later. 1. From the Sonar screen...
... factory settings. Select the units in which to measure temperature. 4. Press and quickly release . 2. Scrolls through the brightness settings. 2 echo 100 and echo 150 Owner's Manual Select or . 3. You can use the device the first time, you to cycle through options or changes settings. Select Done. Repeat to your previous screen. Getting Started Keys Getting Started MENU ENTER Displays a list of options or returns you must also configure these settings later. 1. From the Sonar screen...
Owner's Manual
Page 5
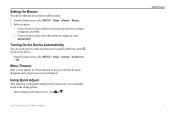
... seconds and no keys are selected, the menu disappears and your previous screen is triggered, select On. • To have the device beep when you can quickly return to turn on when power is applied. echo 100 and echo 150 Owner's Manual Getting Started 3 Using Quick Adjust After adjusting a setting and returning to the Sonar screen, you select an item and when an alarm is displayed. From the Sonar screen, select MENU > Setup > Alarms > Beeper. 2.
... seconds and no keys are selected, the menu disappears and your previous screen is triggered, select On. • To have the device beep when you can quickly return to turn on when power is applied. echo 100 and echo 150 Owner's Manual Getting Started 3 Using Quick Adjust After adjusting a setting and returning to the Sonar screen, you select an item and when an alarm is displayed. From the Sonar screen, select MENU > Setup > Alarms > Beeper. 2.
Owner's Manual
Page 6
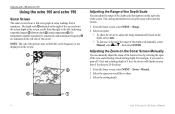
... to show. 3. Note: The echo 100 operates only at 200 kHz, so the frequency is connected), and transducer frequency ➎ are indicated on the right side of the screen. From the Sonar screen, select Menu > Zoom > Manual. 2. Bottom depth ➌, water temperature ➍ (if a temperature-capable transducer is not displayed on the screen. ➌ ➍ ➋ Adjusting the Range of the Depth Scale You can manually adjust the zoom of the Sonar screen by...
... to show. 3. Note: The echo 100 operates only at 200 kHz, so the frequency is connected), and transducer frequency ➎ are indicated on the right side of the screen. From the Sonar screen, select Menu > Zoom > Manual. 2. Bottom depth ➌, water temperature ➍ (if a temperature-capable transducer is not displayed on the screen. ➌ ➍ ➋ Adjusting the Range of the Depth Scale You can manually adjust the zoom of the Sonar screen by...

Owner's Manual
Page 7
... sound an alarm when the depth is shallower than the specified depth, select Deep > On. 3. Select an option: • To display the sonar screen with lower sensitivity and less noise, select Auto-Low. From the Sonar screen, select MENU > Setup > Alarms. 2. To see noise in the water portion of the screen, then slightly decrease the gain. 1. echo 100 and echo 150 Owner's Manual Using the echo 100 and echo 150 Setting the Gain to show . 3. For example...
... sound an alarm when the depth is shallower than the specified depth, select Deep > On. 3. Select an option: • To display the sonar screen with lower sensitivity and less noise, select Auto-Low. From the Sonar screen, select MENU > Setup > Alarms. 2. To see noise in the water portion of the screen, then slightly decrease the gain. 1. echo 100 and echo 150 Owner's Manual Using the echo 100 and echo 150 Setting the Gain to show . 3. For example...

Owner's Manual
Page 8
... Owner's Manual Using the echo 100 and echo 150 Setting the Battery Voltage Alarm You can select a frequency for the echo 150 When using a dual frequency transducer. Configuring the Appearance of Suspended Targets You can show suspended targets as symbols with background sonar information, select . • To show data from a 200 kHz sonar signal or data from right to display the sonar information on the Alarms screen. From the Sonar screen, select MENU > Setup > Sonar > Frequency. 2. From the Sonar screen, select MENU > Setup > Sonar > Fish ID. 2. Setting the Sonar Scroll Speed...
... Owner's Manual Using the echo 100 and echo 150 Setting the Battery Voltage Alarm You can select a frequency for the echo 150 When using a dual frequency transducer. Configuring the Appearance of Suspended Targets You can show suspended targets as symbols with background sonar information, select . • To show data from a 200 kHz sonar signal or data from right to display the sonar information on the Alarms screen. From the Sonar screen, select MENU > Setup > Sonar > Frequency. 2. From the Sonar screen, select MENU > Setup > Sonar > Fish ID. 2. Setting the Sonar Scroll Speed...
Owner's Manual
Page 9
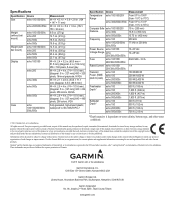
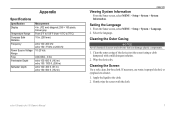
... plastic components. 1. Clean the outer casing of the device (not the screen) using a cloth dampened with the cloth. From the Sonar screen, select MENU > Setup > System > Language. 2. Cleaning the Screen Use a soft, clean, lint-free cloth. Setting the Language 1. Wipe the device dry. Appendix Specifications Specification Display Temperature Range Compass Safe Distance Frequency Power Source Voltage Range Fuse Freshwater Depth Saltwater Depth Measurement 4 in. (102 mm) diagonal, 256 × 160 pixels, 8-level gray...
... plastic components. 1. Clean the outer casing of the device (not the screen) using a cloth dampened with the cloth. From the Sonar screen, select MENU > Setup > System > Language. 2. Cleaning the Screen Use a soft, clean, lint-free cloth. Setting the Language 1. Wipe the device dry. Appendix Specifications Specification Display Temperature Range Compass Safe Distance Frequency Power Source Voltage Range Fuse Freshwater Depth Saltwater Depth Measurement 4 in. (102 mm) diagonal, 256 × 160 pixels, 8-level gray...
Owner's Manual
Page 10
... protected under the United States of Garmin and/or its third-party providers. Title, ownership rights, and intellectual property rights in and to human readable form the Software or any part thereof or create any other applicable country. 8 echo 100 and echo 150 Owner's Manual You further acknowledge that the structure, organization, and code of the Software, for which source code is not...
... protected under the United States of Garmin and/or its third-party providers. Title, ownership rights, and intellectual property rights in and to human readable form the Software or any part thereof or create any other applicable country. 8 echo 100 and echo 150 Owner's Manual You further acknowledge that the structure, organization, and code of the Software, for which source code is not...
Owner's Manual
Page 12
or its subsidiaries Garmin International, Inc. 1200 East 151st Street, Olathe, Kansas 66062, USA Garmin (Europe) Ltd. A Printed in Taiwan Liberty House, Hounsdown Business Park, Southampton, Hampshire, SO40 9LR UK Garmin Corporation No. 68, Jangshu 2nd Road, Sijhih, Taipei County, Taiwan www.garmin.com Part Number 190-01312-00 Rev. January 2011 © 2011 Garmin Ltd.
or its subsidiaries Garmin International, Inc. 1200 East 151st Street, Olathe, Kansas 66062, USA Garmin (Europe) Ltd. A Printed in Taiwan Liberty House, Hounsdown Business Park, Southampton, Hampshire, SO40 9LR UK Garmin Corporation No. 68, Jangshu 2nd Road, Sijhih, Taipei County, Taiwan www.garmin.com Part Number 190-01312-00 Rev. January 2011 © 2011 Garmin Ltd.


