Owner's Manual
Page 3
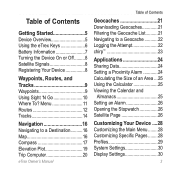
Menu 11 Routes 12 Tracks 14 Navigation 16 Navigating to a Destination..........16 Map 16 Compass 17 Elevation Plot 19 Trip Computer 20 eTrex Owner's Manual Table of Contents Geocaches 21 Downloading Geocaches 21 Filtering the Geocache List..........21 Navigating to a Geocache............22 Logging the Attempt 22 chirp 23 ...
Menu 11 Routes 12 Tracks 14 Navigation 16 Navigating to a Destination..........16 Map 16 Compass 17 Elevation Plot 19 Trip Computer 20 eTrex Owner's Manual Table of Contents Geocaches 21 Downloading Geocaches 21 Filtering the Geocache List..........21 Navigating to a Geocache............22 Logging the Attempt 22 chirp 23 ...
Owner's Manual
Page 5
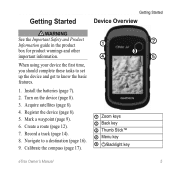
... (page 8). 3. Record a track (page 14). 8. Acquire satellites (page 8). 4. Register the device (page 8). 5. Install the batteries (page 7). 2. Mark a waypoint (page 9). 6. Create a route (page 12). 7. Calibrate the compass (page 17). ➊ Zoom keys ➋ Back key ➌ Thumb Stick™ ➍ Menu key ➎ /Backlight key...
... (page 8). 3. Record a track (page 14). 8. Acquire satellites (page 8). 4. Register the device (page 8). 5. Install the batteries (page 7). 2. Mark a waypoint (page 9). 6. Create a route (page 12). 7. Calibrate the compass (page 17). ➊ Zoom keys ➋ Back key ➌ Thumb Stick™ ➍ Menu key ➎ /Backlight key...
Owner's Manual
Page 16
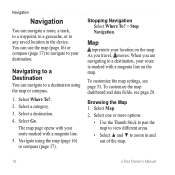
...Stick to pan the map to view different areas. • Select ▲ and ▼ to any saved location in and out of the map. 16 eTrex Owner's Manual Select Where To?. 2. Select Go. The map page opens with your route is marked with a magenta line. 5. Browsing the Map 1. Navigate... destination. When you travel, moves. To customize the map dashboard and data fields, see page 31. You can use the map (page 16) or compass (page 17) to navigate to your location on the map. Stopping Navigation Select Where To? > Stop Navigation. Navigation Navigation You can navigate to a ...
...Stick to pan the map to view different areas. • Select ▲ and ▼ to any saved location in and out of the map. 16 eTrex Owner's Manual Select Where To?. 2. Select Go. The map page opens with your route is marked with a magenta line. 5. Browsing the Map 1. Navigate... destination. When you travel, moves. To customize the map dashboard and data fields, see page 31. You can use the map (page 16) or compass (page 17) to navigate to your location on the map. Stopping Navigation Select Where To? > Stop Navigation. Navigation Navigation You can navigate to a ...
Owner's Manual
Page 17
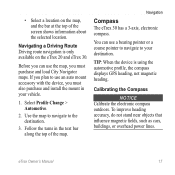
... about the selected location. Calibrating the Compass Notice Calibrate the electronic compass outdoors. TIP: When the device is only available on the map, and the bar at the top of the map. • Select a location on the eTrex 20 and eTrex 30. Select Profile Change > Automotive.... 2. Use the map to navigate to your vehicle. 1. Navigation Compass The eTrex 30 has a 3-axis, electronic compass. You can use a bearing pointer or a course pointer to navigate to...
... about the selected location. Calibrating the Compass Notice Calibrate the electronic compass outdoors. TIP: When the device is only available on the map, and the bar at the top of the map. • Select a location on the eTrex 20 and eTrex 30. Select Profile Change > Automotive.... 2. Use the map to navigate to your vehicle. 1. Navigation Compass The eTrex 30 has a 3-axis, electronic compass. You can use a bearing pointer or a course pointer to navigate to...
Owner's Manual
Page 18
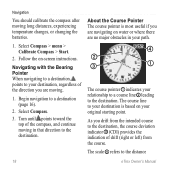
...10124; ➊ The course pointer ➊ indicates your relationship to a course line ➋ leading to the destination. Select Compass > menu > Calibrate Compass > Start. 2. Select Compass. 3. The scale ➍ refers to a destination (page 16). 2. Follow the on your original starting point. Turn until... indicator ➌ (CDI) provides the indication of the compass, and continue moving long distances, experiencing temperature changes, or changing the batteries. 1. Begin navigation to the distance 18 eTrex Owner's Manual As you are no major obstacles in that...
...10124; ➊ The course pointer ➊ indicates your relationship to a course line ➋ leading to the destination. Select Compass > menu > Calibrate Compass > Start. 2. Select Compass. 3. The scale ➍ refers to a destination (page 16). 2. Follow the on your original starting point. Turn until... indicator ➌ (CDI) provides the indication of the compass, and continue moving long distances, experiencing temperature changes, or changing the batteries. 1. Begin navigation to the distance 18 eTrex Owner's Manual As you are no major obstacles in that...
Owner's Manual
Page 19
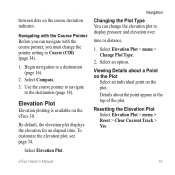
Select Compass. 3. Select Elevation Plot > menu > Change Plot Type. 2. eTrex Owner's Manual 19 By default, the elevation plot displays the elevation for an elapsed time. Viewing Details about the point appear at the top of the plot. between dots on the eTrex 30. Use the course pointer to navigate to a destination (page 16). 2. Navigating...
Select Compass. 3. Select Elevation Plot > menu > Change Plot Type. 2. eTrex Owner's Manual 19 By default, the elevation plot displays the elevation for an elapsed time. Viewing Details about the point appear at the top of the plot. between dots on the eTrex 30. Use the course pointer to navigate to a destination (page 16). 2. Navigating...
Owner's Manual
Page 22
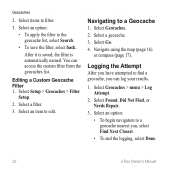
... is automatically named. Select a geocache. 3. Select Go. 4. Select Geocaches > menu > Log Attempt. 2. Navigate using the map (page 16) or compass (page 17). Select an option: • To apply the filter to filter. 3. Navigating to a geocache nearest you, select Find Next Closest. •...; To end the logging, select Done. 22 eTrex Owner's Manual Select an option: • To begin navigation to a Geocache 1. Editing a Custom Geocache Filter 1. Select an item to find a...
... is automatically named. Select a geocache. 3. Select Go. 4. Select Geocaches > menu > Log Attempt. 2. Navigate using the map (page 16) or compass (page 17). Select an option: • To apply the filter to filter. 3. Navigating to a geocache nearest you, select Find Next Closest. •...; To end the logging, select Done. 22 eTrex Owner's Manual Select an option: • To begin navigation to a Geocache 1. Editing a Custom Geocache Filter 1. Select an item to find a...
Owner's Manual
Page 28
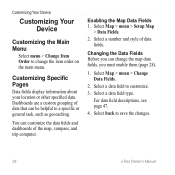
Changing the Data Fields Before you can customize the data fields and dashboards of the map, compass, and trip computer. Select a number and style of data that can be helpful to customize. 3. For data field descriptions, see page 47. 4. Select... must enable them (page 28). 1. Customizing Your Device Customizing Your Device Customizing the Main Menu Select menu > Change Item Order to save the changes. 28 eTrex Owner's Manual Select a data field type. Select Map > menu > Change Data Fields. 2. Dashboards are a custom grouping of data fields. Select Map > menu > Setup ...
Changing the Data Fields Before you can customize the data fields and dashboards of the map, compass, and trip computer. Select a number and style of data that can be helpful to customize. 3. For data field descriptions, see page 47. 4. Select... must enable them (page 28). 1. Customizing Your Device Customizing Your Device Customizing the Main Menu Select menu > Change Item Order to save the changes. 28 eTrex Owner's Manual Select a data field type. Select Map > menu > Change Data Fields. 2. Dashboards are a custom grouping of data fields. Select Map > menu > Setup ...
Owner's Manual
Page 29
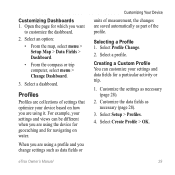
Select an option: • From the map, select menu > Setup Map > Data Fields > Dashboard. • From the compass or trip computer, select menu > Change Dashboard. 3. For example, your settings and views can customize your device based on water. ... Profile Change. 2. Customizing Dashboards 1. Profiles Profiles are collections of the profile. Open the page for which you are saved automatically as data fields or eTrex Owner's Manual Customizing Your Device units of measurement, the changes are using the device for geocaching and for a particular activity or trip. 1. Creating a...
Select an option: • From the map, select menu > Setup Map > Data Fields > Dashboard. • From the compass or trip computer, select menu > Change Dashboard. 3. For example, your settings and views can customize your device based on water. ... Profile Change. 2. Customizing Dashboards 1. Profiles Profiles are collections of the profile. Open the page for which you are saved automatically as data fields or eTrex Owner's Manual Customizing Your Device units of measurement, the changes are using the device for geocaching and for a particular activity or trip. 1. Creating a...
Owner's Manual
Page 34
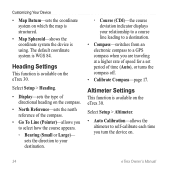
...deviation indicator displays your relationship to a course line leading to a destination. • Compass-switches from an electronic compass to a GPS compass when you are traveling at a higher rate of speed for a set period of the compass. • Go To Line (Pointer)-allows you to self-calibrate each time you ...turn the device on the eTrex 30. Select Setup > Altimeter. • Auto Calibration-allows the altimeter to select how the course...
...deviation indicator displays your relationship to a course line leading to a destination. • Compass-switches from an electronic compass to a GPS compass when you are traveling at a higher rate of speed for a set period of the compass. • Go To Line (Pointer)-allows you to self-calibrate each time you ...turn the device on the eTrex 30. Select Setup > Altimeter. • Auto Calibration-allows the altimeter to select how the course...
Owner's Manual
Page 39
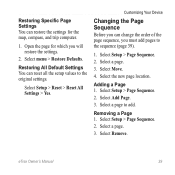
...of the page sequence, you will restore the settings. 2. Select a page. 3. Select the new page location. Select a page. 3. Open the page for the map, compass, and trip computer. 1. Select Add Page. 3. Select Setup > Page Sequence. 2. Restoring All Default Settings You can reset all the setup values to add. Select menu... for which you must add pages to the sequence (page 39). 1. Select Setup > Page Sequence. 2. Select a page to the original settings. Select Move. 4. eTrex Owner's Manual 39 Select Setup > Reset > Reset All Settings > Yes. Adding a Page 1.
...of the page sequence, you will restore the settings. 2. Select a page. 3. Select the new page location. Select a page. 3. Open the page for the map, compass, and trip computer. 1. Select Add Page. 3. Select Setup > Page Sequence. 2. Restoring All Default Settings You can reset all the setup values to add. Select menu... for which you must add pages to the sequence (page 39). 1. Select Setup > Page Sequence. 2. Select a page to the original settings. Select Move. 4. eTrex Owner's Manual 39 Select Setup > Reset > Reset All Settings > Yes. Adding a Page 1.
Owner's Manual
Page 54
... map setup 32 alarms clock 26 marine 38 proximity 24 tones for 31 almanac hunting and fishing 25 sunrise and sunset 25 altimeter calibrating 20 plot type 35 settings 34 ANT+ accessories 46 area calculation 25 automotive mode 31 auto mounts 17 auto zoom 32 B backlight timeout 40...7 warnings 7 BirdsEye satellite imagery 11 BlueChart g2 maps 11 54 C calculator 25 calendar 25 calibrating altimeter 20 compass 18 caring for the device 42 long-term storage 42 chirp 23 City Navigator maps 17 compass 17 calibrating 18 navigating 18 restore 39 setup options 34 connecting to another device 24 USB cable...
... map setup 32 alarms clock 26 marine 38 proximity 24 tones for 31 almanac hunting and fishing 25 sunrise and sunset 25 altimeter calibrating 20 plot type 35 settings 34 ANT+ accessories 46 area calculation 25 automotive mode 31 auto mounts 17 auto zoom 32 B backlight timeout 40...7 warnings 7 BirdsEye satellite imagery 11 BlueChart g2 maps 11 54 C calculator 25 calendar 25 calibrating altimeter 20 compass 18 caring for the device 42 long-term storage 42 chirp 23 City Navigator maps 17 compass 17 calibrating 18 navigating 18 restore 39 setup options 34 connecting to another device 24 USB cable...
Quick Start Manual
Page 2
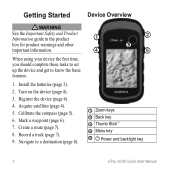
Register the device (page 4). 4. Install the batteries (page 3). 2. Calibrate the compass (page 5). 6. Navigate to know the basic features. 1. Turn on the device (page 4). 3. Record a track (page 7). 9. When using your ...➋ ➌ ➍ ➎ ➊ Zoom keys ➋ Back key ➌ Thumb Stick™ ➍ Menu key ➎ Power and backlight key 2 eTrex 20/30 Quick Start Manual Acquire satellites (page 4). 5. Mark a waypoint (page 6). 7. Getting Started Device Overview ‹ warning See the Important Safety and Product Information guide in...
Register the device (page 4). 4. Install the batteries (page 3). 2. Calibrate the compass (page 5). 6. Navigate to know the basic features. 1. Turn on the device (page 4). 3. Record a track (page 7). 9. When using your ...➋ ➌ ➍ ➎ ➊ Zoom keys ➋ Back key ➌ Thumb Stick™ ➍ Menu key ➎ Power and backlight key 2 eTrex 20/30 Quick Start Manual Acquire satellites (page 4). 5. Mark a waypoint (page 6). 7. Getting Started Device Overview ‹ warning See the Important Safety and Product Information guide in...
Quick Start Manual
Page 5
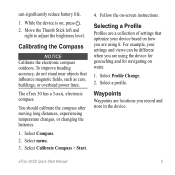
...Compass Notice Calibrate the electronic compass outdoors. eTrex 20/30 Quick Start Manual 5 You should calibrate the compass after moving long distances, experiencing temperature changes, or changing the batteries. 1. Select Calibrate Compass > Start. 4. Select Profile Change. 2. Waypoints Waypoints are using it. Follow the on , press . 2. Select Compass.... Move the Thumb Stick left and right to adjust the brightness level. The eTrex 30 has a 3-axis, electronic compass. Selecting a Profile Profiles are using the device for geocaching and for navigating on...
...Compass Notice Calibrate the electronic compass outdoors. eTrex 20/30 Quick Start Manual 5 You should calibrate the compass after moving long distances, experiencing temperature changes, or changing the batteries. 1. Select Calibrate Compass > Start. 4. Select Profile Change. 2. Waypoints Waypoints are using it. Follow the on , press . 2. Select Compass.... Move the Thumb Stick left and right to adjust the brightness level. The eTrex 30 has a 3-axis, electronic compass. Selecting a Profile Profiles are using the device for geocaching and for navigating on...
Quick Start Manual
Page 8
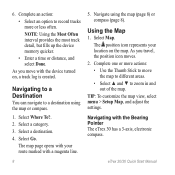
.... 6. Select a destination. 4. Complete an action: • Select an option to a destination using the map (page 8) or compass (page 8). Select Where To?. 2. The map page opens with the Bearing Pointer The eTrex 30 has a 3-axis, electronic compass. 8 eTrex 20/30 Quick Start Manual Tip: To customize the map view, select menu > Setup Map, and adjust the... the Map 1. Select Map. Navigating with your location on , a track log is created. As you travel, the position icon moves. 2. Navigate using the map or compass. 1.
.... 6. Select a destination. 4. Complete an action: • Select an option to a destination using the map (page 8) or compass (page 8). Select Where To?. 2. The map page opens with the Bearing Pointer The eTrex 30 has a 3-axis, electronic compass. 8 eTrex 20/30 Quick Start Manual Tip: To customize the map view, select menu > Setup Map, and adjust the... the Map 1. Select Map. Navigating with your location on , a track log is created. As you travel, the position icon moves. 2. Navigate using the map or compass. 1.

Quick Start Manual
Page 9
... USB cable to a Computer 1. Plug the small end of the compass, and continue moving . 1. Sign in My Computer on Windows eTrex 20/30 Quick Start Manual computers and as mounted volumes on -screen instructions to find and download geocaches to a computer (page 9). 2. Select Compass. 3. Pull up the weather cap from the mini-USB port...
... USB cable to a Computer 1. Plug the small end of the compass, and continue moving . 1. Sign in My Computer on Windows eTrex 20/30 Quick Start Manual computers and as mounted volumes on -screen instructions to find and download geocaches to a computer (page 9). 2. Select Compass. 3. Pull up the weather cap from the mini-USB port...


