SAR Specific Absorption Rate Statement
Page 1
...established by Industry Canada. NOTE: In the United States and Canada, the SAR limit for any variations in measurements. © 2008 Garmin Ltd. or its highest certified power level in the U.S. in the following table. The standards include a substantial safety margin designed ... conducted using standard operating positions accepted by the FCC and by the FCC of all meet the governmental requirements for review by each government for later products; The guidelines are designed to assure the safety of the U.S. Product Rino 110 Rino 120 Rino 130 Rino 520HCx Rino 530HCx ...
...established by Industry Canada. NOTE: In the United States and Canada, the SAR limit for any variations in measurements. © 2008 Garmin Ltd. or its highest certified power level in the U.S. in the following table. The standards include a substantial safety margin designed ... conducted using standard operating positions accepted by the FCC and by the FCC of all meet the governmental requirements for review by each government for later products; The guidelines are designed to assure the safety of the U.S. Product Rino 110 Rino 120 Rino 130 Rino 520HCx Rino 530HCx ...
Owner's Manual
Page 2
... be used without obligation to change without the express prior written consent of Garmin. Tel. 913/397.8200 or 800/800.1020 Fax 913/397.8282 Garmin (Europe) Ltd. Garmin®, AutoLocate®, Personal Navigator®, MapSource®, TracBack®, BlueChart®, and Rino®... are registered trademarks of this manual onto a hard drive or other Garmin products. March 2006 Part Number 190-00418...
... be used without obligation to change without the express prior written consent of Garmin. Tel. 913/397.8200 or 800/800.1020 Fax 913/397.8282 Garmin (Europe) Ltd. Garmin®, AutoLocate®, Personal Navigator®, MapSource®, TracBack®, BlueChart®, and Rino®... are registered trademarks of this manual onto a hard drive or other Garmin products. March 2006 Part Number 190-00418...

Owner's Manual
Page 3
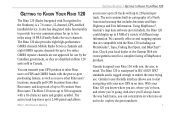
...some basic unit operations to understand all of the Rino 120 and their options in detail. The Getting Started section provides basic information about the Rino 120. The section for using the features. To get the most from your Rino 120 and some additional features and step-by -step ...describes the process of setting up your new Rino 120, read through the Quick Start Guide first, then this Owner's Manual to familiarize you with you for choosing the Garmin® Rino® 120 (Radio Integrated with Navigation for using the page and its main intention is organized...
...some basic unit operations to understand all of the Rino 120 and their options in detail. The Getting Started section provides basic information about the Rino 120. The section for using the features. To get the most from your Rino 120 and some additional features and step-by -step ...describes the process of setting up your new Rino 120, read through the Quick Start Guide first, then this Owner's Manual to familiarize you with you for choosing the Garmin® Rino® 120 (Radio Integrated with Navigation for using the page and its main intention is organized...
Owner's Manual
Page 4
... > TABLE OF CONTENTS Introduction i Getting to Know Your Rino 120 1 Front of the Rino 120 2 Back of the Rino 120 3 Main Page Sequence 4 Operating the Rino 120 5 Status Bar Overview 6 Understanding GPS 7 Unit Operation 8 Radio Page 8 Initializing the Rino 120 8 Using My ID and Symbol Fields 9 Setting the Channel and Squelch...GPS On/Off 17 Informational Picture 18 GPS Status 18 Radio Transmission Status 18 ii Mark Waypoint's Indicators 19 Using the Rino 120 Radio Features 20 Peer-to-Peer Positioning 20 New Contact Page Overview 20 Sending a Location 23 Map Page 24...
... > TABLE OF CONTENTS Introduction i Getting to Know Your Rino 120 1 Front of the Rino 120 2 Back of the Rino 120 3 Main Page Sequence 4 Operating the Rino 120 5 Status Bar Overview 6 Understanding GPS 7 Unit Operation 8 Radio Page 8 Initializing the Rino 120 8 Using My ID and Symbol Fields 9 Setting the Channel and Squelch...GPS On/Off 17 Informational Picture 18 GPS Status 18 Radio Transmission Status 18 ii Mark Waypoint's Indicators 19 Using the Rino 120 Radio Features 20 Peer-to-Peer Positioning 20 New Contact Page Overview 20 Sending a Location 23 Map Page 24...

Owner's Manual
Page 5
...Address or Intersection 52 Finding a Last Found Place 54 Sending a Note 55 Using a Goto 56 Route Page 57 Creating and Using a Route 57 Editing a Route 58 Adding or Editing from the Route Map Page 61 Rino® 120 Owner's Manual INTRODUCTION > TABLE OF CONTENTS Navigating a Route 62 Stopping Navigation... 63 Data Fields for the Route Page 63 Data field options for Route Page 63 Tracks Page 64 Using the TracBack Feature 65 Setting up the...
...Address or Intersection 52 Finding a Last Found Place 54 Sending a Note 55 Using a Goto 56 Route Page 57 Creating and Using a Route 57 Editing a Route 58 Adding or Editing from the Route Map Page 61 Rino® 120 Owner's Manual INTRODUCTION > TABLE OF CONTENTS Navigating a Route 62 Stopping Navigation... 63 Data Fields for the Route Page 63 Data field options for Route Page 63 Tracks Page 64 Using the TracBack Feature 65 Setting up the...
Owner's Manual
Page 7
... a variety of different map information. With your Rino 120 you know the way back home, you can transmit your Rino 120 with you set out to 50 contacts from other Rino users' locations, manually poll GPS locations from Rino users. Using MapSource®, Garmin's map data software (not included), the Rino 120 could display up to do: explore the great...
... a variety of different map information. With your Rino 120 you know the way back home, you can transmit your Rino 120 with you set out to 50 contacts from other Rino users' locations, manually poll GPS locations from Rino users. Using MapSource®, Garmin's map data software (not included), the Rino 120 could display up to do: explore the great...
Owner's Manual
Page 8
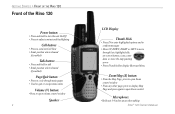
GETTING STARTED > FRONT OF THE RINO 120 Front of the Rino 120 Power button: • Press and hold to turn the unit On/Off • Press to adjust contrast and backlighting...and hold to talk • Sends position when released (if enabled) Page/Quit button: • Press to cycle through main pages • Used to quit or escape menu items Volume (V) button: • Press to open volume control window Speaker 2 LCD Display Thumb Stick • Press...: • From the Map Page, press to open Zoom control Microphone: • Hold unit 3-4 inches away when talking Rino® 120 Owner's Manual
GETTING STARTED > FRONT OF THE RINO 120 Front of the Rino 120 Power button: • Press and hold to turn the unit On/Off • Press to adjust contrast and backlighting...and hold to talk • Sends position when released (if enabled) Page/Quit button: • Press to cycle through main pages • Used to quit or escape menu items Volume (V) button: • Press to open volume control window Speaker 2 LCD Display Thumb Stick • Press...: • From the Map Page, press to open Zoom control Microphone: • Hold unit 3-4 inches away when talking Rino® 120 Owner's Manual
Owner's Manual
Page 11
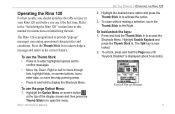
... menu option and press the Thumb Stick In to the current feature. Refer to provide "pop-up Message 5 The Rino 120 is programmed to the "Initializing the Rino 120" section later in your Rino 120 unit before you use the page Option Menu: 1. The Talk key is displayed (about 5 seconds). Keylock Pop-up " messages concerning operational characteristics...
... menu option and press the Thumb Stick In to the current feature. Refer to provide "pop-up Message 5 The Rino 120 is programmed to the "Initializing the Rino 120" section later in your Rino 120 unit before you use the page Option Menu: 1. The Talk key is displayed (about 5 seconds). Keylock Pop-up " messages concerning operational characteristics...

Owner's Manual
Page 12
As you use your Rino. Using External Power Receiving Radio signal 6 Transmitting Radio signal Backlight On Radio On Peer-To-Peer On/Location Ready to Send Keylock On Alarm Clock On GPS On, Position Ready GPS On, Position Not Ready Rino® 120 Owner's Manual Install new batteries or recharge batteries. The icons you may see...
As you use your Rino. Using External Power Receiving Radio signal 6 Transmitting Radio signal Backlight On Radio On Peer-To-Peer On/Location Ready to Send Keylock On Alarm Clock On GPS On, Position Ready GPS On, Position Not Ready Rino® 120 Owner's Manual Install new batteries or recharge batteries. The icons you may see...
Owner's Manual
Page 13
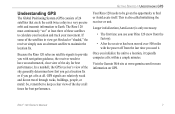
... you use your Rino 120 (new from the factory). • After the receiver has been moved over 500 miles with the power off from the last time you with navigation guidance, the receiver needs to calculate your location and track your movement. Visit the Garmin Web site at www.garmin.com...circle the earth twice a day in view get a location fix or if you initialize the unit to provide you used it typically computes a fix within a couple minutes. Because the Rino 120 relies on GPS. GPS signals are relatively weak and do not travel through rocks, buildings, people, or metal: So...
... you use your Rino 120 (new from the factory). • After the receiver has been moved over 500 miles with the power off from the last time you with navigation guidance, the receiver needs to calculate your location and track your movement. Visit the Garmin Web site at www.garmin.com...circle the earth twice a day in view get a location fix or if you initialize the unit to provide you used it typically computes a fix within a couple minutes. Because the Rino 120 relies on GPS. GPS signals are relatively weak and do not travel through rocks, buildings, people, or metal: So...
Owner's Manual
Page 14
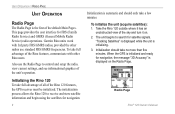
... 3. This page provides the user interface for satellite signals. Initializing the Rino 120 To take no more than five minutes. Also use standard FRS/GMRS frequencies. Radio Page Rino® 120 Owner's Manual Take the Rino 120 outside where it has an unobstructed view of the unit's operation. The...sky and turn it on the Radio Page. Initialization should only take full advantage of the Rino 120 features, the GPS receiver must be initialized. Garmin Rino units work with other radios use the Radio Page to search for FRS (Family Radio Service) and GMRS (General Mobile ...
... 3. This page provides the user interface for satellite signals. Initializing the Rino 120 To take no more than five minutes. Also use standard FRS/GMRS frequencies. Radio Page Rino® 120 Owner's Manual Take the Rino 120 outside where it has an unobstructed view of the unit's operation. The...sky and turn it on the Radio Page. Initialization should only take full advantage of the Rino 120 features, the GPS receiver must be initialized. Garmin Rino units work with other radios use the Radio Page to search for FRS (Family Radio Service) and GMRS (General Mobile ...
Owner's Manual
Page 15
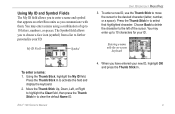
... as you communicate with the on-screen keyboard To enter a name: 1. You may enter a name using a combination of the cursor. Press the Thumb Stick In to clear the default Name ID. Rino® 120 Owner's Manual 4. Using My ID and Symbol Fields The My ID field allows you to enter a name and symbol... Stick In to activate the field and display the keyboard. 2. The Symbol field allows you have entered your ID. To enter a new ID, use the Thumb Stick to move the cursor to further personalize your new ID, highlight OK and press the Thumb Stick In. 9 When you to choose...
... as you communicate with the on-screen keyboard To enter a name: 1. You may enter a name using a combination of the cursor. Press the Thumb Stick In to clear the default Name ID. Rino® 120 Owner's Manual 4. Using My ID and Symbol Fields The My ID field allows you to enter a name and symbol... Stick In to activate the field and display the keyboard. 2. The Symbol field allows you have entered your ID. To enter a new ID, use the Thumb Stick to move the cursor to further personalize your new ID, highlight OK and press the Thumb Stick In. 9 When you to choose...

Owner's Manual
Page 16
... (icons). 2. Because not all the selections can "wrap" back to the top or bottom by releasing the Thumb Stick then pressing in the list. Using the Thumb Stick, highlight the face symbol to scroll through the list more quickly. TIP: Hold the Thumb Stick Up or Down to show a list... the My ID field. Once you can fit in the window, a slider bar on other selection windows. 3. This same method may also be used on the right side indicates your current position in the same direction again. UNIT OPERATION > RADIO PAGE To change the user symbol: 1. Press the Thumb...
... (icons). 2. Because not all the selections can "wrap" back to the top or bottom by releasing the Thumb Stick then pressing in the list. Using the Thumb Stick, highlight the face symbol to scroll through the list more quickly. TIP: Hold the Thumb Stick Up or Down to show a list... the My ID field. Once you can fit in the window, a slider bar on other selection windows. 3. This same method may also be used on the right side indicates your current position in the same direction again. UNIT OPERATION > RADIO PAGE To change the user symbol: 1. Press the Thumb...
Owner's Manual
Page 17
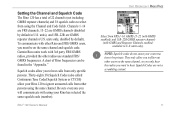
...are GMRS channels (disabled by default). units only, disabled by default in U.S. Garmin Rino units work with other radios use standard FRS/ GMRS frequencies. To communicate with 3rd party FRS/GMRS radios, provided the other Rino and FRS/GMRS users, you to ignore unwanted calls from only specific persons...14, GMRS 15-22 (with GMRS enabled), and 15R-22R GMRS repeater channels (with using the Channel and Code fields. Setting the Channel and Squelch Code The Rino 120 has a total of Rino frequencies can be on the same channel, so you only hear the radios you to hear...
...are GMRS channels (disabled by default). units only, disabled by default in U.S. Garmin Rino units work with other radios use standard FRS/ GMRS frequencies. To communicate with 3rd party FRS/GMRS radios, provided the other Rino and FRS/GMRS users, you to ignore unwanted calls from only specific persons...14, GMRS 15-22 (with GMRS enabled), and 15R-22R GMRS repeater channels (with using the Channel and Code fields. Setting the Channel and Squelch Code The Rino 120 has a total of Rino frequencies can be on the same channel, so you only hear the radios you to hear...
Owner's Manual
Page 18
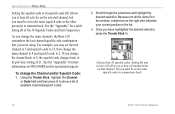
... must be on FRS/GMRS and its previous setting of the 38 Squelch Codes and their frequencies. As you change the main channels, the Rino 120 remembers the last channel/squelch code combination that channel, but you must be set the unit channel to 5 and squelch code to 21, ...then change the main channel to 8 and squelch code to show a list of available channels/squelch codes. 2. For example, you were using. Scroll through the selections and highlight the desired selection. Because not all the items fit in the list. 3. See the "Appendix" for more ...
... must be on FRS/GMRS and its previous setting of the 38 Squelch Codes and their frequencies. As you change the main channels, the Rino 120 remembers the last channel/squelch code combination that channel, but you must be set the unit channel to 5 and squelch code to 21, ...then change the main channel to 8 and squelch code to show a list of available channels/squelch codes. 2. For example, you were using. Scroll through the selections and highlight the desired selection. Because not all the items fit in the list. 3. See the "Appendix" for more ...

Owner's Manual
Page 19
...(or if you listen to scan. The Rino series automatically squelches a frequency to Scan Current Codes or Scan All Codes. The Rino 120 then uses that Squelch Code when it receives an incoming signal, the Rino 120 automatically decodes the Squelch Code used by the incoming signal. The Monitor option... lets you transmit), it stops on that unit. When the Rino 120 is scanning or monitoring channels...
...(or if you listen to scan. The Rino series automatically squelches a frequency to Scan Current Codes or Scan All Codes. The Rino 120 then uses that Squelch Code when it receives an incoming signal, the Rino 120 automatically decodes the Squelch Code used by the incoming signal. The Monitor option... lets you transmit), it stops on that unit. When the Rino 120 is scanning or monitoring channels...

Owner's Manual
Page 20
...> RADIO PAGE To scan or monitor a channel(s): 1. Scan starts searching through the available channels. To stop using either the Select All or Clear All buttons and press the Thumb Stick In. 3. Using the Thumb Stick, highlight the Option Menu on that are checked are scanned. Highlight Setup Scanlist and press...add/remove the check mark in front of each item in the Radio Page Option Menu. 14 Rino® 120 Owner's Manual Refer to any radio transmissions on -screen button and press In. Using the Thumb Stick, highlight the Scan or Monitor button and then press In. Monitor opens the ...
...> RADIO PAGE To scan or monitor a channel(s): 1. Scan starts searching through the available channels. To stop using either the Select All or Clear All buttons and press the Thumb Stick In. 3. Using the Thumb Stick, highlight the Option Menu on that are checked are scanned. Highlight Setup Scanlist and press...add/remove the check mark in front of each item in the Radio Page Option Menu. 14 Rino® 120 Owner's Manual Refer to any radio transmissions on -screen button and press In. Using the Thumb Stick, highlight the Scan or Monitor button and then press In. Monitor opens the ...

Owner's Manual
Page 21
...recommended for more on this feature. Scramble-Adds a level of your needs. UNIT OPERATION > RADIO PAGE Allow Polling-Enables/disables the Rino 120's ability to respond to -peer positioning feature. This page determines how the radio functions and enables you to achieve the desired voice ...be used in the headset when transmitting successfully using VOX. Setting the VOX level to other 3rd party radios. When On, the voice transmission sounds garbled to 5 is recommended for quiet environments while a higher VOX setting should be necessary to adjust the level to use the...
...recommended for more on this feature. Scramble-Adds a level of your needs. UNIT OPERATION > RADIO PAGE Allow Polling-Enables/disables the Rino 120's ability to respond to -peer positioning feature. This page determines how the radio functions and enables you to achieve the desired voice ...be used in the headset when transmitting successfully using VOX. Setting the VOX level to other 3rd party radios. When On, the voice transmission sounds garbled to 5 is recommended for quiet environments while a higher VOX setting should be necessary to adjust the level to use the...

Owner's Manual
Page 22
..., it must have the unit automatically detect the type. If you are using GMRS channels. See the "FCC Licensing Information" section and the "Appendix" for more than one type of a headset microphone. 16 Rino® 120 Owner's Manual UNIT OPERATION > RADIO PAGE NOTE: When Scramble is not available... at all in Canadian Rino units. This option is only available when GMRS is enabled and is set the unit ...
..., it must have the unit automatically detect the type. If you are using GMRS channels. See the "FCC Licensing Information" section and the "Appendix" for more than one type of a headset microphone. 16 Rino® 120 Owner's Manual UNIT OPERATION > RADIO PAGE NOTE: When Scramble is not available... at all in Canadian Rino units. This option is only available when GMRS is enabled and is set the unit ...
Owner's Manual
Page 24
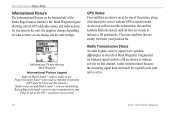
... top of the hill = a position was received GPS Status Four satellites are shown to indicate activity on at the top of the Radio Page features Garmin's Mr. Mark Waypoint figure showing current GPS and radio status, and radio actions. Fragmented (or broken) signal symbols ( ) are shown on...As radio signals come in Mark's hand = radio is ready to use this feature.) Radio waves around Mark's radio = you are transmitting Raised flag in his hand = peer-to-peer transmission is set to. 18 Rino® 120 Owner's Manual Audio remains muted because the incoming signal does not ...
... top of the hill = a position was received GPS Status Four satellites are shown to indicate activity on at the top of the Radio Page features Garmin's Mr. Mark Waypoint figure showing current GPS and radio status, and radio actions. Fragmented (or broken) signal symbols ( ) are shown on...As radio signals come in Mark's hand = radio is ready to use this feature.) Radio waves around Mark's radio = you are transmitting Raised flag in his hand = peer-to-peer transmission is set to. 18 Rino® 120 Owner's Manual Audio remains muted because the incoming signal does not ...

