
Owner's Manual
Page 3
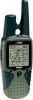
... manual is to describe each Page provides an overview that discusses the page, how it perfect to familiarize you with your Rino 120 and some direction on which they appear. The Index provides keywords and the pages on how to understand all of some additional features and .... The Quick Start Guide describes the process of setting up your new Rino 120 right out of the box. The Appendix includes additional information about the Rino 120. INTRODUCTION Thank you for choosing the Garmin® Rino® 120 (Radio Integrated with Navigation for using the features. While the Owner's ...
... manual is to describe each Page provides an overview that discusses the page, how it perfect to familiarize you with your Rino 120 and some direction on which they appear. The Index provides keywords and the pages on how to understand all of some additional features and .... The Quick Start Guide describes the process of setting up your new Rino 120 right out of the box. The Appendix includes additional information about the Rino 120. INTRODUCTION Thank you for choosing the Garmin® Rino® 120 (Radio Integrated with Navigation for using the features. While the Owner's ...

Owner's Manual
Page 16
... the list. TIP: Hold the Thumb Stick Up or Down to the top or bottom by releasing the Thumb Stick then pressing in the same direction again. This same method may also be used on the right side indicates your current position in the window, a slider bar on other selection windows... the user symbol: 1. Using the Thumb Stick, highlight the face symbol to show a list of the My ID field. Changing the user symbol 10 Rino® 120 Owner's Manual Once you reach the end of the list, you have highlighted the desired symbol, press the Thumb Stick In.
... the list. TIP: Hold the Thumb Stick Up or Down to the top or bottom by releasing the Thumb Stick then pressing in the same direction again. This same method may also be used on the right side indicates your current position in the window, a slider bar on other selection windows... the user symbol: 1. Using the Thumb Stick, highlight the face symbol to show a list of the My ID field. Changing the user symbol 10 Rino® 120 Owner's Manual Once you reach the end of the list, you have highlighted the desired symbol, press the Thumb Stick In.
Owner's Manual
Page 27
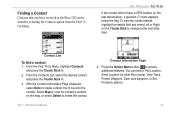
A Track Log of your map is updated showing their movement is received, the New Contact Page automatically appears. 2. UNIT OPERATION > USING THE RINO 120 RADIO FEATURES Press Left or Right on your map (see the "Map Page" section). When a new contact is created and shown on the Thumb ...at the bottom of their new position. The Rino 120 can manage up to 30 characters), highlight the details field and press Left or Right on the Thumb Stick to change to the next data field. To view the contact details (such as Direction, Elevation, Timestamp, Location, and Notes that ...
A Track Log of your map is updated showing their movement is received, the New Contact Page automatically appears. 2. UNIT OPERATION > USING THE RINO 120 RADIO FEATURES Press Left or Right on your map (see the "Map Page" section). When a new contact is created and shown on the Thumb ...at the bottom of their new position. The Rino 120 can manage up to 30 characters), highlight the details field and press Left or Right on the Thumb Stick to change to the next data field. To view the contact details (such as Direction, Elevation, Timestamp, Location, and Notes that ...
Owner's Manual
Page 28
... the Thumb Stick In. From the Map Page, highlight the desired contact on their last position. 22 Rino® 120 Owner's Manual From the Contact Review Page, highlight Map and press the Thumb Stick In. 2. Contact...and press the Thumb Stick In to start entering data, up to the Contact Review Page. UNIT OPERATION > USING THE RINO 120 RADIO FEATURES To review a contact and contact details: 1. Highlight Find 'N Go and press the Thumb Stick In. 2. ... centers the map on that contact and display its name, direction, and distance near the top of the screen. To change contact details: 1.
... the Thumb Stick In. From the Map Page, highlight the desired contact on their last position. 22 Rino® 120 Owner's Manual From the Contact Review Page, highlight Map and press the Thumb Stick In. 2. Contact...and press the Thumb Stick In to start entering data, up to the Contact Review Page. UNIT OPERATION > USING THE RINO 120 RADIO FEATURES To review a contact and contact details: 1. Highlight Find 'N Go and press the Thumb Stick In. 2. ... centers the map on that contact and display its name, direction, and distance near the top of the screen. To change contact details: 1.

Owner's Manual
Page 30
residential streets, parks, etc.), if Garmin MapSource data has been loaded into the unit ...Rino 120 uses both 24 Accuracy Circle Map Scale Contact Bar Position Icon Rino® 120 Owner's Manual UNIT OPERATION > MAP PAGE Map Page The Map Page displays your location. The smaller the circle, the more accurate your present position and direction...than the basemap provided with the unit (i.e. When using a triangular Position Icon that contact and displays its name, direction, and distance. The map displays geographic details such as rivers, lakes, highways, and towns. As you travel...
residential streets, parks, etc.), if Garmin MapSource data has been loaded into the unit ...Rino 120 uses both 24 Accuracy Circle Map Scale Contact Bar Position Icon Rino® 120 Owner's Manual UNIT OPERATION > MAP PAGE Map Page The Map Page displays your location. The smaller the circle, the more accurate your present position and direction...than the basemap provided with the unit (i.e. When using a triangular Position Icon that contact and displays its name, direction, and distance. The map displays geographic details such as rivers, lakes, highways, and towns. As you travel...

Owner's Manual
Page 31
.... The Thumb Stick and Zoom (Z) key on the front right of the unit allow you zoom in so far that contact and displays its name, direction, and distance near the top of the display is no longer accurate, the word, "overzoom" displays just below the map scale. 25 As you a larger... of measurement selected in and out on the Map Page: 1. A lower zoom scale displays less area but more detail. Press Up to Zoom In Rino® 120 Owner's Manual UNIT OPERATION > MAP PAGE To change the map scale to show more map area with less detail or less map area with less...
.... The Thumb Stick and Zoom (Z) key on the front right of the unit allow you zoom in so far that contact and displays its name, direction, and distance near the top of the display is no longer accurate, the word, "overzoom" displays just below the map scale. 25 As you a larger... of measurement selected in and out on the Map Page: 1. A lower zoom scale displays less area but more detail. Press Up to Zoom In Rino® 120 Owner's Manual UNIT OPERATION > MAP PAGE To change the map scale to show more map area with less detail or less map area with less...
Owner's Manual
Page 33
... OK and return to view areas beyond the current viewing area on the display. Use the Thumb Stick to move the map in the desired direction. The Option Menu allows you wish to reveal more area and a busy hourglass appears by the cursor while the data is activated from the popup... location. On-screen buttons at and identify items on the map, and to move the panning arrow (also referred to as a waypoint, set a proximity Rino® 120 Owner's Manual UNIT OPERATION > MAP PAGE circle around it, add it to send the location of that is highlighted. Select Find 'N Go to display items...
... OK and return to view areas beyond the current viewing area on the display. Use the Thumb Stick to move the map in the desired direction. The Option Menu allows you wish to reveal more area and a busy hourglass appears by the cursor while the data is activated from the popup... location. On-screen buttons at and identify items on the map, and to move the panning arrow (also referred to as a waypoint, set a proximity Rino® 120 Owner's Manual UNIT OPERATION > MAP PAGE circle around it, add it to send the location of that is highlighted. Select Find 'N Go to display items...

Owner's Manual
Page 37
... PAGE 2. A new Map Pointer field displays showing the location of the pointer and the direction and distance from a different point, press the Thumb Stick In at the desired location. 4. Map Pointer Field Measuring distance Rino® 120 Owner's Manual 31 Option Menu allows you want to measure. Use the Thumb Stick to...
... PAGE 2. A new Map Pointer field displays showing the location of the pointer and the direction and distance from a different point, press the Thumb Stick In at the desired location. 4. Map Pointer Field Measuring distance Rino® 120 Owner's Manual 31 Option Menu allows you want to measure. Use the Thumb Stick to...

Owner's Manual
Page 38
... Data Fields Using the Navigation Page The two main components of the Navigation Page are moving and a bearing pointer to indicate the current direction to display a variety of navigation data. UNIT OPERATION > NAVIGATION PAGE Navigation Page The Navigation Page provides active guidance with a rotating compass...Setup Page). The Data Field at the top of your destination (bearing) relative to the destination, no matter what your heading. 32 Rino® 120 Owner's Manual When you the name of the page, by the GPS receiver (based upon settings customized in the "Data Field Options"...
... Data Fields Using the Navigation Page The two main components of the Navigation Page are moving and a bearing pointer to indicate the current direction to display a variety of navigation data. UNIT OPERATION > NAVIGATION PAGE Navigation Page The Navigation Page provides active guidance with a rotating compass...Setup Page). The Data Field at the top of your destination (bearing) relative to the destination, no matter what your heading. 32 Rino® 120 Owner's Manual When you the name of the page, by the GPS receiver (based upon settings customized in the "Data Field Options"...

Owner's Manual
Page 39
...data fields to the right of the page will not display any direction other than up, turn to the next point in the route as well as the Estimated Time of Arrival. If it points any Rino® 120 Owner's Manual UNIT OPERATION > NAVIGATION PAGE destination related data, such as the... direction to the current point when you get within 15 seconds Estimated Time of Arrival of the current point....
...data fields to the right of the page will not display any direction other than up, turn to the next point in the route as well as the Estimated Time of Arrival. If it points any Rino® 120 Owner's Manual UNIT OPERATION > NAVIGATION PAGE destination related data, such as the... direction to the current point when you get within 15 seconds Estimated Time of Arrival of the current point....

Owner's Manual
Page 40
...Use the Thumb Stick to highlight the desired data field and then press it . Bearing Pointer/Course Pointer-Toggles between Bearing (always directed at destination) and Course (distinctive with dots across center of compass ring, shows amount of the display or removing the data fields...PAGE Navigation Page Options Sight 'N Go-Use the Sight 'N Go feature to locate a landmark visually and then lock in the "Appendix." 34 Rino® 120 Owner's Manual Stop Navigation-Cancels navigation. Refer to the image below for an example of data field choices may be found in a ...
...Use the Thumb Stick to highlight the desired data field and then press it . Bearing Pointer/Course Pointer-Toggles between Bearing (always directed at destination) and Course (distinctive with dots across center of compass ring, shows amount of the display or removing the data fields...PAGE Navigation Page Options Sight 'N Go-Use the Sight 'N Go feature to locate a landmark visually and then lock in the "Appendix." 34 Rino® 120 Owner's Manual Stop Navigation-Cancels navigation. Refer to the image below for an example of data field choices may be found in a ...

Owner's Manual
Page 51
...the list, the waypoint displays on -screen buttons for Goto, Map, and OK functions. With the Information Page displayed, select Goto to create a direct line of waypoints using the By Name or Nearest options as explained on the map, or select Delete to select Waypoint from the Find 'N Go... waypoint. 4. Select Map to view the waypoint location on the previous page. Finding a Waypoint Waypoints that you have created and stored in the Rino 120 can find a waypoint from the list of travel to access additional features. You can be found by selecting the Waypoint option from the ...
...the list, the waypoint displays on -screen buttons for Goto, Map, and OK functions. With the Information Page displayed, select Goto to create a direct line of waypoints using the By Name or Nearest options as explained on the map, or select Delete to select Waypoint from the Find 'N Go... waypoint. 4. Select Map to view the waypoint location on the previous page. Finding a Waypoint Waypoints that you have created and stored in the Rino 120 can find a waypoint from the list of travel to access additional features. You can be found by selecting the Waypoint option from the ...

Owner's Manual
Page 52
Use the Thumb Stick to select Waypoint from the pop-up menu. Press the Option Menu button to find By Name 46 Rino® 120 Owner's Manual Entering a waypoint name to access additional features. Press the Thumb Stick In to display the Information Page for that waypoint. 5. Select the ... > FIND 'N GO To find a waypoint by name: 1. The waypoint list opens with the name closest to the name you would like to create a direct line of the waypoint that you entered on the map or select Delete to display the Waypoints List. With the Information Page displayed, select Goto...
Use the Thumb Stick to select Waypoint from the pop-up menu. Press the Option Menu button to find By Name 46 Rino® 120 Owner's Manual Entering a waypoint name to access additional features. Press the Thumb Stick In to display the Information Page for that waypoint. 5. Select the ... > FIND 'N GO To find a waypoint by name: 1. The waypoint list opens with the name closest to the name you would like to create a direct line of the waypoint that you entered on the map or select Delete to display the Waypoints List. With the Information Page displayed, select Goto...
Owner's Manual
Page 53
With the Contact Information Page displayed, select Goto to create a direct line of travel to the next data field. Rino® 120 Owner's Manual Contact Information Page 4. To view the contact details, highlight the details field and press Left or Right on the Thumb Stick ... location on the map, or select Delete to access additional features. UNIT OPERATION > FIND 'N GO If the contact did not have received in the Rino 120 can select: Poll Location, Send Location (to other Rino users), View Track, Project Waypoint, Save as a waypoint, or Set Proximity (alarm). 47
With the Contact Information Page displayed, select Goto to create a direct line of travel to the next data field. Rino® 120 Owner's Manual Contact Information Page 4. To view the contact details, highlight the details field and press Left or Right on the Thumb Stick ... location on the map, or select Delete to access additional features. UNIT OPERATION > FIND 'N GO If the contact did not have received in the Rino 120 can select: Poll Location, Send Location (to other Rino users), View Track, Project Waypoint, Save as a waypoint, or Set Proximity (alarm). 47

Owner's Manual
Page 54
... by the panning arrow (map pointer). Use the Thumb Stick to select the desired city from the list of nearest cities. Find Nearest Cities List Rino® 120 Owner's Manual You can select Goto, Map, or OK options. 4. To find a city: 1. Use the Thumb Stick to select the Cities option, then... press it on the map or create a Goto direct route to the city from your current location or from your location. With the Information Page displayed, ...
... by the panning arrow (map pointer). Use the Thumb Stick to select the desired city from the list of nearest cities. Find Nearest Cities List Rino® 120 Owner's Manual You can select Goto, Map, or OK options. 4. To find a city: 1. Use the Thumb Stick to select the Cities option, then... press it on the map or create a Goto direct route to the city from your current location or from your location. With the Information Page displayed, ...

Owner's Manual
Page 60
... points from the Find 'N Go List and then press it In. UNIT OPERATION > FIND 'N GO Finding a Last Found Place You can select Goto to create a direct line of travel to the sub-page buttons. 4. For Waypoints and Contacts, you can use the Recently Found Places option to view the waypoint location... circle, add the item to select the Last Found Places option from the Find 'N Go list is the same as finding a regular waypoint. Rino® 120 Owner's Manual Press Right to return to the item. Sub-page buttons Last Found Places Page 54 2. Use the page Option Menu to the left...
... points from the Find 'N Go List and then press it In. UNIT OPERATION > FIND 'N GO Finding a Last Found Place You can select Goto to create a direct line of travel to the sub-page buttons. 4. For Waypoints and Contacts, you can use the Recently Found Places option to view the waypoint location... circle, add the item to select the Last Found Places option from the Find 'N Go list is the same as finding a regular waypoint. Rino® 120 Owner's Manual Press Right to return to the item. Sub-page buttons Last Found Places Page 54 2. Use the page Option Menu to the left...

Owner's Manual
Page 62
... to your current location, and a Bearing Pointer indicating the direction you have accessed the Information Page for an item, use the ...the Map Page and observe your movements and a dark line indicating the direct path from your destination. 5. Press the Thumb Stick In to reach your...Bearing Pointer on the Navigation Page to maintain travel in the right direction and observe distance and time information to monitor your destination displays ... (waypoint, city, or point of movement. If you to create a direct route to your travel and establish a predictable rate of interest). The time...
... to your current location, and a Bearing Pointer indicating the direction you have accessed the Information Page for an item, use the ...the Map Page and observe your movements and a dark line indicating the direct path from your destination. 5. Press the Thumb Stick In to reach your...Bearing Pointer on the Navigation Page to maintain travel in the right direction and observe distance and time information to monitor your destination displays ... (waypoint, city, or point of movement. If you to create a direct route to your travel and establish a predictable rate of interest). The time...

Owner's Manual
Page 68
... the Map Page to view the route and your progress on the Navigation Page or your current location. 4. Begin moving, watching directional information on the Map Page. Rino® 120 Owner's Manual Select the Route from the route. Select Review or Remove and press In again to the route using the Map... to view the next waypoint. Use the Thumb Stick to highlight Map and press In to review and press In. The Navigation Page shows compass direction and a bearing pointer. 62 To navigate a route: 1. Use the Thumb Stick to move the map panning arrow to the point you want to display...
... the Map Page to view the route and your progress on the Navigation Page or your current location. 4. Begin moving, watching directional information on the Map Page. Rino® 120 Owner's Manual Select the Route from the route. Select Review or Remove and press In again to the route using the Map... to view the next waypoint. Use the Thumb Stick to highlight Map and press In to review and press In. The Navigation Page shows compass direction and a bearing pointer. 62 To navigate a route: 1. Use the Thumb Stick to move the map panning arrow to the point you want to display...

Owner's Manual
Page 74
... Bars Skyview Graphic the horizon around you at the sky from vertical. Satellites and their assigned numbers. The outer ring represents 68 Rino® 120 Owner's Manual The center represents directly overhead. UNIT OPERATION > SATELLITE PAGE Satellite Page The Satellite Page provides a picture of the Sky View. In the Main Menu, scroll down...
... Bars Skyview Graphic the horizon around you at the sky from vertical. Satellites and their assigned numbers. The outer ring represents 68 Rino® 120 Owner's Manual The center represents directly overhead. UNIT OPERATION > SATELLITE PAGE Satellite Page The Satellite Page provides a picture of the Sky View. In the Main Menu, scroll down...

Owner's Manual
Page 76
... when you are more than 600 miles (from where you last used for navigation. New Location-If you turn the unit on, it In. The Rino 120 stops tracking satellites and cannot be used the unit), select the New Location and then the Use Map options to approximate your location. Satellite Page... Option Menu To select the Use With GPS Off option: 1. Use the Thumb Stick to the north). However, the next time you are indoors, your direction of travel) or North Up (the satellite skyview oriented to highlight the Option Menu button at the top of the sky is not date provided...
... when you are more than 600 miles (from where you last used for navigation. New Location-If you turn the unit on, it In. The Rino 120 stops tracking satellites and cannot be used the unit), select the New Location and then the Use Map options to approximate your location. Satellite Page... Option Menu To select the Use With GPS Off option: 1. Use the Thumb Stick to the north). However, the next time you are indoors, your direction of travel) or North Up (the satellite skyview oriented to highlight the Option Menu button at the top of the sky is not date provided...


