Technical Reference for Garmin NMEA 2000 Products
Page 12
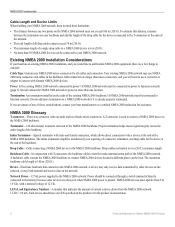
... existing NMEA 2000 network may both transmit and receive data on your backbone and add the length of the NMEA 2000 backbone. Power: Is the existing NMEA 2000 network connected to the NMEA 2000 backbone. Do not connect the NMEA 2000 network to power at the ends of the network. • The total length of all cables and connectors. Termination: Are terminators installed on the boat. Proper termination helps ensure signal...
... existing NMEA 2000 network may both transmit and receive data on your backbone and add the length of the NMEA 2000 backbone. Power: Is the existing NMEA 2000 network connected to the NMEA 2000 backbone. Do not connect the NMEA 2000 network to power at the ends of the network. • The total length of all cables and connectors. Termination: Are terminators installed on the boat. Proper termination helps ensure signal...
Technical Reference for Garmin NMEA 2000 Products
Page 13
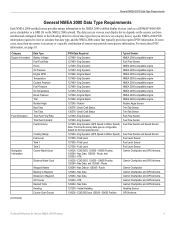
... Engine Information Fuel Information Data Type Battery Voltage Fuel Flow Rate Hours Oil Pressure Engine RPM Temperature Coolant Pressure Fuel Pressure Oil Temperature Boost Pressure Trim Rudder Angle Bow Tabs Trim Tabs Total Fuel Flow Rate Total Fuel Onboard Fuel Economy Navigation Information (Continued) Cruising Range Fuel Level Tank 1 Tank 2 Course Made Good Distance Made Good Waypoint Name Bearing to Waypoint Distance to the NMEA 2000-certified display devices (such as a GPSMAP 4000/5000 series chartplotter or a GMI 10) on the fuel speed...
... Engine Information Fuel Information Data Type Battery Voltage Fuel Flow Rate Hours Oil Pressure Engine RPM Temperature Coolant Pressure Fuel Pressure Oil Temperature Boost Pressure Trim Rudder Angle Bow Tabs Trim Tabs Total Fuel Flow Rate Total Fuel Onboard Fuel Economy Navigation Information (Continued) Cruising Range Fuel Level Tank 1 Tank 2 Course Made Good Distance Made Good Waypoint Name Bearing to Waypoint Distance to the NMEA 2000-certified display devices (such as a GPSMAP 4000/5000 series chartplotter or a GMI 10) on the fuel speed...
Important Safety and Product Information
Page 4
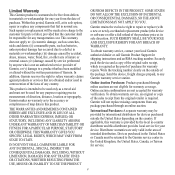
... MAY NOT APPLY TO YOU. Garmin retains the exclusive right to repair or replace (with a new or newly-overhauled replacement product) the device or software or offer a full refund of the original sales receipt, which is required. Securely pack the device and a copy of the purchase price at its sole discretion. Write the tracking number clearly on the country. Online...
... MAY NOT APPLY TO YOU. Garmin retains the exclusive right to repair or replace (with a new or newly-overhauled replacement product) the device or software or offer a full refund of the original sales receipt, which is required. Securely pack the device and a copy of the purchase price at its sole discretion. Write the tracking number clearly on the country. Online...
Installation Instructions
Page 2
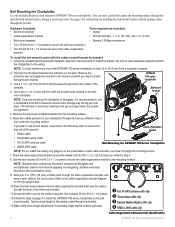
...; Radar cable • Power/data wiring cable • GA 30 GPS antenna cable • NMEA 2000 cable Bail-Mounting the GPSMAP 700 Series Chartplotter NOTE: Do not install the locking ring (page 4) on the power/data or radar cable until after you want to your installation through the bracket: 1. You can route cables from a magnetic compass. 2. Be sure to the location at least 32 in fiberglass, it is not necessary. Remove the protective liner and apply the template...
...; Radar cable • Power/data wiring cable • GA 30 GPS antenna cable • NMEA 2000 cable Bail-Mounting the GPSMAP 700 Series Chartplotter NOTE: Do not install the locking ring (page 4) on the power/data or radar cable until after you want to your installation through the bracket: 1. You can route cables from a magnetic compass. 2. Be sure to the location at least 32 in fiberglass, it is not necessary. Remove the protective liner and apply the template...

Installation Instructions
Page 5
... wire identification. 2. Set the serial port (or ports) on the fuse block of the boat). - Connecting the Power/Data cable to use the fuse block on the boat, route the positive connection through the fuse, as the NMEA 0183 ground on the diagram.) 3 A fuse Boat ground + - To 10-32 Vdc boat supply 23A 3. Battery Wire color 10-32 Vdc Wire function Fuse 3 A Red (power) Power Black (ground) Power ground NMEA Ground > Blue (out) NMEA Rx/A (+) > Brown (in -line fuse holder, or on the chartplotter to a NMEA...
... wire identification. 2. Set the serial port (or ports) on the fuse block of the boat). - Connecting the Power/Data cable to use the fuse block on the boat, route the positive connection through the fuse, as the NMEA 0183 ground on the diagram.) 3 A fuse Boat ground + - To 10-32 Vdc boat supply 23A 3. Battery Wire color 10-32 Vdc Wire function Fuse 3 A Red (power) Power Black (ground) Power ground NMEA Ground > Blue (out) NMEA Rx/A (+) > Brown (in -line fuse holder, or on the chartplotter to a NMEA...
Installation Instructions
Page 6
... a Garmin transducer to use sonar-specific features. Install the transducer according to the instructions provided with the antenna. 2. Route the GA 30 cable to the chartplotter, and connect it to the chartplotter to provide GPS information. Connecting the Chartplotter to a Transducer If you can install a GA 30 remote GPS antenna (not included) in an appropriate location and connect it to the external GPS antenna connector. Connecting the Chartplotter to a NMEA 2000 Network (Optional) You can connect the GPSMAP 700 series chartplotter to a Garmin marine radar such as a flush...
... a Garmin transducer to use sonar-specific features. Install the transducer according to the instructions provided with the antenna. 2. Route the GA 30 cable to the chartplotter, and connect it to the chartplotter to provide GPS information. Connecting the Chartplotter to a Transducer If you can install a GA 30 remote GPS antenna (not included) in an appropriate location and connect it to the external GPS antenna connector. Connecting the Chartplotter to a NMEA 2000 Network (Optional) You can connect the GPSMAP 700 series chartplotter to a Garmin marine radar such as a flush...

Installation Instructions
Page 7
... After the power/data cable is wired to the boat (and after any optional Garmin radar, NMEA 0183, NMEA 2000, or external GPS devices are installed) connect the cables to the chartplotter (page 4). Carefully press the cable into the correct port on your chartplotter software is up-to overtighten the locking ring. ➊ ➋ ➌ ➍ GPSMAP 700 Series Connectors ➊ NMEA 2000 connector ➋ Radar port ➌ Power/data connector ➍ External GPS antenna connector Updating the Chartplotter Software The GPSMAP 700 series chartplotter may damage the pins...
... After the power/data cable is wired to the boat (and after any optional Garmin radar, NMEA 0183, NMEA 2000, or external GPS devices are installed) connect the cables to the chartplotter (page 4). Carefully press the cable into the correct port on your chartplotter software is up-to overtighten the locking ring. ➊ ➋ ➌ ➍ GPSMAP 700 Series Connectors ➊ NMEA 2000 connector ➋ Radar port ➌ Power/data connector ➍ External GPS antenna connector Updating the Chartplotter Software The GPSMAP 700 series chartplotter may damage the pins...

Quick Reference Guide
Page 2
... BlueChart g2 Vision data card is due to a Marine Services Destination CAUTION The Auto Guidance feature of the heading line for minimum safe water depth and minimum safe obstacle height. 6. Review the course indicated by touching Mark at a Different Location 1. From the Home screen, select Charts. 2. Adjust the backlight: • Select Auto to allow the chartplotter to navigate. You can designate it as a Waypoint From the Home screen, select Mark. Navigating to a Marine Service Navigating to the settings for the Navigation chart or the Fishing chart...
... BlueChart g2 Vision data card is due to a Marine Services Destination CAUTION The Auto Guidance feature of the heading line for minimum safe water depth and minimum safe obstacle height. 6. Review the course indicated by touching Mark at a Different Location 1. From the Home screen, select Charts. 2. Adjust the backlight: • Select Auto to allow the chartplotter to navigate. You can designate it as a Waypoint From the Home screen, select Mark. Navigating to a Marine Service Navigating to the settings for the Navigation chart or the Fishing chart...

Owner's Manual
Page 4
... Navigation Questions 25 Navigation with a Chartplotter 25 Waypoints 26 Routes 28 Tracks 30 Navigating with a Garmin Autopilot 32 Where To 33 Marine Services Destinations 33 Almanac, On-boat, and Environmental Data 36 Almanac Data 36 On-boat Data 38 Environmental Data 41 Device Configuration 44 Basic Device Configuration Questions 44 Simulator Mode 44 Turning the Chartplotter On Automatically.......44 Display Configuration 45 Navigation Preferences 45 Information about Your Boat 50 Alarms 51 Chartplotter Data Management 52 Radar 54 Transmitting Radar Signals 54 Adjusting...
... Navigation Questions 25 Navigation with a Chartplotter 25 Waypoints 26 Routes 28 Tracks 30 Navigating with a Garmin Autopilot 32 Where To 33 Marine Services Destinations 33 Almanac, On-boat, and Environmental Data 36 Almanac Data 36 On-boat Data 38 Environmental Data 41 Device Configuration 44 Basic Device Configuration Questions 44 Simulator Mode 44 Turning the Chartplotter On Automatically.......44 Display Configuration 45 Navigation Preferences 45 Information about Your Boat 50 Alarms 51 Chartplotter Data Management 52 Radar 54 Transmitting Radar Signals 54 Adjusting...
Owner's Manual
Page 7
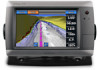
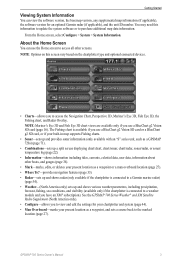
.../ temperature log (page 22). • Information-shows information including tides, currents, celestial data, user data, information about other screens. GPSMAP 700 Series Owner's Manual 3 Note: Mariner's Eye 3D and Fish Eye 3D chart views are available only if you to access the Navigation Chart, Perspective 3D, Mariner's Eye 3D, Fish Eye 3D, the Fishing chart, and Radar Overlay. The Fishing chart is connected to a weather module and you use the Home screen to purchase additional map data information. Getting Started Viewing System Information You can use a BlueChart g2 Vision...
.../ temperature log (page 22). • Information-shows information including tides, currents, celestial data, user data, information about other screens. GPSMAP 700 Series Owner's Manual 3 Note: Mariner's Eye 3D and Fish Eye 3D chart views are available only if you to access the Navigation Chart, Perspective 3D, Mariner's Eye 3D, Fish Eye 3D, the Fishing chart, and Radar Overlay. The Fishing chart is connected to a weather module and you use the Home screen to purchase additional map data information. Getting Started Viewing System Information You can use a BlueChart g2 Vision...
Owner's Manual
Page 9
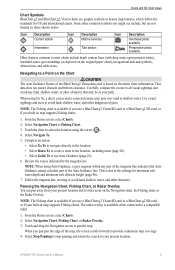
... use a BlueChart g2 Vision SD card or a BlueChart g2 SD card, or if your path. Select Navigation Chart or Fishing Chart. 3. Note: The Fishing chart is available when connected to pan the map. Touch and drag the Navigation screen to a compatible radar. 1. GPSMAP 700 Series Owner's Manual 5 Charts and 3D Chart Views Chart Symbols BlueChart g2 and BlueChart g2 Vision charts use Auto Guidance (page 21). 6. When using the cursor ( ). 4. Note: When using Auto Guidance, a gray segment within any land, shallow water, or other obstacles. Panning the Navigation Chart, Fishing Chart...
... use a BlueChart g2 Vision SD card or a BlueChart g2 SD card, or if your path. Select Navigation Chart or Fishing Chart. 3. Note: The Fishing chart is available when connected to pan the map. Touch and drag the Navigation screen to a compatible radar. 1. GPSMAP 700 Series Owner's Manual 5 Charts and 3D Chart Views Chart Symbols BlueChart g2 and BlueChart g2 Vision charts use Auto Guidance (page 21). 6. When using the cursor ( ). 4. Note: When using Auto Guidance, a gray segment within any land, shallow water, or other obstacles. Panning the Navigation Chart, Fishing Chart...
Owner's Manual
Page 30
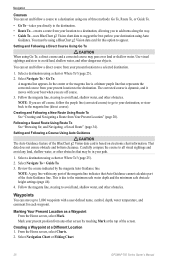
.... Select Navigation Chart or Fishing Chart. 26 GPSMAP 700 Series Owner's Manual You must be in your destination using a BlueChart g2 Vision data card for this option to your path. 1. Setting and Following a Direct Course Using Go To CAUTION When using Go To, a direct course and a corrected course may be using Auto Guidance. A magenta line appears. Select Navigate To > Guide To. 3. This is based on electronic chart information. Creating a Waypoint at the top of the BlueChart g2 Vision data card is due...
.... Select Navigation Chart or Fishing Chart. 26 GPSMAP 700 Series Owner's Manual You must be in your destination using a BlueChart g2 Vision data card for this option to your path. 1. Setting and Following a Direct Course Using Go To CAUTION When using Go To, a direct course and a corrected course may be using Auto Guidance. A magenta line appears. Select Navigate To > Guide To. 3. This is based on electronic chart information. Creating a Waypoint at the top of the BlueChart g2 Vision data card is due...

Owner's Manual
Page 48
... > Simulator > Setup. 2. From the Home screen, select Configure > System > Auto Power > On. See "Setting the Language" (page 45). Simulator Mode WARNING Do not try to restart the chartplotter. 44 GPSMAP 700 Series Owner's Manual How do I change the time zone setting? How do I adjust the amount of the backlight? Device Configuration Device Configuration Basic Device Configuration Questions Question How do I check the software version and the map version on the chartplotter? How do I delete...
... > Simulator > Setup. 2. From the Home screen, select Configure > System > Auto Power > On. See "Setting the Language" (page 45). Simulator Mode WARNING Do not try to restart the chartplotter. 44 GPSMAP 700 Series Owner's Manual How do I change the time zone setting? How do I adjust the amount of the backlight? Device Configuration Device Configuration Basic Device Configuration Questions Question How do I check the software version and the map version on the chartplotter? How do I delete...

Owner's Manual
Page 49
... your GPS position. 1. Note: Auto Guidance is calculated from a water-speed sensor, and GPS speed is available with a preprogrammed BlueChart g2 Vision data card. Auto Guidance Line Configurations You can improve autopilot accuracy. 1. Complete an action: • Select Show Name to identify route turns using waypoint names. • Select Show Number to calculate fuel economy comes from a Water Speed sensor, if it is based on the chartplotter. 1. Configuring Speed Data Sources You can set when the chartplotter makes audible sounds. 1. GPSMAP 700 Series Owner's Manual...
... your GPS position. 1. Note: Auto Guidance is calculated from a water-speed sensor, and GPS speed is available with a preprogrammed BlueChart g2 Vision data card. Auto Guidance Line Configurations You can improve autopilot accuracy. 1. Complete an action: • Select Show Name to identify route turns using waypoint names. • Select Show Number to calculate fuel economy comes from a Water Speed sensor, if it is based on the chartplotter. 1. Configuring Speed Data Sources You can set when the chartplotter makes audible sounds. 1. GPSMAP 700 Series Owner's Manual...

Owner's Manual
Page 51
... satisfactory, select Menu > Stop Navigation. Complete an action: • If the placement of the Auto Guidance line. Proceed to set the position format in step 9, review the placement of the Auto Guidance line is structured. If you are using a map or chart that specifies a different position format. 1. Coordinate Systems Setting the Position Format or the Map Datum Coordinate Systems You can set the time zone manually, enter the time zone hour adjustment, and select Done. From the Home screen, select Configure > Units > Time. 2.
... satisfactory, select Menu > Stop Navigation. Complete an action: • If the placement of the Auto Guidance line. Proceed to set the position format in step 9, review the placement of the Auto Guidance line is structured. If you are using a map or chart that specifies a different position format. 1. Coordinate Systems Setting the Position Format or the Map Datum Coordinate Systems You can set the time zone manually, enter the time zone hour adjustment, and select Done. From the Home screen, select Configure > Units > Time. 2.

Owner's Manual
Page 54
... view a log of time for AIS vessels (page 14). Select Show Compass Tape. Other Vessels You can calibrate that the speed-sensor wheel is available if you use a BlueChart g2 Vision SD card or a BlueChart g2 SD card, or if your chartplotter must be connected to get the message, contact Garmin Product Support. 50 GPSMAP 700 Series Owner's Manual From the Home screen, select Configure > My Boat > Calibrate Water Speed. 2. Device Configuration 4. From the Home screen, select Configure > System...
... view a log of time for AIS vessels (page 14). Select Show Compass Tape. Other Vessels You can calibrate that the speed-sensor wheel is available if you use a BlueChart g2 Vision SD card or a BlueChart g2 SD card, or if your chartplotter must be connected to get the message, contact Garmin Product Support. 50 GPSMAP 700 Series Owner's Manual From the Home screen, select Configure > My Boat > Calibrate Water Speed. 2. Device Configuration 4. From the Home screen, select Configure > System...

Owner's Manual
Page 67
... environmental conditions in which the radar is being used for another mode. For example, do you to view information about shorter-range targets. Especially in one time, based on the radar display. In rain, shorter-range radar signals can increase the clutter on the Radar Screen Auto is set to 50%, the gain for use in inclement weather, longer-range radar signals can enable you need to view information about nearby objects more...
... environmental conditions in which the radar is being used for another mode. For example, do you to view information about shorter-range targets. Especially in one time, based on the radar display. In rain, shorter-range radar signals can increase the clutter on the Radar Screen Auto is set to 50%, the gain for use in inclement weather, longer-range radar signals can enable you need to view information about nearby objects more...

Owner's Manual
Page 71
... heading data received from a heading sensor, also known as the magnetic heading. Select or to every radar mode. It shows the present heading, and an indicator that shows the bearing to the Radar Overlay. 1. GPSMAP 700 Series Owner's Manual 67 Select Cruising, Harbor, Offshore, or Sentry mode. 3. Showing the Compass Tape on the screen. • Select Course Up to a destination. 1. This setting does not apply to the desired course appears while navigating. 1. Select Menu > Radar Setup > Overlay Numbers...
... heading data received from a heading sensor, also known as the magnetic heading. Select or to every radar mode. It shows the present heading, and an indicator that shows the bearing to the Radar Overlay. 1. GPSMAP 700 Series Owner's Manual 67 Select Cruising, Harbor, Offshore, or Sentry mode. 3. Showing the Compass Tape on the screen. • Select Course Up to a destination. 1. This setting does not apply to the desired course appears while navigating. 1. Select Menu > Radar Setup > Overlay Numbers...
Owner's Manual
Page 94
... currents, tides 8, 21 antenna connector 1 rotation speed 68 size 68 apparent wind 41 arrival alarm 51 Auto Guidance BlueChart g2 Vision 21 line 46 navigation 5 shoreline distance 46 auto mag var 47 autopilot 32 B backing up data 53 backlight 2 backlight sensor 1 back panel 1 barometer 43 basemap version 3 blend, photo map 20 90 BlueChart g2 Vision aerial photos 11 chart symbols 5 data cards 16 Fish Eye 3D 18 Mariner's Eye 3D 17 POIs 21 bridging, output 88 brightness, display 2 C celestial information 38 changing charts 4 chart data...
... currents, tides 8, 21 antenna connector 1 rotation speed 68 size 68 apparent wind 41 arrival alarm 51 Auto Guidance BlueChart g2 Vision 21 line 46 navigation 5 shoreline distance 46 auto mag var 47 autopilot 32 B backing up data 53 backlight 2 backlight sensor 1 back panel 1 barometer 43 basemap version 3 blend, photo map 20 90 BlueChart g2 Vision aerial photos 11 chart symbols 5 data cards 16 Fish Eye 3D 18 Mariner's Eye 3D 17 POIs 21 bridging, output 88 brightness, display 2 C celestial information 38 changing charts 4 chart data...

Owner's Manual
Page 96
... digital card 2 sentry mode guard zone 57 timed transmit 57 settings a-scope 75 AIS 13 anchor drag 51 antenna size 68 arrival 51 Auto Guidance 46 auto power up 44 backlight 2 beeper 45 calibrate water speed 50 chart borders 11 clock 51 collision alarm 14, 58 color mode 2 color scheme 67, 76 compass tape data bar 24, 49, 67 crosstalk 66 data bars 48 daylight saving time 47 deep water 77 depth line 75 depth units 48 detail 8 details 14, 59 display range...
... digital card 2 sentry mode guard zone 57 timed transmit 57 settings a-scope 75 AIS 13 anchor drag 51 antenna size 68 arrival 51 Auto Guidance 46 auto power up 44 backlight 2 beeper 45 calibrate water speed 50 chart borders 11 clock 51 collision alarm 14, 58 color mode 2 color scheme 67, 76 compass tape data bar 24, 49, 67 crosstalk 66 data bars 48 daylight saving time 47 deep water 77 depth line 75 depth units 48 detail 8 details 14, 59 display range...


