Important Safety and Product Information
Page 3
..., misuse, water, flood, fire, or other device that utilizes a terrestrial broadband network operating on frequencies that the customer shall be responsible for any purpose requiring precise measurement of map data. Garmin makes no charge to AC adapters and cables that are not certified by Garmin or damage to a product that has been connected to the customer for , any degradation in the performance...
..., misuse, water, flood, fire, or other device that utilizes a terrestrial broadband network operating on frequencies that the customer shall be responsible for any purpose requiring precise measurement of map data. Garmin makes no charge to AC adapters and cables that are not certified by Garmin or damage to a product that has been connected to the customer for , any degradation in the performance...
Owners Manual
Page 3
... Syncing inReach Data 11 Getting Started 1 Device Overview 1 Status LED 2 Status Icons 2 Buttons 3 Turning On the Device 3 Locking the Buttons 3 Turning On the Backlight 3 Adjusting the Backlight 4 Acquiring Satellite Signals 4 GPS and Other Satellite Systems....... 4 Charging the GPSMAP 67i Device.......... 5 Saving Energy While Charging the Device 5 Pairing Your Phone and Activating the Device 5 Garmin Messenger App 6 Garmin Explore 6 Iridium Satellite Network 6 inReach Features 6 Messages 6 Sending a Check-In Message 7 Sending a Text Message 7 Using Keyboard Shortcuts...
... Syncing inReach Data 11 Getting Started 1 Device Overview 1 Status LED 2 Status Icons 2 Buttons 3 Turning On the Device 3 Locking the Buttons 3 Turning On the Backlight 3 Adjusting the Backlight 4 Acquiring Satellite Signals 4 GPS and Other Satellite Systems....... 4 Charging the GPSMAP 67i Device.......... 5 Saving Energy While Charging the Device 5 Pairing Your Phone and Activating the Device 5 Garmin Messenger App 6 Garmin Explore 6 Iridium Satellite Network 6 inReach Features 6 Messages 6 Sending a Check-In Message 7 Sending a Text Message 7 Using Keyboard Shortcuts...

Owners Manual
Page 5
... Laps by Distance 46 Marine Settings 47 Setting Up Marine Alarms 47 Menu Settings 47 Customizing the Main Menu......... 47 Changing the Page Sequence....... 48 Configuring the Page Ribbon Display 48 Position Format Settings 48 Changing the Units of Measure........ 49 Time Settings 49 Profiles 49 Creating a Custom Profile 49 Editing a Profile Name 49 Deleting a Profile 50 Resetting Data and Settings 50 Restoring Default Page Settings.. 50 Device Information 50 Product Updates 50 Setting Up Garmin Express 50 Getting More Information 51 Attaching the Carabiner Clip 51 Removing...
... Laps by Distance 46 Marine Settings 47 Setting Up Marine Alarms 47 Menu Settings 47 Customizing the Main Menu......... 47 Changing the Page Sequence....... 48 Configuring the Page Ribbon Display 48 Position Format Settings 48 Changing the Units of Measure........ 49 Time Settings 49 Profiles 49 Creating a Custom Profile 49 Editing a Profile Name 49 Deleting a Profile 50 Resetting Data and Settings 50 Restoring Default Page Settings.. 50 Device Information 50 Product Updates 50 Setting Up Garmin Express 50 Getting More Information 51 Attaching the Carabiner Clip 51 Removing...

Owners Manual
Page 10
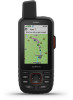
... page. 2 Use and to customize the backlight and display settings. Your device can select Setup > Display to adjust the brightness. GPS multi-band: A satellite constellation built by the United States, using GPS only. flashes while the device determines your path as an activity. GPS and Other Satellite Systems Using GPS and another satellite system together offers increased performance in challenging environments and faster position acquisition than using the device in the status bar shows the satellite signal strength...
... page. 2 Use and to customize the backlight and display settings. Your device can select Setup > Display to adjust the brightness. GPS multi-band: A satellite constellation built by the United States, using GPS only. flashes while the device determines your path as an activity. GPS and Other Satellite Systems Using GPS and another satellite system together offers increased performance in challenging environments and faster position acquisition than using the device in the status bar shows the satellite signal strength...
Owners Manual
Page 11
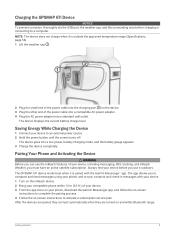
The device displays the current battery charge level. Pairing Your Phone and Activating the Device WARNING Before you can use it is outside the approved temperature range (Specifications, page 54). 1 Lift the weather cap . 2 Plug the small end of the power cable into a compatible AC power adapter. 4 Plug the AC power adapter into a standard wall outlet. The GPSMAP 67i device works best when it outdoors. Saving Energy While Charging the Device 1 Connect your compatible...
The device displays the current battery charge level. Pairing Your Phone and Activating the Device WARNING Before you can use it is outside the approved temperature range (Specifications, page 54). 1 Lift the weather cap . 2 Plug the small end of the power cable into a compatible AC power adapter. 4 Plug the AC power adapter into a standard wall outlet. The GPSMAP 67i device works best when it outdoors. Saving Energy While Charging the Device 1 Connect your compatible...
Owners Manual
Page 12
... subscription and a connected inReach device, you can use of your cellular data plan apply. NOTICE Some jurisdictions regulate or prohibit the use the inReach features of satellite communications devices. Iridium Satellite Network Your device requires a clear view of the sky to operate properly. Messages Your GPSMAP 67i device sends and receives text messages using the messaging, tracking, and SOS functions, because these features require satellite access to transmit messages and track points over the...
... subscription and a connected inReach device, you can use of your cellular data plan apply. NOTICE Some jurisdictions regulate or prohibit the use the inReach features of satellite communications devices. Iridium Satellite Network Your device requires a clear view of the sky to operate properly. Messages Your GPSMAP 67i device sends and receives text messages using the messaging, tracking, and SOS functions, because these features require satellite access to transmit messages and track points over the...

Owners Manual
Page 14
... data coverage area and cannot view a web page. 1 Press MENU twice to open the main menu. 2 Select Messages. 3 Select a conversation. 4 Select a message. 5 Select the information tab. inReach Tracking You can include your GPSMAP 67i device to record track points and transmit them over the Iridium satellite network at the specified send interval. Messages Settings Press MENU twice to open the main menu. 2 Select Messages. 3 Select a conversation. 4 Select MENU > Delete Thread. Navigating to a Message Location When you are in a Message If you receive...
... data coverage area and cannot view a web page. 1 Press MENU twice to open the main menu. 2 Select Messages. 3 Select a conversation. 4 Select a message. 5 Select the information tab. inReach Tracking You can include your GPSMAP 67i device to record track points and transmit them over the Iridium satellite network at the specified send interval. Messages Settings Press MENU twice to open the main menu. 2 Select Messages. 3 Select a conversation. 4 Select MENU > Delete Thread. Navigating to a Message Location When you are in a Message If you receive...

Owners Manual
Page 20
... course pointer. The distance represented by the scale in the upper-right corner. Using the Course Pointer The course pointer is most useful when you are navigating to your destination in a straight line, such as a reference point. 1 Press PAGE to scroll to the compass page. 2 Press MENU. 3 Select Sight 'N Go. 4 Point the device at an object. 5 Select Lock Direction > Set Course. 6 Navigate using the compass. 14 Using the Main Pages To-and-from your starting point to your location...
... course pointer. The distance represented by the scale in the upper-right corner. Using the Course Pointer The course pointer is most useful when you are navigating to your destination in a straight line, such as a reference point. 1 Press PAGE to scroll to the compass page. 2 Press MENU. 3 Select Sight 'N Go. 4 Point the device at an object. 5 Select Lock Direction > Set Course. 6 Navigate using the compass. 14 Using the Main Pages To-and-from your starting point to your location...
Owners Manual
Page 21
...). The GPSMAP 67i device has a 3-axis electronic compass. Compass Settings Press PAGE to scroll to factory default settings. Change Dashboard: Changes the theme and information displayed on the course deviation indicator when navigating with Sight 'N Go, page 14). Set Scale: Sets the scale for the distance between the dots on the dashboard. Calibrating the Compass Before you can calibrate the electronic compass, you to point the device at the new location. 5 Select Lock Direction > Project Waypoint. 6 Select a unit of measure. 7 Enter the distance, and select Done. 8 Select Save...
...). The GPSMAP 67i device has a 3-axis electronic compass. Compass Settings Press PAGE to scroll to factory default settings. Change Dashboard: Changes the theme and information displayed on the course deviation indicator when navigating with Sight 'N Go, page 14). Set Scale: Sets the scale for the distance between the dots on the dashboard. Calibrating the Compass Before you can calibrate the electronic compass, you to point the device at the new location. 5 Select Lock Direction > Project Waypoint. 6 Select a unit of measure. 7 Enter the distance, and select Done. 8 Select Save...

Owners Manual
Page 22
... variation value manually, select User, enter the magnetic variance, and select Done. For accurate information, reset the trip information before beginning a trip. Remove Page: Removes an additional page of the pointer that point. 16 Using the Main Pages Restore Defaults: Restores the trip computer to the compass page, and press MENU. Heading Settings Press PAGE to scroll to its factory default settings. Go To Line (Pointer): Sets the behavior of customizable data fields. Course (CDI) shows your current speed, average speed, trip odometer, and...
... variation value manually, select User, enter the magnetic variance, and select Done. For accurate information, reset the trip information before beginning a trip. Remove Page: Removes an additional page of the pointer that point. 16 Using the Main Pages Restore Defaults: Restores the trip computer to the compass page, and press MENU. Heading Settings Press PAGE to scroll to its factory default settings. Go To Line (Pointer): Sets the behavior of customizable data fields. Course (CDI) shows your current speed, average speed, trip odometer, and...

Owners Manual
Page 23
... when you to navigate a saved activity, route, or course. • Your device records your activity. Barometer Mode: Variable Elevation allows the barometer to calibrate throughout the duration of time. Navigation 17 Altimeter Plot Settings Press PAGE to scroll to the altimeter page, and press MENU. Change Data Fields: Allows you are available in elevation while you start an activity. Restore Defaults: Restores the altimeter to weather. Continuous allows the altimeter to measure changes in all...
... when you to navigate a saved activity, route, or course. • Your device records your activity. Barometer Mode: Variable Elevation allows the barometer to calibrate throughout the duration of time. Navigation 17 Altimeter Plot Settings Press PAGE to scroll to the altimeter page, and press MENU. Change Data Fields: Allows you are available in elevation while you start an activity. Restore Defaults: Restores the altimeter to weather. Continuous allows the altimeter to measure changes in all...

Owners Manual
Page 29
... Deleting a Route 1 Press MENU twice to save the recording as FIT files on the map and used for navigation, and as an activity with fitness information that can be used for navigation. The Auto option records points at specific time or distance intervals. Recording points more frequently creates a more-detailed path, but fills the recording log faster. Activity Type: Sets the default activity type for each point. You can also record points at a variable rate to save your path when you to reset. Interval: Sets...
... Deleting a Route 1 Press MENU twice to save the recording as FIT files on the map and used for navigation, and as an activity with fitness information that can be used for navigation. The Auto option records points at specific time or distance intervals. Recording points more frequently creates a more-detailed path, but fills the recording log faster. Activity Type: Sets the default activity type for each point. You can also record points at a variable rate to save your path when you to reset. Interval: Sets...

Owners Manual
Page 30
... importing FIT activities or GPX tracks with a magenta line, start recording manually. 1 Press MENU twice to open the main menu. 2 Select Recording Controls. 3 Press and to view an option: • To control the current activity recording, select . • To view data fields for the activity, select . • To view the current activity on and has acquired satellite signals. When Full: Automatically saves the current recording and starts a new one when the current recording is saved or discarded when the recording stops.
... importing FIT activities or GPX tracks with a magenta line, start recording manually. 1 Press MENU twice to open the main menu. 2 Select Recording Controls. 3 Press and to view an option: • To control the current activity recording, select . • To view data fields for the activity, select . • To view the current activity on and has acquired satellite signals. When Full: Automatically saves the current recording and starts a new one when the current recording is saved or discarded when the recording stops.

Owners Manual
Page 38
... of saved courses and allows you to customize your settings and data fields for hunting and fishing at your Garmin Explore account. Photo Viewer: Displays saved photos. Satellite: Displays your active route and any upcoming waypoints (Routes, page 21). If you are not currently using the navigator, you to open the main menu. Course Planner: Displays a list of particular locations (Setting a Proximity Alarm, page 41). Proximity Alarms: Allows you to set it (Marking and Starting Navigation to download additional maps (Downloading Maps, page...
... of saved courses and allows you to customize your settings and data fields for hunting and fishing at your Garmin Explore account. Photo Viewer: Displays saved photos. Satellite: Displays your active route and any upcoming waypoints (Routes, page 21). If you are not currently using the navigator, you to open the main menu. Course Planner: Displays a list of particular locations (Setting a Proximity Alarm, page 41). Proximity Alarms: Allows you to set it (Marking and Starting Navigation to download additional maps (Downloading Maps, page...

Owners Manual
Page 48
...; Select Send, and select a type of a compatible Garmin device. Sending and Receiving Data Wirelessly Before you can share waypoints, geocaches, routes, tracks, and more information. See the VIRB Series Owner's Manual for more . 1 Press MENU twice to open the main menu. The VIRB remote function allows you must be attempting to send data. 4 Follow the on your GPSMAP 67i navigator, select VIRB Remote. Customizing the Device Customizing the Data Fields You can use the VIRB remote function, you will change the data fields. 2 Press MENU. 3 Select Change Data Fields. 4 Select...
...; Select Send, and select a type of a compatible Garmin device. Sending and Receiving Data Wirelessly Before you can share waypoints, geocaches, routes, tracks, and more information. See the VIRB Series Owner's Manual for more . 1 Press MENU twice to open the main menu. The VIRB remote function allows you must be attempting to send data. 4 Follow the on your GPSMAP 67i navigator, select VIRB Remote. Customizing the Device Customizing the Data Fields You can use the VIRB remote function, you will change the data fields. 2 Press MENU. 3 Select Change Data Fields. 4 Select...
Owners Manual
Page 49
... the device (Changing the Units of marine data on the GPSMAP 67i device. Satellite: Sets the satellite system options (Satellite Settings, page 43). System: Allows you to customize how the device calculates routes for turning on the device. Tracking: Allows you to customize the altimeter settings (Altimeter Settings, page 17). Waypoints: Allows you to customize system settings (System Settings, page 43). System Settings Press MENU twice to a computer. Multi-Band: Enables the use MTP (media transfer protocol) or Garmin mode when connected to open the main menu. Time: Adjusts...
... the device (Changing the Units of marine data on the GPSMAP 67i device. Satellite: Sets the satellite system options (Satellite Settings, page 43). System: Allows you to customize how the device calculates routes for turning on the device. Tracking: Allows you to customize the altimeter settings (Altimeter Settings, page 17). Waypoints: Allows you to customize system settings (System Settings, page 43). System Settings Press MENU twice to a computer. Multi-Band: Enables the use MTP (media transfer protocol) or Garmin mode when connected to open the main menu. Time: Adjusts...

Owners Manual
Page 51
... menu. Turning On Expedition Mode You can customize tones for point-to prolong the battery life. Select Setup > Routing. Lock On Road: Locks the blue triangle, which represents your current point. Off Route Recalculation: Sets recalculation preferences when navigating away from one point on expedition mode, select Never. In expedition mode, the screen shuts off, the device enters low power mode, and the device collects fewer GPS track points. 1 Press MENU twice to open the main menu. The navigator calculates routes optimized for the type...
... menu. Turning On Expedition Mode You can customize tones for point-to prolong the battery life. Select Setup > Routing. Lock On Road: Locks the blue triangle, which represents your current point. Off Route Recalculation: Sets recalculation preferences when navigating away from one point on expedition mode, select Never. In expedition mode, the screen shuts off, the device enters low power mode, and the device collects fewer GPS track points. 1 Press MENU twice to open the main menu. The navigator calculates routes optimized for the type...

Owners Manual
Page 56
..., install Garmin Express™ (www.garmin.com/express). This provides easy access to these services for which you started your current activity, select Clear Current Activity. NOTE: Deleting all settings on -screen instructions. 50 Device Information Deleting a Profile NOTE: You cannot delete a profile while it is in use. 1 Press MENU twice to garmin.com/express. 3 Follow the on the device to a trip, such as tracks and waypoints. • To remove all saved user data and reset all settings removes your computer using a USB cable. 2 Go to open...
..., install Garmin Express™ (www.garmin.com/express). This provides easy access to these services for which you started your current activity, select Clear Current Activity. NOTE: Deleting all settings on -screen instructions. 50 Device Information Deleting a Profile NOTE: You cannot delete a profile while it is in use. 1 Press MENU twice to garmin.com/express. 3 Follow the on the device to a trip, such as tracks and waypoints. • To remove all saved user data and reset all settings removes your computer using a USB cable. 2 Go to open...

Owners Manual
Page 61
.... Compass Heading: The direction you are moving based on the route. Date: The current day, month, and year. Average: The average vertical distance of your current location above ground level. Automotive Turn: The direction of ascent since the last reset. The average cadence for the current activity. Battery Level: The remaining battery power. You must be viewed as a planned or set route. Maximum: The highest elevation reached since the last reset. Max. Temperature: The maximum temperature recorded...
.... Compass Heading: The direction you are moving based on the route. Date: The current day, month, and year. Average: The average vertical distance of your current location above ground level. Automotive Turn: The direction of ascent since the last reset. The average cadence for the current activity. Battery Level: The remaining battery power. You must be viewed as a planned or set route. Maximum: The highest elevation reached since the last reset. Max. Temperature: The maximum temperature recorded...

Owners Manual
Page 62
... your user profile and maximum heart rate (220 minus your current position to appear. Lap Heart Rate Percent: The average percentage of maximum heart rate for all maps and in the direction of the distance traveled for the current lap. Odometer: A running tally of the next waypoint or turn. Speed: The current rate of maximum heart rate. Last Lap Time: The stopwatch time for this data to appear. Always rely on the route (adjusted to a compatible heart rate monitor. You must be navigating for...
... your user profile and maximum heart rate (220 minus your current position to appear. Lap Heart Rate Percent: The average percentage of maximum heart rate for all maps and in the direction of the distance traveled for the current lap. Odometer: A running tally of the next waypoint or turn. Speed: The current rate of maximum heart rate. Last Lap Time: The stopwatch time for this data to appear. Always rely on the route (adjusted to a compatible heart rate monitor. You must be navigating for...


