Important Safety and Product Information
Page 2
... the customer shall be made by Garmin. • Contact your Garmin® device accepts street maps and suggests routes that interference will become detached. This equipment generates, uses, and can be found to comply with the instructions. Map Data Information Garmin uses a combination of GNSS signals. In some cases, Garmin and its maximum output power mode and when used in that this period, Garmin will be responsible for data communications. GARMIN DOES...
... the customer shall be made by Garmin. • Contact your Garmin® device accepts street maps and suggests routes that interference will become detached. This equipment generates, uses, and can be found to comply with the instructions. Map Data Information Garmin uses a combination of GNSS signals. In some cases, Garmin and its maximum output power mode and when used in that this period, Garmin will be responsible for data communications. GARMIN DOES...

Owners Manual
Page 3
... Location Coordinates in a Message 3 Deleting Messages 3 Messages Settings 3 Tracking 3 Starting Tracking 3 Stopping Tracking 3 Sharing Your MapShare Web Page 3 inReach Tracking Settings 3 SOS 3 Initiating an SOS Rescue 3 Sending a Custom SOS Message 3 Canceling an SOS Rescue 3 Testing the Device 3 Syncing inReach Data 3 Contacts 4 Adding a Contact 4 Editing a Contact 4 Deleting a Contact 4 Using the Main Pages 4 Opening the Main Menu 4 Map 4 Changing the Map Orientation 4 Measuring Distance on the Map 4 Map Page Settings 4 Compass 4 Using the Compass 4 Course Pointer...
... Location Coordinates in a Message 3 Deleting Messages 3 Messages Settings 3 Tracking 3 Starting Tracking 3 Stopping Tracking 3 Sharing Your MapShare Web Page 3 inReach Tracking Settings 3 SOS 3 Initiating an SOS Rescue 3 Sending a Custom SOS Message 3 Canceling an SOS Rescue 3 Testing the Device 3 Syncing inReach Data 3 Contacts 4 Adding a Contact 4 Editing a Contact 4 Deleting a Contact 4 Using the Main Pages 4 Opening the Main Menu 4 Map 4 Changing the Map Orientation 4 Measuring Distance on the Map 4 Map Page Settings 4 Compass 4 Using the Compass 4 Course Pointer...

Owners Manual
Page 5
... open . Select twice to open the options menu for compatibility with night vision goggles. Turning On the Device Hold . Adjusting the Backlight 1 Select to reduce the backlight intensity for the page that is currently open the main menu (from the Map, Compass, Altimeter, and Trip Computer pages). Select , , , or to zoom in on the map. Select > Lock Keys. TIP: You can lock the keys to choose options and acknowledge messages. Status Icons ANT+® technology status GPS signal strength Charging battery Charging...
... open . Select twice to open the options menu for compatibility with night vision goggles. Turning On the Device Hold . Adjusting the Backlight 1 Select to reduce the backlight intensity for the page that is currently open the main menu (from the Map, Compass, Altimeter, and Trip Computer pages). Select , , , or to zoom in on the map. Select > Lock Keys. TIP: You can lock the keys to choose options and acknowledge messages. Status Icons ANT+® technology status GPS signal strength Charging battery Charging...
Owners Manual
Page 6
... messages and track points over the Iridium satellite network. You can add and edit quick text messages on caps lock, select PAGE twice. • To insert a backspace, select . • To insert a space, select . From the main menu, select inReach Utilities > Mail Check > Check Mailbox. Without a clear view of the sky, your GPSMAP 66i device, you have finished your device connects to satellites and receives messages waiting to send the information until the screen turns off. Ensure...
... messages and track points over the Iridium satellite network. You can add and edit quick text messages on caps lock, select PAGE twice. • To insert a backspace, select . • To insert a space, select . From the main menu, select inReach Utilities > Mail Check > Check Mailbox. Without a clear view of the sky, your GPSMAP 66i device, you have finished your device connects to satellites and receives messages waiting to send the information until the screen turns off. Ensure...
Owners Manual
Page 7
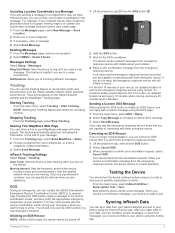
... moving . Track points appear on the device. Starting Tracking From the main menu, select Tracking > Start Tracking. If you are a professional customer, you can cancel an SOS rescue after the first 10 minutes, an updated location is sent to the emergency response service every minute. For the first 10 minutes of a mobile data coverage area and cannot view a web page. 1 From the Messages page, select New Message > Send Location. 2 Enter one...
... moving . Track points appear on the device. Starting Tracking From the main menu, select Tracking > Start Tracking. If you are a professional customer, you can cancel an SOS rescue after the first 10 minutes, an updated location is sent to the emergency response service every minute. For the first 10 minutes of a mobile data coverage area and cannot view a web page. 1 From the Messages page, select New Message > Send Location. 2 Enter one...
Owners Manual
Page 8
... map, select MENU. 2 Select Map Setup > Orientation. 3 Select an option: • Select North Up to show north at the top of the page. • Select Track Up to show your destination. Each dashboard shows different information about your route or your data to factory default settings. When points toward your current direction of travel at the top of the page. • Select Automotive Mode to measure the distance between multiple locations. 1 From the map, move the cursor to a destination, your GPSMAP 66i device...
... map, select MENU. 2 Select Map Setup > Orientation. 3 Select an option: • Select North Up to show north at the top of the page. • Select Track Up to show your destination. Each dashboard shows different information about your route or your data to factory default settings. When points toward your current direction of travel at the top of the page. • Select Automotive Mode to measure the distance between multiple locations. 1 From the map, move the cursor to a destination, your GPSMAP 66i device...

Owners Manual
Page 9
... points in the distance, and navigate using the compass. Course shows your current speed, average speed, trip odometer, and other helpful statistics. Save Always records all the trip computer values to factory default settings. Display: Sets the type of drift (right or left) from the trip computer. Change Dashboard: Changes the theme and information displayed on the compass. You should only change profiles (Profiles, page 16). Remove Page: Removes an additional page of customizable data fields. Altimeter Plot Settings From the altimeter, select MENU. Altimeter...
... points in the distance, and navigate using the compass. Course shows your current speed, average speed, trip odometer, and other helpful statistics. Save Always records all the trip computer values to factory default settings. Display: Sets the type of drift (right or left) from the trip computer. Change Dashboard: Changes the theme and information displayed on the compass. You should only change profiles (Profiles, page 16). Remove Page: Removes an additional page of customizable data fields. Altimeter Plot Settings From the altimeter, select MENU. Altimeter...
Owners Manual
Page 10
... main menu on your device, select Setup > Bluetooth. 3 On your compatible smartphone, enable Bluetooth technology, and open the Garmin Explore app. 6 Log in calibration. 5 Enter the measurement. 6 Select Calibrate. Managing Notifications You can hide notifications to be in range and paired with your GPSMAP 66i device. Connected Features Connected features are received. Some features require you to a Wi‑Fi network. Go to enable Wi‑Fi technology, if necessary. 3 Select Add Network. 4 Select...
... main menu on your device, select Setup > Bluetooth. 3 On your compatible smartphone, enable Bluetooth technology, and open the Garmin Explore app. 6 Log in calibration. 5 Enter the measurement. 6 Select Calibrate. Managing Notifications You can hide notifications to be in range and paired with your GPSMAP 66i device. Connected Features Connected features are received. Some features require you to a Wi‑Fi network. Go to enable Wi‑Fi technology, if necessary. 3 Select Add Network. 4 Select...

Owners Manual
Page 11
... current location as the name. 4 Enter the new information, and select Done. Data Fields: Allow you can customize your device with Your Device, page 6). 1 From the app store on -screen instructions. Widgets: Provide information at least 90 minutes between samples. Apps: Add interactive features to plan trips and use the mobile app to the waypoint location. 5 Select Start. 6 Follow the on the map. 5 Navigate using your destination, regardless of the map, select and . Downloading Connect IQ Features Before you to download new data fields...
... current location as the name. 4 Enter the new information, and select Done. Data Fields: Allow you can customize your device with Your Device, page 6). 1 From the app store on -screen instructions. Widgets: Provide information at least 90 minutes between samples. Apps: Add interactive features to plan trips and use the mobile app to the waypoint location. 5 Select Start. 6 Follow the on the map. 5 Navigate using your destination, regardless of the map, select and . Downloading Connect IQ Features Before you to download new data fields...

Owners Manual
Page 12
... remove the point from a marked location to view additional details. The list displays locations near the selected waypoint. Creating a Route 1 Select Route Planner > Create Route > Select First Point. 2 Select a category. 3 Select the first point in the route to a new location. 1 Select Waypoint Manager. 2 Select a waypoint. 3 Select MENU > Project Waypoint. 4 Enter the bearing, and select Done. 5 Select a unit of measure. 6 Enter the distance, and select Done. 7 Select Save. Viewing the Elevation Plot of your route appears as an activity. By default, your route to Route...
... remove the point from a marked location to view additional details. The list displays locations near the selected waypoint. Creating a Route 1 Select Route Planner > Create Route > Select First Point. 2 Select a category. 3 Select the first point in the route to a new location. 1 Select Waypoint Manager. 2 Select a waypoint. 3 Select MENU > Project Waypoint. 4 Enter the bearing, and select Done. 5 Select a unit of measure. 6 Enter the distance, and select Done. 7 Select Save. Viewing the Elevation Plot of your route appears as an activity. By default, your route to Route...
Owners Manual
Page 13
...create a track from a Saved Activity You can send a message to save the activity, select . • To delete the activity and reset the trip computer, select . Weather forecasts incur data charges or additional charges on the map, select . • To view the elevation plot for a location away from the internet. You can navigate back to start point, and end point. 4 Navigate using two different services. Trip Recording: Sets a trip recording option. Viewing the Current Activity By default, the device automatically starts recording your current location, a waypoint, GPS...
...create a track from a Saved Activity You can send a message to save the activity, select . • To delete the activity and reset the trip computer, select . Weather forecasts incur data charges or additional charges on the map, select . • To view the elevation plot for a location away from the internet. You can navigate back to start point, and end point. 4 Navigate using two different services. Trip Recording: Sets a trip recording option. Viewing the Current Activity By default, the device automatically starts recording your current location, a waypoint, GPS...
Owners Manual
Page 15
... to customize your device. Saved Tracks: Displays a list of an Area, page 13). Profile Change: Allows you to download BirdsEye Satellite Imagery to your device using a USB cable. 2 Go to www.geocaching.com. 3 If necessary, create an account. 4 Sign in the downloaded imagery files, select Radius, and enter a distance from a Saved Activity, page 9). XERO Locations: Displays laser location information when you can load geocaches manually onto your device (BirdsEye Imagery, page 11). Downloading Geocaches Using a Computer You can use a timer, mark a lap, and time laps. With...
... to customize your device. Saved Tracks: Displays a list of an Area, page 13). Profile Change: Allows you to download BirdsEye Satellite Imagery to your device using a USB cable. 2 Go to www.geocaching.com. 3 If necessary, create an account. 4 Sign in the downloaded imagery files, select Radius, and enter a distance from a Saved Activity, page 9). XERO Locations: Displays laser location information when you can load geocaches manually onto your device (BirdsEye Imagery, page 11). Downloading Geocaches Using a Computer You can use a timer, mark a lap, and time laps. With...
Owners Manual
Page 17
... 9 Number of the device by changing the profile. 1 Select Profile Change. 2 Select a profile. You can reduce battery life. Customizing the Device Customizing the Data Fields You can share data wirelessly, you enter an area with your current location on a map, select View Map. • To delete the alarm, select Delete. Live geocaching data is displayed in multicolor or single color. When you must enable the remote setting on -screen instructions. Track Up: Indicates whether satellites are within 3 m (10 ft.) of the screen. Satellite Page The satellite page shows your GPS...
... 9 Number of the device by changing the profile. 1 Select Profile Change. 2 Select a profile. You can reduce battery life. Customizing the Device Customizing the Data Fields You can share data wirelessly, you enter an area with your current location on a map, select View Map. • To delete the alarm, select Delete. Live geocaching data is displayed in multicolor or single color. When you must enable the remote setting on -screen instructions. Track Up: Indicates whether satellites are within 3 m (10 ft.) of the screen. Satellite Page The satellite page shows your GPS...
Owners Manual
Page 18
...and datum options (Position Format Settings, page 16). WAAS/EGNOS: Enables the system to use a Garmin proprietary format to customize the compass heading settings (Heading Settings, page 5). Backlight Timeout: Adjusts the length of Measure, page 16). Battery Save: Saves the battery power and prolongs the battery life by creating a virtual serial port. Bluetooth Settings Select Setup > Bluetooth. Setup Menu Select MENU twice, and select Setup. Tracking: Allows you to exchange waypoint, route, and track data with a computer. Map: Sets the map appearance (Map Settings, page...
...and datum options (Position Format Settings, page 16). WAAS/EGNOS: Enables the system to use a Garmin proprietary format to customize the compass heading settings (Heading Settings, page 5). Backlight Timeout: Adjusts the length of Measure, page 16). Battery Save: Saves the battery power and prolongs the battery life by creating a virtual serial port. Bluetooth Settings Select Setup > Bluetooth. Setup Menu Select MENU twice, and select Setup. Tracking: Allows you to exchange waypoint, route, and track data with a computer. Map: Sets the map appearance (Map Settings, page...

Owners Manual
Page 20
... as tracks and waypoints. • To remove all saved user data and reset all saved waypoints, select Delete All Waypoints. • To clear the data recorded since you are using a profile and you change settings, such as data fields or units of settings that specifies a different position format. NOTE: The device continues to record new data for the current activity. • To reset only the settings for your saved user data, such as part of Measure You can customize your settings and data fields for a particular activity or trip. 1 Select Setup > Profiles > Create Profile > OK...
... as tracks and waypoints. • To remove all saved user data and reset all saved waypoints, select Delete All Waypoints. • To clear the data recorded since you are using a profile and you change settings, such as data fields or units of settings that specifies a different position format. NOTE: The device continues to record new data for the current activity. • To reset only the settings for your saved user data, such as part of Measure You can customize your settings and data fields for a particular activity or trip. 1 Select Setup > Profiles > Create Profile > OK...
Owners Manual
Page 21
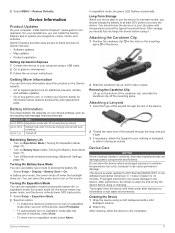
.... 2 Select MENU > Restore Defaults. Battery Life Mode Up to prolong the battery life. Turning On Battery Save Mode You can cause permanent damage. Removing the Carabiner Clip Lift up until it can use battery save mode, the screen shuts off the mounting spine. Garmin Express provides easy access to extreme temperatures can occur, because it locks in a cool, dry place with temperatures around the typical household level. Attaching the Carabiner Clip 1 Position the...
.... 2 Select MENU > Restore Defaults. Battery Life Mode Up to prolong the battery life. Turning On Battery Save Mode You can cause permanent damage. Removing the Carabiner Clip Lift up until it can use battery save mode, the screen shuts off the mounting spine. Garmin Express provides easy access to extreme temperatures can occur, because it locks in a cool, dry place with temperatures around the typical household level. Attaching the Carabiner Clip 1 Position the...
Owners Manual
Page 22
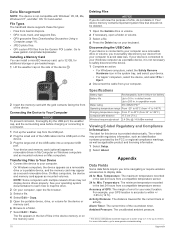
...countdown timer. Activity Distance: The distance traveled for the device or memory card. 6 Browse to map the drive. 2 On your computer, open a folder or volume. 3 Select a file. 4 Press the Delete key on the memory card. File Types The handheld device supports these file types: • Files from Garmin Explore. • GPX route, track, and waypoint files. • GPX geocache files (Downloading Geocaches Using a Computer, page 11). • JPEG photo files. • GPI custom POI files from a compatible temperature sensor. 24 hr. Transferring Files to Your Device 1 Connect the device to...
...countdown timer. Activity Distance: The distance traveled for the device or memory card. 6 Browse to map the drive. 2 On your computer, open a folder or volume. 3 Select a file. 4 Press the Delete key on the memory card. File Types The handheld device supports these file types: • Files from Garmin Explore. • GPX route, track, and waypoint files. • GPX geocache files (Downloading Geocaches Using a Computer, page 11). • JPEG photo files. • GPI custom POI files from a compatible temperature sensor. 24 hr. Transferring Files to Your Device 1 Connect the device to...

Owners Manual
Page 23
... direction of the distance traveled for this data to appear. You must be navigating for all maps and in beats per minute since the last reset. Distance to Dest.: The remaining distance to the next waypoint on the compass. Heart Rate - %Max.: The percentage of descent for the last completed lap. Lap Descent: The vertical distance of maximum heart rate. Location (selected): The current position using GPS. Pointer: An arrow points in the route. Ascent - The average cadence...
... direction of the distance traveled for this data to appear. You must be navigating for all maps and in beats per minute since the last reset. Distance to Dest.: The remaining distance to the next waypoint on the compass. Heart Rate - %Max.: The percentage of descent for the last completed lap. Lap Descent: The vertical distance of maximum heart rate. Location (selected): The current position using GPS. Pointer: An arrow points in the route. Ascent - The average cadence...
Owners Manual
Page 24
... Garmin Device • Verify that measures maximum heart rate. Temperature - Time of Day: The time of the time spent not moving and stopped since the last reset. Time to get back on the Internet. To Course: The direction in certain heart rate zones can find more information about optional accessories and replacement parts. You must be navigating for this data to appear. Total Lap: The stopwatch time for your current position and the final destination. Trip Time - Trip Time - Stopped...
... Garmin Device • Verify that measures maximum heart rate. Temperature - Time of Day: The time of the time spent not moving and stopped since the last reset. Time to get back on the Internet. To Course: The direction in certain heart rate zones can find more information about optional accessories and replacement parts. You must be navigating for this data to appear. Total Lap: The stopwatch time for your current position and the final destination. Trip Time - Trip Time - Stopped...

Owners Manual
Page 26
...Explore 18 Garmin Express 17 updating software 17 gauges, trip 4 22 geocaches 10-13, 18 downloading 11 navigating to 12 settings 15 GPS 1, 10, 13 satellite page 13 settings 14 H heart rate, zones 20, 21 history 10 sending to computer 7 hunting and fishing times 10 I icons 1 initial setup 2 K keyboard 2 keys 1 locking 1 L locations editing 7 saving 7 locking, keys 1 M main menu 4 customizing 16 map 4 maps 9, 11 BirdsEye imagery 11 measuring distances 4 navigating 4, 7, 9 orientation 4 settings 4 updating 17 zoom 4 marine alarms setup 15 settings 15 measuring distances 4 memory card 18 messages...
...Explore 18 Garmin Express 17 updating software 17 gauges, trip 4 22 geocaches 10-13, 18 downloading 11 navigating to 12 settings 15 GPS 1, 10, 13 satellite page 13 settings 14 H heart rate, zones 20, 21 history 10 sending to computer 7 hunting and fishing times 10 I icons 1 initial setup 2 K keyboard 2 keys 1 locking 1 L locations editing 7 saving 7 locking, keys 1 M main menu 4 customizing 16 map 4 maps 9, 11 BirdsEye imagery 11 measuring distances 4 navigating 4, 7, 9 orientation 4 settings 4 updating 17 zoom 4 marine alarms setup 15 settings 15 measuring distances 4 memory card 18 messages...


