
T2010 User's Guide
Page 7
... Keyboard 36 Quick Point Pointing Device/Touch Screen 39 Quick Point Control Adjustment 42 Clicking on Touch Screen 43 Right-Clicking on Touch Screen 43 Calibrating the Touch Screen 44 Double-Clicking 44 Dragging 44 Installing a Pen Tether 46 Volume Control 47 Controlling the Volume 47 LifeBook Security/Tablet PC Buttons 48 Security Button Functions 48 Pre...
... Keyboard 36 Quick Point Pointing Device/Touch Screen 39 Quick Point Control Adjustment 42 Clicking on Touch Screen 43 Right-Clicking on Touch Screen 43 Calibrating the Touch Screen 44 Double-Clicking 44 Dragging 44 Installing a Pen Tether 46 Volume Control 47 Controlling the Volume 47 LifeBook Security/Tablet PC Buttons 48 Security Button Functions 48 Pre...

T2010 User's Guide
Page 13
...the computing power of desktop personal computers (PCs) to operate your choice". 13 Example: "Click Fujitsu Menu, and select your LifeBook T2010 notebook's hardware and pre-installed system software. Your LifeBook T2010 notebook comes with Windows® XP Tablet PC Edition 2005 or Windows Vista™ Business... that all cross-references are cross-referenced within the text. On-screen menu items appear in tablet configuration using pen input. Preface About This Guide The LifeBook T2010 notebook from Fujitsu Computer Systems Corporation is powered by clicking the link, you will ...
...the computing power of desktop personal computers (PCs) to operate your choice". 13 Example: "Click Fujitsu Menu, and select your LifeBook T2010 notebook's hardware and pre-installed system software. Your LifeBook T2010 notebook comes with Windows® XP Tablet PC Edition 2005 or Windows Vista™ Business... that all cross-references are cross-referenced within the text. On-screen menu items appear in tablet configuration using pen input. Preface About This Guide The LifeBook T2010 notebook from Fujitsu Computer Systems Corporation is powered by clicking the link, you will ...

T2010 User's Guide
Page 21
This architecture allows you to transfer data from a variety of different digital devices. See "Quick Point Pointing Device/Touch Screen" on a mouse. Quick Point Cursor Control The Quick Point control offers an additional method for data storage. Fingerprint Sensor The fingerprint sensor device allows you ...
This architecture allows you to transfer data from a variety of different digital devices. See "Quick Point Pointing Device/Touch Screen" on a mouse. Quick Point Cursor Control The Quick Point control offers an additional method for data storage. Fingerprint Sensor The fingerprint sensor device allows you ...
T2010 User's Guide
Page 33
Opening the Display Panel Lift the display backwards, being careful not to touch the screen with your system as a Tablet If you opened it. Turning the display in the incorrect direction could get scratched. 1 Lift the display until it is perpendicular to the keyboard. (Figure 9). 2... in either direction (Figure 10) so that it is at a comfortable viewing angle. (Figure 8) Using the System as a tablet. (Figure 11) To return the system to use the system as a tablet, perform the following steps. • The display can now use your fingers, until it is lying nearly atop the keyboard...
Opening the Display Panel Lift the display backwards, being careful not to touch the screen with your system as a Tablet If you opened it. Turning the display in the incorrect direction could get scratched. 1 Lift the display until it is perpendicular to the keyboard. (Figure 9). 2... in either direction (Figure 10) so that it is at a comfortable viewing angle. (Figure 8) Using the System as a tablet. (Figure 11) To return the system to use the system as a tablet, perform the following steps. • The display can now use your fingers, until it is lying nearly atop the keyboard...

T2010 User's Guide
Page 34
Display Panel Tablet Mode Adjusting Display Panel Brightness Once you may want to adjust the brightness level of the display. 34 - There are three ways to a more comfortable ... settings in the system's Pen and Tablet Settings). • [Fn+F6]: Pressing repeatedly will lower the brightness of your Tablet PC, you have turned on your display. • [Fn+F7]: Pressing repeatedly will increase the brightness of the screen to adjust the brightness: keyboard, power management utility, and Fujitsu Menu. Figure 9. Rotating Display Figure 11...
Display Panel Tablet Mode Adjusting Display Panel Brightness Once you may want to adjust the brightness level of the display. 34 - There are three ways to a more comfortable ... settings in the system's Pen and Tablet Settings). • [Fn+F6]: Pressing repeatedly will lower the brightness of your Tablet PC, you have turned on your display. • [Fn+F7]: Pressing repeatedly will increase the brightness of the screen to adjust the brightness: keyboard, power management utility, and Fujitsu Menu. Figure 9. Rotating Display Figure 11...

T2010 User's Guide
Page 35
...by batteries scenarios. Using the Fujitsu Menu to Display brightness. Set the screen brightness sliders for When plugged in the left panel. Set the screen brightness sliders for battery and AC power scenarios. THE HIGHER THE BRIGHTNESS LEVEL, THE MORE POWER THE TABLET PC WILL CONSUME AND THE FASTER ...YOUR BATTERIES WILL DISCHARGE. Select the Display tab and set the screen brightness slider for On battery and Plugged in the left panel. IF USING AC POWER...
...by batteries scenarios. Using the Fujitsu Menu to Display brightness. Set the screen brightness sliders for When plugged in the left panel. Set the screen brightness sliders for battery and AC power scenarios. THE HIGHER THE BRIGHTNESS LEVEL, THE MORE POWER THE TABLET PC WILL CONSUME AND THE FASTER ...YOUR BATTERIES WILL DISCHARGE. Select the Display tab and set the screen brightness slider for On battery and Plugged in the left panel. IF USING AC POWER...

T2010 User's Guide
Page 39
... works the same way a mouse ball does, and moves the cursor around the display. The Quick Point is used . 39 - Quick Point Pointing Device/Touch Screen It is composed of a cursor control at the center of the keyboard and three buttons on the palm rest of the cursor to select items... on the application that is built into your LifeBook notebook. It only requires light pressure with the cursor control, the middle button allows you use, the faster the cursor will move. The actual functionality...
... works the same way a mouse ball does, and moves the cursor around the display. The Quick Point is used . 39 - Quick Point Pointing Device/Touch Screen It is composed of a cursor control at the center of the keyboard and three buttons on the palm rest of the cursor to select items... on the application that is built into your LifeBook notebook. It only requires light pressure with the cursor control, the middle button allows you use, the faster the cursor will move. The actual functionality...

T2010 User's Guide
Page 40
...; PARAMETERS FOR THE QUICK POINT CAN BE ADJUSTED FROM THE MOUSE DIALOG BOX LOCATED IN THE WINDOWS CONTROL PANEL. 40 - Quick Point Pointing Device/Touch Screen To double-click, move the cursor to the item you wish to select, press the left button twice in rapid succession. This procedure does not...
...; PARAMETERS FOR THE QUICK POINT CAN BE ADJUSTED FROM THE MOUSE DIALOG BOX LOCATED IN THE WINDOWS CONTROL PANEL. 40 - Quick Point Pointing Device/Touch Screen To double-click, move the cursor to the item you wish to select, press the left button twice in rapid succession. This procedure does not...
T2010 User's Guide
Page 41
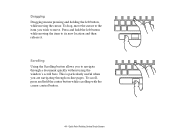
To drag, move . Quick Point Pointing Device/Touch Screen To scroll, press and hold the left button, while moving the item to navigate through on-line pages. This is particularly useful when you are ...
To drag, move . Quick Point Pointing Device/Touch Screen To scroll, press and hold the left button, while moving the item to navigate through on-line pages. This is particularly useful when you are ...
T2010 User's Guide
Page 42
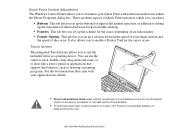
... selections made from within the Mouse Properties dialog box. EXCESSIVE FORCE COULD RESULT IN DAMAGE TO THE LED AND/OR TOUCH SCREEN. • TO PURCHASE ADDITIONAL OR REPLACEMENT STYLUSES, VISIT FUJITSU'S ACCESSORIES WEBSITE AT: WWW.SHOPFUJITSU.COM. 42 - You can adjust: • Buttons: This tab lets you set up the buttons for... lets you set up a relation between the speed of your application for details. • DO NOT USE EXCESSIVE FORCE WHEN TAPPING OR WRITING ON THE SCREEN WITH THE STYLUS. It also allows you to enable a Pointer Trail for the cursor arrow. Quick Point Pointing Device/Touch...
... selections made from within the Mouse Properties dialog box. EXCESSIVE FORCE COULD RESULT IN DAMAGE TO THE LED AND/OR TOUCH SCREEN. • TO PURCHASE ADDITIONAL OR REPLACEMENT STYLUSES, VISIT FUJITSU'S ACCESSORIES WEBSITE AT: WWW.SHOPFUJITSU.COM. 42 - You can adjust: • Buttons: This tab lets you set up the buttons for... lets you set up a relation between the speed of your application for details. • DO NOT USE EXCESSIVE FORCE WHEN TAPPING OR WRITING ON THE SCREEN WITH THE STYLUS. It also allows you to enable a Pointer Trail for the cursor arrow. Quick Point Pointing Device/Touch...
T2010 User's Guide
Page 43
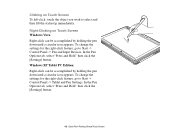
...the [Settings] button. Windows XP Tablet PC Edition: Right-click can be accomplished by holding the pen down until a circular icon appears. To change the settings for the right-click feature, go to Start -> Control Panel -> Pen and Input Devices. Clicking on Touch Screen Windows Vista Right-click can be... tab, select "Press and Hold" then click the [Settings] button. 43 - Right-Clicking on Touch Screen To left-click, touch the object you wish to Start -> Control Panel -> Tablet and Pen Settings. To change the settings for the right-click feature, go to select and then lift ...
...the [Settings] button. Windows XP Tablet PC Edition: Right-click can be accomplished by holding the pen down until a circular icon appears. To change the settings for the right-click feature, go to Start -> Control Panel -> Pen and Input Devices. Clicking on Touch Screen Windows Vista Right-click can be... tab, select "Press and Hold" then click the [Settings] button. 43 - Right-Clicking on Touch Screen To left-click, touch the object you wish to Start -> Control Panel -> Tablet and Pen Settings. To change the settings for the right-click feature, go to select and then lift ...

T2010 User's Guide
Page 44
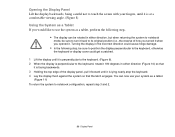
... drag the item to its new location by touching the screen, moving the stylus across the screen, and then lifting the stylus to move. To drag, touch the Touch Screen with the stylus by moving and then lifting the stylus. Calibrating the Touch Screen In order to ensure accurate tracking between the stylus and... cursor, you must run the Touch Screen Calibration Utility before you use the Touch Screen for the first time, or after you wish to release it. Dragging can also be done using your stylus on the item you change the ...
... drag the item to its new location by touching the screen, moving the stylus across the screen, and then lifting the stylus to move. To drag, touch the Touch Screen with the stylus by moving and then lifting the stylus. Calibrating the Touch Screen In order to ensure accurate tracking between the stylus and... cursor, you must run the Touch Screen Calibration Utility before you use the Touch Screen for the first time, or after you wish to release it. Dragging can also be done using your stylus on the item you change the ...

T2010 User's Guide
Page 45
...COULD RESULT IN FAULTY CALIBRATION. 4 Using the stylus, firmly touch the screen directly on the screen. 5 Repeat step 4 until you have selected all of the display. Windows XP Tablet PC Edition: Double-click the Tablet and Pen Settings icon and select the Settings tab. DO NOT USE ...EXCESSIVE FORCE WHEN TAPPING ON THE SCREEN DURING CALIBRATION. Quick Point Pointing Device/Touch Screen If you have selected all the symbols, ...
...COULD RESULT IN FAULTY CALIBRATION. 4 Using the stylus, firmly touch the screen directly on the screen. 5 Repeat step 4 until you have selected all of the display. Windows XP Tablet PC Edition: Double-click the Tablet and Pen Settings icon and select the Settings tab. DO NOT USE ...EXCESSIVE FORCE WHEN TAPPING ON THE SCREEN DURING CALIBRATION. Quick Point Pointing Device/Touch Screen If you have selected all the symbols, ...
T2010 User's Guide
Page 46
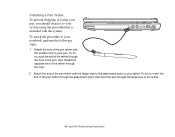
... your system using the pen tether that is included with the larger loop to the attachment point on your pen. Quick Point Pointing Device/Touch Screen To do so, push the end of the tether through the loop. 2 Attach the end of the tether through the hole in the tether. 46... - Installing a Pen Tether To prevent dropping or losing your pen, you should attach it to your tablet. To do so, insert the end of the pen tether through the attachment point, then feed the pen through the large loop in the pen...
... your system using the pen tether that is included with the larger loop to the attachment point on your pen. Quick Point Pointing Device/Touch Screen To do so, push the end of the tether through the loop. 2 Attach the end of the tether through the hole in the tether. 46... - Installing a Pen Tether To prevent dropping or losing your pen, you should attach it to your tablet. To do so, insert the end of the pen tether through the attachment point, then feed the pen through the large loop in the pen...

T2010 User's Guide
Page 49
...will act as if you had pressed the [Tab] key. Security Panel Button Functions 49 - Button Icon System State System is displayed). LifeBook Security/Tablet PC Buttons When you press the [Fn] button then press and release the [Page Down] button, each press of the button will act ... secondary functions. Pre-logon button functions All five buttons can be used before logging on to Windows (i.e., the Windows logon screen is pre-boot or resuming from suspend Security Panel Function Security Button 1 Security Button 2 Security Button 3 Security Button 4 Security Enter Button ...
...will act as if you had pressed the [Tab] key. Security Panel Button Functions 49 - Button Icon System State System is displayed). LifeBook Security/Tablet PC Buttons When you press the [Fn] button then press and release the [Page Down] button, each press of the button will act ... secondary functions. Pre-logon button functions All five buttons can be used before logging on to Windows (i.e., the Windows logon screen is pre-boot or resuming from suspend Security Panel Function Security Button 1 Security Button 2 Security Button 3 Security Button 4 Security Enter Button ...

T2010 User's Guide
Page 50
LifeBook Security/Tablet PC Buttons Button Icon System State System is prelogon (Windows logon screen is changed to tablet configuration, the orientation automatically changes to portrait mode by default. 50 - When you would like to invoke secondary function Ctl+Alt+Del Button None None Table 2. Pre-logon Tablet PC Button Functions When you press the [Fn] button then...
LifeBook Security/Tablet PC Buttons Button Icon System State System is prelogon (Windows logon screen is changed to tablet configuration, the orientation automatically changes to portrait mode by default. 50 - When you would like to invoke secondary function Ctl+Alt+Del Button None None Table 2. Pre-logon Tablet PC Button Functions When you press the [Fn] button then...

T2010 User's Guide
Page 51
...LifeBook Security/Tablet PC Buttons Post-logon Tablet PC Button Functions 51 - Button Icon System State System is postlogon (Windows desktop is in pre-boot, the system screen orientation changes from portrait (vertical) to landscape (horizontal) or from landscape to portrait. When you press the [Screen...Application B (Default = MS Journal) Screen Rotation Secondary Function Selection Ctl+Alt+Del Button Display Switching: 1. THE SCREEN ORIENTATION DEFAULT CAN BE CHANGED BY GOING TO THE CONTROL PANEL AND DOUBLE-CLICKING ON THE FUJITSU TABLET CONTROLS ICON AND SELECTING THE DESIRED ...
...LifeBook Security/Tablet PC Buttons Post-logon Tablet PC Button Functions 51 - Button Icon System State System is postlogon (Windows desktop is in pre-boot, the system screen orientation changes from portrait (vertical) to landscape (horizontal) or from landscape to portrait. When you press the [Screen...Application B (Default = MS Journal) Screen Rotation Secondary Function Selection Ctl+Alt+Del Button Display Switching: 1. THE SCREEN ORIENTATION DEFAULT CAN BE CHANGED BY GOING TO THE CONTROL PANEL AND DOUBLE-CLICKING ON THE FUJITSU TABLET CONTROLS ICON AND SELECTING THE DESIRED ...

T2010 User's Guide
Page 52
... 53 to select a different application for the buttons. Screen Rotation /Display Switching Button The screen rotation feature would use the portrait orientation; Four of the post-logon functions. Page Up / Application B Button When you to navigate quickly through large documents. LifeBook Security/Tablet PC Buttons Function / Fujitsu Menu Utility Button The [Function] button works in conjunction...
... 53 to select a different application for the buttons. Screen Rotation /Display Switching Button The screen rotation feature would use the portrait orientation; Four of the post-logon functions. Page Up / Application B Button When you to navigate quickly through large documents. LifeBook Security/Tablet PC Buttons Function / Fujitsu Menu Utility Button The [Function] button works in conjunction...

T2010 User's Guide
Page 53
... launches the Logon screen or the Windows Task Manager. Changing Tablet PC Button Functions The Application A and B buttons can be changed to tablet configuration, the orientation automatically changes to specific details above. LifeBook Security/Tablet PC Buttons THE SCREEN ORIENTATION DEFAULT CAN BE CHANGED BY GOING TO THE CONTROL PANEL AND DOUBLE-CLICKING ON THE FUJITSU TABLET CONTROLS ICON AND...
... launches the Logon screen or the Windows Task Manager. Changing Tablet PC Button Functions The Application A and B buttons can be changed to tablet configuration, the orientation automatically changes to specific details above. LifeBook Security/Tablet PC Buttons THE SCREEN ORIENTATION DEFAULT CAN BE CHANGED BY GOING TO THE CONTROL PANEL AND DOUBLE-CLICKING ON THE FUJITSU TABLET CONTROLS ICON AND...
T2010 User's Guide
Page 56
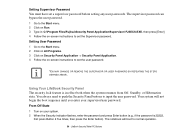
... Start menu. 2 Click on -screen instructions to set the Supervisor password. You always need to push the Security Panel buttons to the Start menu. 2 Click on All Programs. 3 Click on Security Panel Application -> Security Panel Application. 4 Follow the on your supervisor/user password. LifeBook Security/Tablet PC Buttons Using Your LifeBook Security Panel The security...
... Start menu. 2 Click on -screen instructions to set the Supervisor password. You always need to push the Security Panel buttons to the Start menu. 2 Click on All Programs. 3 Click on Security Panel Application -> Security Panel Application. 4 Follow the on your supervisor/user password. LifeBook Security/Tablet PC Buttons Using Your LifeBook Security Panel The security...

