Datasheet
Page 2
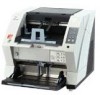
... Patterns and Error Diffusion volume applications. x 21 in . The 500 page automatic document feeder (ADF) accommodates a wide range of documents sizes from 2.07" x 2.91" to 12" x 17" with a wide variety of America, Inc. Adobe® Acrobat® 7.0 Standard, ScandAll 21, Limited Warranty 3 months on all service programs noted in a flash with the Fujitsu fi-5900C scanner to...
... Patterns and Error Diffusion volume applications. x 21 in . The 500 page automatic document feeder (ADF) accommodates a wide range of documents sizes from 2.07" x 2.91" to 12" x 17" with a wide variety of America, Inc. Adobe® Acrobat® 7.0 Standard, ScandAll 21, Limited Warranty 3 months on all service programs noted in a flash with the Fujitsu fi-5900C scanner to...
Getting Started Guide
Page 5
...respective companies. Microsoft® Windows®NT 4.0 Server operating system, Microsoft® Windows®NT 4.0 Workstation operating system. fi-5900C Image Scanner Getting Started iii Their standards and logos ( ) are the trademarks or registered trademarks of Adobe Systems Incorporated in the United...are trademarks or registered trademarks of Pixel Translations, a division of this product with adopting measures for any damage caused by errors or omissions or by statements of mercury Hg Lamp(s) inside this product. How Trademarks Are Indicated In This Manual References...
...respective companies. Microsoft® Windows®NT 4.0 Server operating system, Microsoft® Windows®NT 4.0 Workstation operating system. fi-5900C Image Scanner Getting Started iii Their standards and logos ( ) are the trademarks or registered trademarks of Adobe Systems Incorporated in the United...are trademarks or registered trademarks of Pixel Translations, a division of this product with adopting measures for any damage caused by errors or omissions or by statements of mercury Hg Lamp(s) inside this product. How Trademarks Are Indicated In This Manual References...

Getting Started Guide
Page 8
... the power plug from the power outlet. Install the scanner away from falling. Do not install the scanner in a well-ventilated location. Do not carry the scanner alone. Do not install the scanner on the scanner or use the scanner's surface top to scanning errors. Install the scanner on a level surface that the floor is heavy. This may...
... the power plug from the power outlet. Install the scanner away from falling. Do not install the scanner in a well-ventilated location. Do not carry the scanner alone. Do not install the scanner on the scanner or use the scanner's surface top to scanning errors. Install the scanner on a level surface that the floor is heavy. This may...
Getting Started Guide
Page 10
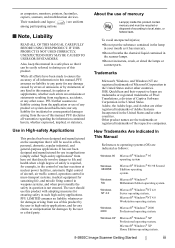
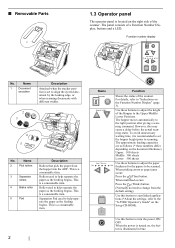
... paper Thick thickness for the papers to the "fi-5900C Operator's Guide" on the Setup CD-ROM). When the power is turned on the right side of the scanner. This is illuminated in blue. This is a...the paper from the default setting) Use this may cause a delay before the actual scanning starts. Name 1 Document smoother Description Attached when the stacker position is a consumable item. 2 Name Function Hopper Height Paper Thickness Thin Send...approximate loading capacities are as the feeding begins. When picking errors or paper jams occur: Press the (Thin) button.
... paper Thick thickness for the papers to the "fi-5900C Operator's Guide" on the Setup CD-ROM). When the power is turned on the right side of the scanner. This is illuminated in blue. This is a...the paper from the default setting) Use this may cause a delay before the actual scanning starts. Name 1 Document smoother Description Attached when the stacker position is a consumable item. 2 Name Function Hopper Height Paper Thickness Thin Send...approximate loading capacities are as the feeding begins. When picking errors or paper jams occur: Press the (Thin) button.
Getting Started Guide
Page 11
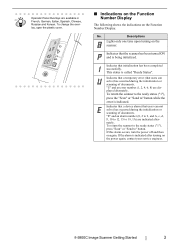
...documents. Number Display. Indicates that a temporary error (that the scanner has been turned ON and is called "Ready Status". "E" and an alarm number (0, 2 to 9, and A, c, d, F, 10 to 12, 15 to Scan Indicates that users can not solve) has occurred during the initialization or scanning of documents. If the alarm is indicated. fi-5900C Image Scanner... Getting Started 3 To change the over- To return the scanner to the ready status ("1"), press ...
...documents. Number Display. Indicates that a temporary error (that the scanner has been turned ON and is called "Ready Status". "E" and an alarm number (0, 2 to 9, and A, c, d, F, 10 to 12, 15 to Scan Indicates that users can not solve) has occurred during the initialization or scanning of documents. If the alarm is indicated. fi-5900C Image Scanner... Getting Started 3 To change the over- To return the scanner to the ready status ("1"), press ...
Getting Started Guide
Page 14
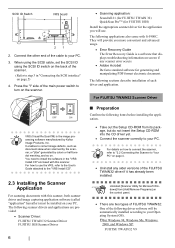
...tone dot meshing, and so on. ner, or "jitter" generated by Kofax Image Products, Inc. The following applications also come with fi-5900C. For FUJITSU TWAIN32 Scanner Driver ■ Preparation Confirm the following items before installing the application. • Take out the Setup CD-ROM from [Add/Remove...the main power switch to correct image defects, such as document skew when scanned by the scan- When using the SCSI cable, set the SCSI ID using the SCSI ID switch on page 4. • Uninstall any scanner error occurs. • Adobe Acrobat De facto standard software ...
...tone dot meshing, and so on. ner, or "jitter" generated by Kofax Image Products, Inc. The following applications also come with fi-5900C. For FUJITSU TWAIN32 Scanner Driver ■ Preparation Confirm the following items before installing the application. • Take out the Setup CD-ROM from [Add/Remove...the main power switch to correct image defects, such as document skew when scanned by the scan- When using the SCSI cable, set the SCSI ID using the SCSI ID switch on page 4. • Uninstall any scanner error occurs. • Adobe Acrobat De facto standard software ...
Getting Started Guide
Page 15
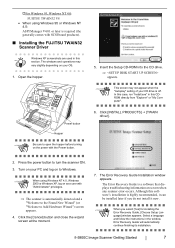
...in this HINT section. ATTENTION This screen may vary slightly depending on your CD drive is off. Turn on your OS. 1. The Error Recovery Guide Installation window appears. Insert the Setup CD-ROM into the CD drive. ⇒ appears. Click [INSTALL PRODUCTS] J [TWAIN driver...the moment. 7. fi-5900C Image Scanner Getting Started 7 ATTENTION When you do not install it now. The windows and operations may not appear when the "Autoplay" setting of your PC and log on the power with SCSI board products). ■ Installing the FUJITSU TWAIN32 Scanner Driver Windows XP...
...in this HINT section. ATTENTION This screen may vary slightly depending on your CD drive is off. Turn on your OS. 1. The Error Recovery Guide Installation window appears. Insert the Setup CD-ROM into the CD drive. ⇒ appears. Click [INSTALL PRODUCTS] J [TWAIN driver...the moment. 7. fi-5900C Image Scanner Getting Started 7 ATTENTION When you do not install it now. The windows and operations may not appear when the "Autoplay" setting of your PC and log on the power with SCSI board products). ■ Installing the FUJITSU TWAIN32 Scanner Driver Windows XP...
Getting Started Guide
Page 19
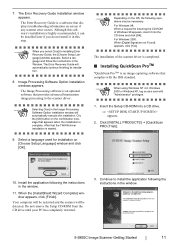
...8658; appears. 2. Although this step. The Error Recovery Guide will automatically execute the installation. Click [INSTALL PRODUCTS] J [QuickScan PRO (Trial)]. 10. The Image Processing software is a software that complies with "Administrator" privileges. 1. fi-5900C Image Scanner Getting Started 11 Clic the [OK] button on...Window. When the [InstallShield Wizard Complete] window appears, click [Finish]. Continue to the scanner dirver. The Error Recovery Guide is an optional software that appears when the installation is started. 9. ATTENTION Depending on screen if ...
...8658; appears. 2. Although this step. The Error Recovery Guide will automatically execute the installation. Click [INSTALL PRODUCTS] J [QuickScan PRO (Trial)]. 10. The Image Processing software is a software that complies with "Administrator" privileges. 1. fi-5900C Image Scanner Getting Started 11 Clic the [OK] button on...Window. When the [InstallShield Wizard Complete] window appears, click [Finish]. Continue to the scanner dirver. The Error Recovery Guide is an optional software that appears when the installation is started. 9. ATTENTION Depending on screen if ...
Getting Started Guide
Page 20
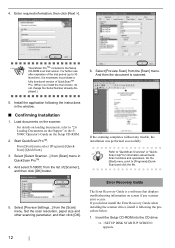
...documents, refer to "2.6 Loading Documents on the Hopper" in the Setup CD-ROM is scanned. 5. Start QuickScan ProTM. And select fi-5900C from the [Scan] menu. Refer to [Programs]-[Quick- Select [Preview Settings...] from the list of QuickScanTM Pro. (When you did not install the Error Recovery Guide when installing the scanner...If you install the trial version, do not change the Serial Number already displayed.) 6. And then the document is an trial version. Select [Select Scanner...] from the [Scan] menu. HINT Scan Help" for information about Quick- Insert the Setup CD-ROM ...
...documents, refer to "2.6 Loading Documents on the Hopper" in the Setup CD-ROM is scanned. 5. Start QuickScan ProTM. And select fi-5900C from the [Scan] menu. Refer to [Programs]-[Quick- Select [Preview Settings...] from the list of QuickScanTM Pro. (When you did not install the Error Recovery Guide when installing the scanner...If you install the trial version, do not change the Serial Number already displayed.) 6. And then the document is an trial version. Select [Select Scanner...] from the [Scan] menu. HINT Scan Help" for information about Quick- Insert the Setup CD-ROM ...
Getting Started Guide
Page 21
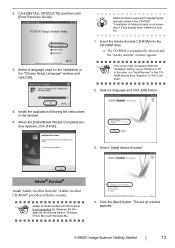
...98 Second Edition, Windows NT4.0, Microsoft Windows Me. 4. When the [InstallShield Wizard Complete] window appears, click [Finish]. 3. Click the [Next] button. fi-5900C Image Scanner Getting Started 13 Select a language and Click [OK] button. 4. Adobe® Acrobat® Install Adobe Acrobat from "Explorer" or "My Computer". 2....application following the instructions in the CD-ROM. * Installation of your PC. 1. Click [INSTALL PRODUCTS] and then click [Error Recovery Guide]. 3. Insert the Adobe Acrobat CD-ROM into the CD-ROM drive. ⇒ The CD-ROM is not neces...
...98 Second Edition, Windows NT4.0, Microsoft Windows Me. 4. When the [InstallShield Wizard Complete] window appears, click [Finish]. 3. Click the [Next] button. fi-5900C Image Scanner Getting Started 13 Select a language and Click [OK] button. 4. Adobe® Acrobat® Install Adobe Acrobat from "Explorer" or "My Computer". 2....application following the instructions in the CD-ROM. * Installation of your PC. 1. Click [INSTALL PRODUCTS] and then click [Error Recovery Guide]. 3. Insert the Adobe Acrobat CD-ROM into the CD-ROM drive. ⇒ The CD-ROM is not neces...
Getting Started Guide
Page 22
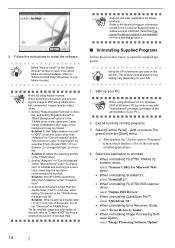
... When uninstalling Scandall 21, select "ScandAll 21". • When uninstalling FUJITSU ISIS scanner driver, select "Fujitsu ISIS Drivers". • When uninstalling QuickScan ProTM, select "QuickScan 3.0". • When uninstalling Error Recovery Guide, select "Error Recovery Guide". • When uninstalling Image Processing Software Option, select "...time. Setting "Edge Shadow Removal" in the TWAIN driver. 2. Setting "Adaptive" for using Adobe Acrobat: When scanning a document and converting the image to PDF using Windows NT 4.0, Windows 2000 or Windows XP, log on as a user with "...
... When uninstalling Scandall 21, select "ScandAll 21". • When uninstalling FUJITSU ISIS scanner driver, select "Fujitsu ISIS Drivers". • When uninstalling QuickScan ProTM, select "QuickScan 3.0". • When uninstalling Error Recovery Guide, select "Error Recovery Guide". • When uninstalling Image Processing Software Option, select "...time. Setting "Edge Shadow Removal" in the TWAIN driver. 2. Setting "Adaptive" for using Adobe Acrobat: When scanning a document and converting the image to PDF using Windows NT 4.0, Windows 2000 or Windows XP, log on as a user with "...
Getting Started Guide
Page 24
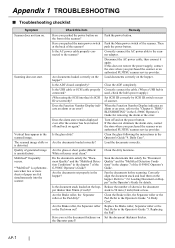
... alarm or an error? Turn off and back on the hopper. Are documents loaded correctly on the hopper. Load documents correctly on the hopper? Have you pushed the main power switch at the back of sheets in the chapter 7 of the fi-5900C Operator's Guide. Push the power button. Refer to the scanner? Disconnect the AC...
... alarm or an error? Turn off and back on the hopper. Are documents loaded correctly on the hopper. Load documents correctly on the hopper? Have you pushed the main power switch at the back of sheets in the chapter 7 of the fi-5900C Operator's Guide. Push the power button. Refer to the scanner? Disconnect the AC...

Getting Started Guide
Page 25
There is not fed (pick error occurs frequently, or document stops midway). Use the documents that satisfy the "Document Quality" and the "Multifeed Detection Conditions" in the task tray, select [Options] and adjust the Vertical Magnification. Daily Care".... adjusted the Vertical Magnification? Right-click on the document feed path? Replacing of the fi-5900C Operator's Guide? For Windows 98, Windows Me, Windows 2000, Windows XP, select "Scanners and Cameras" in the chapter 5 of Consumables". Remove any debris on fi-5900C and select Properties. Are the Separator roller or the...
There is not fed (pick error occurs frequently, or document stops midway). Use the documents that satisfy the "Document Quality" and the "Multifeed Detection Conditions" in the task tray, select [Options] and adjust the Vertical Magnification. Daily Care".... adjusted the Vertical Magnification? Right-click on the document feed path? Replacing of the fi-5900C Operator's Guide? For Windows 98, Windows Me, Windows 2000, Windows XP, select "Scanners and Cameras" in the chapter 5 of Consumables". Remove any debris on fi-5900C and select Properties. Are the Separator roller or the...

Getting Started Guide
Page 26
... fi-5900C Operator's Guide "6.1 Clearing Document Jams" on the Setup CDROM.) 2. Verify that the documents meet the paper specifications for scanning. (Refer to fi-5900C Operator's Guide "7.2 Document Quality" on the Setup CD-ROM.) • "U2" error Press the [Send to] button on the scanner..... 3. For details, refer to the "fi-590PRF/ fi-590PRB Operator's Guide, "5 Error Message". • "U8" error 1. When you purchased the scanner or an authorized FUJITSU scanner service provider. One of the temporary errors. • "U1" error 1. The documents that the Pick roller is full. 3. ...
... fi-5900C Operator's Guide "6.1 Clearing Document Jams" on the Setup CDROM.) 2. Verify that the documents meet the paper specifications for scanning. (Refer to fi-5900C Operator's Guide "7.2 Document Quality" on the Setup CD-ROM.) • "U2" error Press the [Send to] button on the scanner..... 3. For details, refer to the "fi-590PRF/ fi-590PRB Operator's Guide, "5 Error Message". • "U8" error 1. When you purchased the scanner or an authorized FUJITSU scanner service provider. One of the temporary errors. • "U1" error 1. The documents that the Pick roller is full. 3. ...
Operator's Guide
Page 9
...this product. Warning Indications Used In This Manual This manual uses the following indications to during use this manual, its updates or supplements, whether such errors are omissions or statements resulting from negligence, accidents, or any other persons. nor any liability for any damage caused by... errors or omissions or by statements of any kind in this manual before you use of this product. Thoroughly read and fully understand the Safety ...
...this product. Warning Indications Used In This Manual This manual uses the following indications to during use this manual, its updates or supplements, whether such errors are omissions or statements resulting from negligence, accidents, or any other persons. nor any liability for any damage caused by... errors or omissions or by statements of any kind in this manual before you use of this product. Thoroughly read and fully understand the Safety ...
Operator's Guide
Page 18
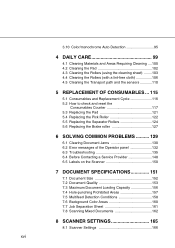
... Rollers 124 5.6 Replacing the Brake roller 127 6 SOLVING COMMON PROBLEMS .......... 129 6.1 Clearing Document Jams 130 6.2 Error messages of the Operator panel 132 6.3 Troubleshooting 135 6.4 Before Contacting a Service Provider 148 6.5 Labels on the Scanner 150 7 DOCUMENT SPECIFICATIONS 151 7.1 Document Size 152 7.2 Document Quality 153 7.3 Maximum Document Loading Capacity 156 7.4 Hole-punching Prohibited Areas 157 7.5 Multifeed Detection Conditions 158...
... Rollers 124 5.6 Replacing the Brake roller 127 6 SOLVING COMMON PROBLEMS .......... 129 6.1 Clearing Document Jams 130 6.2 Error messages of the Operator panel 132 6.3 Troubleshooting 135 6.4 Before Contacting a Service Provider 148 6.5 Labels on the Scanner 150 7 DOCUMENT SPECIFICATIONS 151 7.1 Document Size 152 7.2 Document Quality 153 7.3 Maximum Document Loading Capacity 156 7.4 Hole-punching Prohibited Areas 157 7.5 Multifeed Detection Conditions 158...
Operator's Guide
Page 26
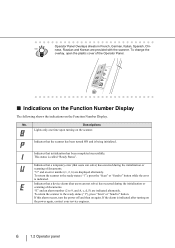
... that initialization has been completed successfully. "U" and an error number (1, 2, 6) are provided with the scanner. To return the scanner to the ready status ("1"), press "Scan" or "Send to " button while the error is indicated after turning on the Function Number Display. ... To change the overlay, open the plastic cover of documents. Thin Send to 9, and A, c, d, F) are indicated alternately. Indicates that a temporary error (that users can solve) has occurred during the initialization or scanning of documents. Indicates that a device alarm (that users can not ...
... that initialization has been completed successfully. "U" and an error number (1, 2, 6) are provided with the scanner. To return the scanner to the ready status ("1"), press "Scan" or "Send to " button while the error is indicated after turning on the Function Number Display. ... To change the overlay, open the plastic cover of documents. Thin Send to 9, and A, c, d, F) are indicated alternately. Indicates that a temporary error (that users can solve) has occurred during the initialization or scanning of documents. Indicates that a device alarm (that users can not ...

Operator's Guide
Page 72
... Front/Back Image #1, and for Image Processing Software HINT Option, refer to use the Scanner Driver Dither Pattern 3 This setting is suitable for scanning line drawings and text documents. 16-level Gray Scans data with 256 gradations from black to white. that only when Image ...[User's Guide]. This setting is available when "Black and White" is displayed.) Black and White Scans data in black and white mode. Error Diffusion This function minimizes the differences of pixels (dots) per inch Specifies the number of color levels. 52 2.13 How to "Image Processing ...
... Front/Back Image #1, and for Image Processing Software HINT Option, refer to use the Scanner Driver Dither Pattern 3 This setting is suitable for scanning line drawings and text documents. 16-level Gray Scans data with 256 gradations from black to white. that only when Image ...[User's Guide]. This setting is available when "Black and White" is displayed.) Black and White Scans data in black and white mode. Error Diffusion This function minimizes the differences of pixels (dots) per inch Specifies the number of color levels. 52 2.13 How to "Image Processing ...
Operator's Guide
Page 77
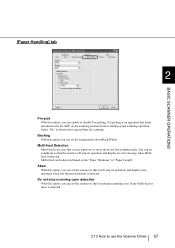
...enable or disable Pre-picking. BASIC SCANNER OPERATIONS [Paper Handling] tab 2 Pre-pick With this option, you can set the background color (Black/White). Select "On" to the scanning position) before starting actual scanning operation. Pre-picking is an error that feeds documents into the ADF (to shorten ...the required time for scanning. Multi-feed Detection Multi-feed is an operation that occurs when two or more sheets are fed simultaneously. Skew With this option, you can set the scanner so that it will...
...enable or disable Pre-picking. BASIC SCANNER OPERATIONS [Paper Handling] tab 2 Pre-pick With this option, you can set the background color (Black/White). Select "On" to the scanning position) before starting actual scanning operation. Pre-picking is an error that feeds documents into the ADF (to shorten ...the required time for scanning. Multi-feed Detection Multi-feed is an operation that occurs when two or more sheets are fed simultaneously. Skew With this option, you can set the scanner so that it will...
Operator's Guide
Page 86
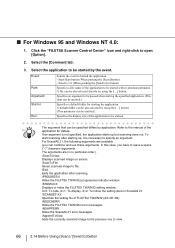
.... (This parameter can be omitted.) Specifies the display size of FUJITSU TWAIN32 (XX=00~99). /NOSCNERR Hides the FUJITSU TWAIN32 error messages. /NOAPPERR Hides the ScandAll 21 error messages. /AppendToView Adds the currently scanned image to the previous one... to view. 66 2.14 Before Using [Scan] / [Send to be passed when starting up, it is not specified, the application starts up but scanning does not. Click the "FUJITSU Scanner...
.... (This parameter can be omitted.) Specifies the display size of FUJITSU TWAIN32 (XX=00~99). /NOSCNERR Hides the FUJITSU TWAIN32 error messages. /NOAPPERR Hides the ScandAll 21 error messages. /AppendToView Adds the currently scanned image to the previous one... to view. 66 2.14 Before Using [Scan] / [Send to be passed when starting up, it is not specified, the application starts up but scanning does not. Click the "FUJITSU Scanner...


