
Operating Guide
Page 10
...: Refers to Microsoft® Windows® 2000 Professional operating system. Windows® XP: Refers to Microsoft® Windows® XP Professional operating system, and Microsoft® Windows® XP Home Edition operating system Windows NT®: Refers to Microsoft® Windows® Millennium Edition operating system. ix Trademarks Microsoft®, Windows® and Windows NT® are registered...
...: Refers to Microsoft® Windows® 2000 Professional operating system. Windows® XP: Refers to Microsoft® Windows® XP Professional operating system, and Microsoft® Windows® XP Home Edition operating system Windows NT®: Refers to Microsoft® Windows® Millennium Edition operating system. ix Trademarks Microsoft®, Windows® and Windows NT® are registered...
Operating Guide
Page 13
Furthermore, the screenshots in this manual are subject to the User's Manual of product improvement. Screen Examples In This Manual The screen examples in this manual are for the FUJITSU TWAIN32 scanner driver and the Image Capturing Software Utilities "ScandAll 21" for Microsoft® Windows®. xii If the actual displayed screen differs from the screen examples in this manual, operate by following the actual displayed screen referring to change without notice in the interest of the scanner application you are using.
Furthermore, the screenshots in this manual are subject to the User's Manual of product improvement. Screen Examples In This Manual The screen examples in this manual are for the FUJITSU TWAIN32 scanner driver and the Image Capturing Software Utilities "ScandAll 21" for Microsoft® Windows®. xii If the actual displayed screen differs from the screen examples in this manual, operate by following the actual displayed screen referring to change without notice in the interest of the scanner application you are using.

Operating Guide
Page 37
... details, see "I Indications on the scanner driver CD-ROM. 10 1.3 Operator panel display" in the launcher (*). Start and read the application software according to the details set in the launcher (*). Select the Function No. Lights when the scanner is turned ON. *) For information... on detailed settings for the launcher, refer to Scan Power button LED - Turns the scanner ON and OFF. set in this section. display button Function Send to the Scanner Utility for Microsoft® Windows® User's Guide...
... details, see "I Indications on the scanner driver CD-ROM. 10 1.3 Operator panel display" in the launcher (*). Start and read the application software according to the details set in the launcher (*). Select the Function No. Lights when the scanner is turned ON. *) For information... on detailed settings for the launcher, refer to Scan Power button LED - Turns the scanner ON and OFF. set in this section. display button Function Send to the Scanner Utility for Microsoft® Windows® User's Guide...

Operating Guide
Page 42
...; 98 Refers to Microsoft® Windows® Millennium Edition operating system. Windows® Me Refers to Microsoft® Windows® 98 operating system. Windows NT® Refers to Microsoft® Windows NT® operating system Version4.0. 2.1 Installing the Scanner 16 2.2 Connecting the Scanner to Microsoft® Windows® 95 operating system. INSTALLATION OF A SCANNER Windows® 95 Refers to a PC...
...; 98 Refers to Microsoft® Windows® Millennium Edition operating system. Windows® Me Refers to Microsoft® Windows® 98 operating system. Windows NT® Refers to Microsoft® Windows NT® operating system Version4.0. 2.1 Installing the Scanner 16 2.2 Connecting the Scanner to Microsoft® Windows® 95 operating system. INSTALLATION OF A SCANNER Windows® 95 Refers to a PC...
Operating Guide
Page 46
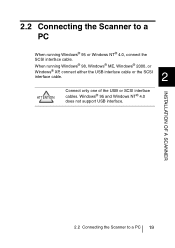
INSTALLATION OF A SCANNER 2.2 Connecting the Scanner to a PC When running Windows® 98, Windows® ME, Windows® 2000, or Windows® XP, connect either the USB interface cable or the SCSI interface cable. 2 ATTENTION Connect only one of the USB or SCSI interface cables. When running Windows® 95 or Windows NT® 4.0, connect the SCSI interface cable. Windows® 95 and Windows NT® 4.0 does not support USB interface. 2.2 Connecting the Scanner to a PC 19
INSTALLATION OF A SCANNER 2.2 Connecting the Scanner to a PC When running Windows® 98, Windows® ME, Windows® 2000, or Windows® XP, connect either the USB interface cable or the SCSI interface cable. 2 ATTENTION Connect only one of the USB or SCSI interface cables. When running Windows® 95 or Windows NT® 4.0, connect the SCSI interface cable. Windows® 95 and Windows NT® 4.0 does not support USB interface. 2.2 Connecting the Scanner to a PC 19
Operating Guide
Page 53
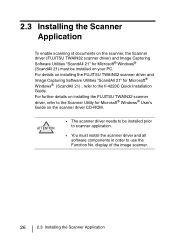
... order to use the Function No. display of documents on the scanner, the Scanner driver (FUJITSU TWAIN32 scanner driver) and Image Capturing Software Utilities "ScandAll 21" for Microsoft® Windows® (ScandAll 21) , refer to the fi-4220C Quick Installation Guide. For details on the scanner driver CD-ROM. 2.3 Installing the Scanner Application To enable scanning of the image...
... order to use the Function No. display of documents on the scanner, the Scanner driver (FUJITSU TWAIN32 scanner driver) and Image Capturing Software Utilities "ScandAll 21" for Microsoft® Windows® (ScandAll 21) , refer to the fi-4220C Quick Installation Guide. For details on the scanner driver CD-ROM. 2.3 Installing the Scanner Application To enable scanning of the image...

Operating Guide
Page 54
The screens and operations may differ slightly if the OS that you are using is updated the screens and operations noted in Windows® XP. Also, when FUJITSU TWAIN32 is other than Windows® XP. BASIC SCANNER OPERATIONS 3 BASIC SCANNER OPERATIONS This chapter describes basic scanner operations. 3 This chapter explains samples of the screens in this chapter will differ slightly. 3.1 Turning the Scanner ON 28 3.2 Loading Documents on the ADF for Scanning ........ 30 3.3 Scanning Documents 36 27
The screens and operations may differ slightly if the OS that you are using is updated the screens and operations noted in Windows® XP. Also, when FUJITSU TWAIN32 is other than Windows® XP. BASIC SCANNER OPERATIONS 3 BASIC SCANNER OPERATIONS This chapter describes basic scanner operations. 3 This chapter explains samples of the screens in this chapter will differ slightly. 3.1 Turning the Scanner ON 28 3.2 Loading Documents on the ADF for Scanning ........ 30 3.3 Scanning Documents 36 27

Operating Guide
Page 63
... on how to be used. Select [Program] - [Scanner Utility for Scanning." 2. Select the scanner to load documents, see "3.2 Loading Documents on the ADF for Microsoft Windows] [ScandAll 21] in that order from the [Start] menu. 3.3 Scanning Documents The following shows the procedure for scanning documents with the ScandAll 21 scanner application (simply called "ScandAll 21" from here on...
... on how to be used. Select [Program] - [Scanner Utility for Scanning." 2. Select the scanner to load documents, see "3.2 Loading Documents on the ADF for Microsoft Windows] [ScandAll 21] in that order from the [Start] menu. 3.3 Scanning Documents The following shows the procedure for scanning documents with the ScandAll 21 scanner application (simply called "ScandAll 21" from here on...
Operating Guide
Page 64
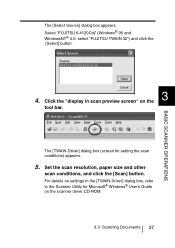
...] dialog box (screen for Microsoft® Windows® User's Guide on the tool bar. For details on settings in scan preview screen" on the scanner driver CD-ROM. 3.3 Scanning Documents 37 Select "FUJITSU fi-4120Cdj" (Windows® 95 and WindowsNT® 4.0, select "FUJITSU TWAIN 32") and click the [Select] button. 3 4. BASIC SCANNER OPERATIONS The [Select Source] dialog box...
...] dialog box (screen for Microsoft® Windows® User's Guide on the tool bar. For details on settings in scan preview screen" on the scanner driver CD-ROM. 3.3 Scanning Documents 37 Select "FUJITSU fi-4120Cdj" (Windows® 95 and WindowsNT® 4.0, select "FUJITSU TWAIN 32") and click the [Select] button. 3 4. BASIC SCANNER OPERATIONS The [Select Source] dialog box...
Operating Guide
Page 68
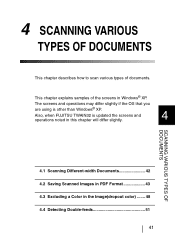
SCANNING VARIOUS TYPES OF DOCUMENTS 4.1 Scanning Different-width Documents 42 4.2 Saving Scanned Images in PDF Format 43 4.3 Excluding a Color in the Image(dropout color) ....... 48 4.4 Detecting Double-feeds 51 41 Also, when FUJITSU TWAIN32 is other than Windows® XP. The screens and operations may differ slightly if the OS that you are using is...
SCANNING VARIOUS TYPES OF DOCUMENTS 4.1 Scanning Different-width Documents 42 4.2 Saving Scanned Images in PDF Format 43 4.3 Excluding a Color in the Image(dropout color) ....... 48 4.4 Detecting Double-feeds 51 41 Also, when FUJITSU TWAIN32 is other than Windows® XP. The screens and operations may differ slightly if the OS that you are using is...

Operating Guide
Page 72
Select "FUJITSU fi-4120Cdj"(Windows® 95 and WindowsNT® 4.0, select "FUJITSU TWAIN 32") at "Device" and click the [Scan] button. ATTENTION Also select "Simplex" when scanning double-sided documents. 4 SCANNING VARIOUS TYPES OF DOCUMENTS 4.2 Saving Scanned Images in PDF Format 45 4. The [TWAIN Driver] dialog box appears.
Select "FUJITSU fi-4120Cdj"(Windows® 95 and WindowsNT® 4.0, select "FUJITSU TWAIN 32") at "Device" and click the [Scan] button. ATTENTION Also select "Simplex" when scanning double-sided documents. 4 SCANNING VARIOUS TYPES OF DOCUMENTS 4.2 Saving Scanned Images in PDF Format 45 4. The [TWAIN Driver] dialog box appears.

Operating Guide
Page 92
... the AC adapter from the outlet when changing the scanners consumable products. 6.1 Consumable and Replacement Cycle 66 6.2 Replacing the Pad ASY 74 6.3 Replacing the Pick Roller 80 65 Also, when FUJITSU TWAIN32 is other than Windows® XP. This chapter explains samples of the... screens in this chapter will differ slightly. REPLACING CONSUMABLES 6 REPLACING CONSUMABLES 6 This chapter describes how to replace scanner consumables. The screens and operations may ...
... the AC adapter from the outlet when changing the scanners consumable products. 6.1 Consumable and Replacement Cycle 66 6.2 Replacing the Pad ASY 74 6.3 Replacing the Pick Roller 80 65 Also, when FUJITSU TWAIN32 is other than Windows® XP. This chapter explains samples of the... screens in this chapter will differ slightly. REPLACING CONSUMABLES 6 REPLACING CONSUMABLES 6 This chapter describes how to replace scanner consumables. The screens and operations may ...
Operating Guide
Page 96
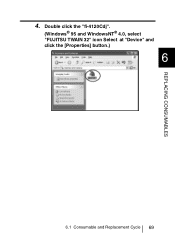
Double click the "fi-4120Cdj". (Windows® 95 and WindowsNT® 4.0, select "FUJITSU TWAIN 32" icon Select at "Device" and click the [Properties] button.) 6 6.1 Consumable and Replacement Cycle 69 REPLACING CONSUMABLES 4.
Double click the "fi-4120Cdj". (Windows® 95 and WindowsNT® 4.0, select "FUJITSU TWAIN 32" icon Select at "Device" and click the [Properties] button.) 6 6.1 Consumable and Replacement Cycle 69 REPLACING CONSUMABLES 4.

Operating Guide
Page 103
... and lock the ADF button. The following shows the procedure for resetting the pad counter. • For Windows® 98 / Windows® Me / Windows® 2000 / Windows® XP 1) When turning on the power, check that the scanner and the personal computer are connected. 2) Double click the "Printer and Other Hardware" icon on the center...
... and lock the ADF button. The following shows the procedure for resetting the pad counter. • For Windows® 98 / Windows® Me / Windows® 2000 / Windows® XP 1) When turning on the power, check that the scanner and the personal computer are connected. 2) Double click the "Printer and Other Hardware" icon on the center...
Operating Guide
Page 105
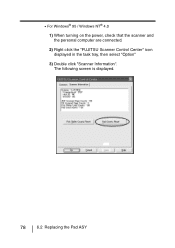
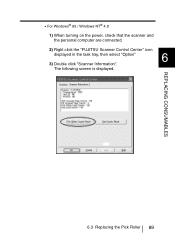
• For Windows® 95 / Windows NT® 4.0 1) When turning on the power, check that the scanner and the personal computer are connected. 2) Right click the "FUJITSU Scanner Control Center" icon displayed in the task tray, then select "Option" 3) Double click "Scanner Information". The following screen is displayed. 78 6.2 Replacing the Pad ASY
• For Windows® 95 / Windows NT® 4.0 1) When turning on the power, check that the scanner and the personal computer are connected. 2) Right click the "FUJITSU Scanner Control Center" icon displayed in the task tray, then select "Option" 3) Double click "Scanner Information". The following screen is displayed. 78 6.2 Replacing the Pad ASY

Operating Guide
Page 114
... 87 Reset the pick counter. The following shows the procedure for resetting the pick counter. • For Windows® 98 / Windows® Me / Windows® 2000 / Windows® XP 1) When turning on the power, check that the scanner and 6 the personal computer are connected. 2) Double click the "Printers and Other Hardware" icon on the operator...
... 87 Reset the pick counter. The following shows the procedure for resetting the pick counter. • For Windows® 98 / Windows® Me / Windows® 2000 / Windows® XP 1) When turning on the power, check that the scanner and 6 the personal computer are connected. 2) Double click the "Printers and Other Hardware" icon on the operator...
Operating Guide
Page 116
REPLACING CONSUMABLES 6.3 Replacing the Pick Roller 89 • For Windows® 95 / Windows NT® 4.0 1) When turning on the power, check that the scanner and the personal computer are connected. 2) Right click the "FUJITSU Scanner Control Center" icon displayed in the task tray, then select "Option" 6 3) Double click "Scanner Information". The following screen is displayed.
REPLACING CONSUMABLES 6.3 Replacing the Pick Roller 89 • For Windows® 95 / Windows NT® 4.0 1) When turning on the power, check that the scanner and the personal computer are connected. 2) Right click the "FUJITSU Scanner Control Center" icon displayed in the task tray, then select "Option" 6 3) Double click "Scanner Information". The following screen is displayed.
Operating Guide
Page 118
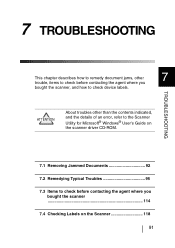
... check device labels. 7 TROUBLESHOOTING TROUBLESHOOTING This chapter describes how to remedy document jams, other than the contents indicated, and the details of an error, refer to the Scanner Utility for Microsoft® Windows® User's Guide on the scanner driver CD-ROM. 7.1 Removing Jammed Documents 92 7.2 Remedying Typical Troubles 95 7.3 Items to check before contacting...
... check device labels. 7 TROUBLESHOOTING TROUBLESHOOTING This chapter describes how to remedy document jams, other than the contents indicated, and the details of an error, refer to the Scanner Utility for Microsoft® Windows® User's Guide on the scanner driver CD-ROM. 7.1 Removing Jammed Documents 92 7.2 Remedying Typical Troubles 95 7.3 Items to check before contacting...
Operating Guide
Page 138
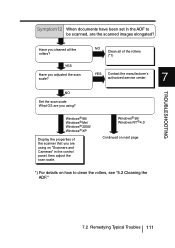
...documents have been set in the control panel, then adjust the scan scale. Windows R 98/ Windows R Me/ Windows R 2000/ Windows R XP Display the properties of the rollers (*1) YES Contact the manufacturer's authorized service center. 7 TROUBLESHOOTING NO Set the scan scale. Have you cleaned all of the scanner...adjusted the scan scale? NO Clean all the rollers? What OS are the scanned images elongated? Windows R 95/ Windows NT R 4.0 Continued on next page *) For details on "Scanners and Cameras" in the ADF to clean the rollers, see "5.2 Cleaning the ADF." 7.2 Remedying ...
...documents have been set in the control panel, then adjust the scan scale. Windows R 98/ Windows R Me/ Windows R 2000/ Windows R XP Display the properties of the rollers (*1) YES Contact the manufacturer's authorized service center. 7 TROUBLESHOOTING NO Set the scan scale. Have you cleaned all of the scanner...adjusted the scan scale? NO Clean all the rollers? What OS are the scanned images elongated? Windows R 95/ Windows NT R 4.0 Continued on next page *) For details on "Scanners and Cameras" in the ADF to clean the rollers, see "5.2 Cleaning the ADF." 7.2 Remedying ...
Operating Guide
Page 139
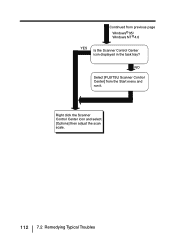
Continued from the Start menu and run it. NO Select [FUJITSU Scanner Control Center] from previous page Windows R 95/ Windows NT R 4.0 YES Is the Scanner Control Center icon displayed in the task tray? Right click the Scanner Control Center icon and select [Options] then adjust the scan scale. 112 7.2 Remedying Typical Troubles
Continued from the Start menu and run it. NO Select [FUJITSU Scanner Control Center] from previous page Windows R 95/ Windows NT R 4.0 YES Is the Scanner Control Center icon displayed in the task tray? Right click the Scanner Control Center icon and select [Options] then adjust the scan scale. 112 7.2 Remedying Typical Troubles


