
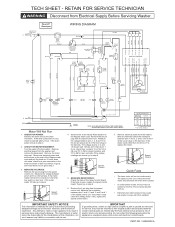
Wiring Diagram (All Languages)
Page 1
... 2, 6, and 10 should read 120 Vac and 0 Vac at pin 1. MEASURE RESISTANCES: Check the fuse on the harness. Remove electrical power from the washer and remove the back panel. The speed control unit controls the timer motor and advances the timer when needed. • In some tumble modes, the... tub may result in the timer line switch or door lock. Remove electrical power from the washer. MEASURE VOLTAGES: Remove the six pin plug from the speed control unit. Measure the voltage between pins 1 and 2, 2 and 3, and 3 and 1 of this ...
... 2, 6, and 10 should read 120 Vac and 0 Vac at pin 1. MEASURE RESISTANCES: Check the fuse on the harness. Remove electrical power from the washer and remove the back panel. The speed control unit controls the timer motor and advances the timer when needed. • In some tumble modes, the... tub may result in the timer line switch or door lock. Remove electrical power from the washer. MEASURE VOLTAGES: Remove the six pin plug from the speed control unit. Measure the voltage between pins 1 and 2, 2 and 3, and 3 and 1 of this ...

Installation Instructions (All Languages)
Page 1
... impossible de joindre la compagnie de gaz, appeler les pompiers. Leave these instructions. This will simplify the installation and ensure the washer is installed correctly and safely. ne pas utiliser le téléphone dans l'immeuble. · Faire sortir tous les occupants...et sécuritaire de la laveuse. Installation Instructions Full Size Tumble Action Washers Notice d'installation Machine à laver par culbutage Before beginning installation, carefully read these instructions near the washer after installation for future reference. WHAT TO DO IF YOU SMELL GAS ...
... impossible de joindre la compagnie de gaz, appeler les pompiers. Leave these instructions. This will simplify the installation and ensure the washer is installed correctly and safely. ne pas utiliser le téléphone dans l'immeuble. · Faire sortir tous les occupants...et sécuritaire de la laveuse. Installation Instructions Full Size Tumble Action Washers Notice d'installation Machine à laver par culbutage Before beginning installation, carefully read these instructions near the washer after installation for future reference. WHAT TO DO IF YOU SMELL GAS ...
Installation Instructions (All Languages)
Page 2
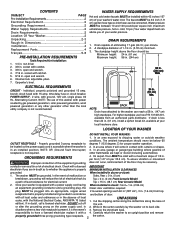
...ELECTRICAL REQUIREMENTS CIRCUIT - NOTE: Drain hose attached to whether the appliance is not required. LOCATION OF YOUR WASHER DO NOT INSTALL YOUR WASHER: 1. per foot (1.27 cm per square inch (maximum unbalance pressure, hot vs. To ensure vibration or movement Improper connection of ...131461201, available from top receptacle that is properly installed and grounded in . (0 cm) Front Console Model a path of door. When installed in contact with a power supply cord having When installed in closet: Front = 1 in. (2.54 cm) an equipment-grounding conductor and a grounding plug, ...
...ELECTRICAL REQUIREMENTS CIRCUIT - NOTE: Drain hose attached to whether the appliance is not required. LOCATION OF YOUR WASHER DO NOT INSTALL YOUR WASHER: 1. per foot (1.27 cm per square inch (maximum unbalance pressure, hot vs. To ensure vibration or movement Improper connection of ...131461201, available from top receptacle that is properly installed and grounded in . (0 cm) Front Console Model a path of door. When installed in contact with a power supply cord having When installed in closet: Front = 1 in. (2.54 cm) an equipment-grounding conductor and a grounding plug, ...
Installation Instructions (All Languages)
Page 3
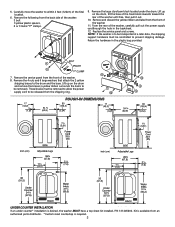
... on the drum, tilt the base of the foam block inwards toward the rear of the washer: 3 bolt 3 yellow plastic spacers, 2 or 3 metal "P" clamps. 9. These braces must be released from the front of the final location. 6. Kit is available from an authorized parts distributor. *Custom sized ...surrounds the items to be reinstalled to within 4 feet (122cm) of the washer. 11. Retain the hardware in the backsheet. 12. From the rear of the washer. 8. 5. Remove the following from the front of the washer, carefully pull out the power supply cordthrough the hole in the plastic bag ...
... on the drum, tilt the base of the foam block inwards toward the rear of the washer: 3 bolt 3 yellow plastic spacers, 2 or 3 metal "P" clamps. 9. These braces must be released from the front of the final location. 6. Kit is available from an authorized parts distributor. *Custom sized ...surrounds the items to be reinstalled to within 4 feet (122cm) of the washer. 11. Retain the hardware in the backsheet. 12. From the rear of the washer. 8. 5. Remove the following from the front of the washer, carefully pull out the power supply cordthrough the hole in the plastic bag ...
Installation Instructions (All Languages)
Page 4
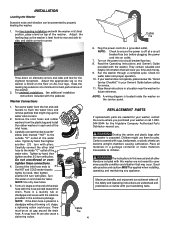
... for the Frigidaire Company Authorized Parts Distributor nearest you. The instructions in your washer or call 1-800944-9044 for best performance of the washer. Adjust the appropriate leg so the washer is unpacked. For pedestal installations, See additional installation instructions included with the washer. Carefully connect...into an outlet. 7. NOTE: Check to ensure the power is level front-to-rear and side-toside, and stable corner-to flush the water lines and remove particles that may occur. Run the washer through a complete cycle. NOTE: A wiring diagram is placed in a...
... for the Frigidaire Company Authorized Parts Distributor nearest you. The instructions in your washer or call 1-800944-9044 for best performance of the washer. Adjust the appropriate leg so the washer is unpacked. For pedestal installations, See additional installation instructions included with the washer. Carefully connect...into an outlet. 7. NOTE: Check to ensure the power is level front-to-rear and side-toside, and stable corner-to flush the water lines and remove particles that may occur. Run the washer through a complete cycle. NOTE: A wiring diagram is placed in a...
Operating Instructions (Operating Instructions)
Page 1
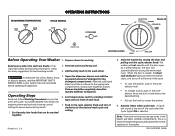
... dispenser drawer. It provides detailed information for washing. Sort laundry into loads that can be completely closed , the Door Lock Indicator lights up when the washer starts, and turns off at the end of the washer. Set Temperatures switch according to fabric type and soil level of detergent... the To reduce the risk of fire, electric shock, measured amount of each load. 7. Printed in your Use and Care Guide. Read your washer Use and Care Guide bleach and fabric softener to restart the washer. 9. It also has many suggestions for laundry additives to the wash drum. ...
... dispenser drawer. It provides detailed information for washing. Sort laundry into loads that can be completely closed , the Door Lock Indicator lights up when the washer starts, and turns off at the end of the washer. Set Temperatures switch according to fabric type and soil level of detergent... the To reduce the risk of fire, electric shock, measured amount of each load. 7. Printed in your Use and Care Guide. Read your washer Use and Care Guide bleach and fabric softener to restart the washer. 9. It also has many suggestions for laundry additives to the wash drum. ...
Operating Instructions (Operating Instructions)
Page 2
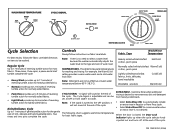
... for most fabrics. This determines water temperatures for basic fabric types. When the door is no need to select a water level because the washer automatically adjusts the water level to LOUD. Note: There is closed, the Door Lock Indicator lights up to 17 minutes of knit, delicate ...fabrics, knits, delicates, hand washables Cold/Cold Washable woolens Warm/Cold EXTRA RINSE - A signal will not sound at OFF or from heavily soiled loads. • Select Extra Rinse ON to automatically include an extra rinse in Regular or Perm Press cycle. • Select Extra Rinse OFF to 11...
... for most fabrics. This determines water temperatures for basic fabric types. When the door is no need to select a water level because the washer automatically adjusts the water level to LOUD. Note: There is closed, the Door Lock Indicator lights up to 17 minutes of knit, delicate ...fabrics, knits, delicates, hand washables Cold/Cold Washable woolens Warm/Cold EXTRA RINSE - A signal will not sound at OFF or from heavily soiled loads. • Select Extra Rinse ON to automatically include an extra rinse in Regular or Perm Press cycle. • Select Extra Rinse OFF to 11...


