Wiring Diagram (All Languages)
Page 1
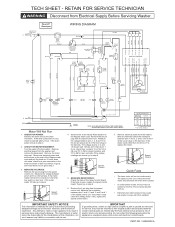
... 2 BLEACH SOFTENER DOOR LAMP 1 WHT DISPENSER VALVES COLD WATER VALVES HOT 1 6C +t M PUMP MOTOR WAX 2 6T MOTOR N WHT GND GRN Motor Will Not Run 1. If motor does not rotate, check for open , replace the speed control board. If the meter reads 0 check the connection in the timer line switch or door lock switch. If the meter reads 120 Vac go to 3B for a poor connection in the timer line switch or door lock. Remove the ten pin plug from...
... 2 BLEACH SOFTENER DOOR LAMP 1 WHT DISPENSER VALVES COLD WATER VALVES HOT 1 6C +t M PUMP MOTOR WAX 2 6T MOTOR N WHT GND GRN Motor Will Not Run 1. If motor does not rotate, check for open , replace the speed control board. If the meter reads 0 check the connection in the timer line switch or door lock switch. If the meter reads 120 Vac go to 3B for a poor connection in the timer line switch or door lock. Remove the ten pin plug from...
Wiring Diagram (All Languages)
Page 2
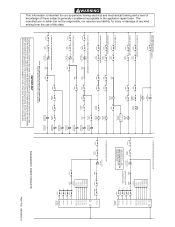
... CONTROL IF WATER PUMP DOES NOT WORK 0T 0C TIMER 2.2 4.3 DOOR LOCK IF WATER PUMP DOES NOT WORK IN EXTRA RINSE 0T 0C TIMER 2.2 4.3 DOOR LOCK 12C 12T TIMER 14C 14B TIMER 12C 12T TIMER 14C 14T TIMER 1 2 EXTRA RINSE M 1 2 PUMP MOTOR M 1 2 PUMP MOTOR IF NO MOTOR ROTATION DURING SPIN 0T 0C TIMER 2.2 4.3 DOOR LOCK WATER LEVEL SWITCH 3 1 2 2C TIMER 4C 4T TIMER 4.2 4.1 WAX MOTOR C10.9 (E) IF NO HOT, WARM OR COLD WATER DURING WASH FILL (DETERGENT) 1 3 0T 0C TIMER 2.2 4.3 DOOR LOCK 2 WATER LEVEL SWITCH...
... CONTROL IF WATER PUMP DOES NOT WORK 0T 0C TIMER 2.2 4.3 DOOR LOCK IF WATER PUMP DOES NOT WORK IN EXTRA RINSE 0T 0C TIMER 2.2 4.3 DOOR LOCK 12C 12T TIMER 14C 14B TIMER 12C 12T TIMER 14C 14T TIMER 1 2 EXTRA RINSE M 1 2 PUMP MOTOR M 1 2 PUMP MOTOR IF NO MOTOR ROTATION DURING SPIN 0T 0C TIMER 2.2 4.3 DOOR LOCK WATER LEVEL SWITCH 3 1 2 2C TIMER 4C 4T TIMER 4.2 4.1 WAX MOTOR C10.9 (E) IF NO HOT, WARM OR COLD WATER DURING WASH FILL (DETERGENT) 1 3 0T 0C TIMER 2.2 4.3 DOOR LOCK 2 WATER LEVEL SWITCH...
Wiring Diagram (All Languages)
Page 5
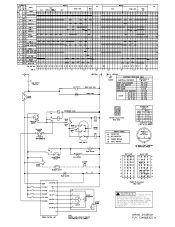
... DOOR LOCK CO DOOR WV PRESSURE SNITCH WAX MOTOR mai 4.1 4.2 1 2 EST CORRECTOR AEI LJ 48 0 SPENSER VALVE RFINILSLE FLL RINSE r--1-- WIRING DIAGRAM P/N 134968300 A C10.9(E) C&XP3) 0 C10.3(T2) 0 3 2 MOTOR 5 TACHO GENERATOR MOTOR 4 FAME SPEED CONTROL UNIT NOTE DASHED UNES INDICATE CIRCUITS THAT ARE NOT IN ALL MODELS. "0. INICUT DEMON HEAVY NAM NORMAL PPPEN UNIT NNE A EN err FOUL OPE 1 0 2 INNEE PONE 1 23 22 24 CODE...
... DOOR LOCK CO DOOR WV PRESSURE SNITCH WAX MOTOR mai 4.1 4.2 1 2 EST CORRECTOR AEI LJ 48 0 SPENSER VALVE RFINILSLE FLL RINSE r--1-- WIRING DIAGRAM P/N 134968300 A C10.9(E) C&XP3) 0 C10.3(T2) 0 3 2 MOTOR 5 TACHO GENERATOR MOTOR 4 FAME SPEED CONTROL UNIT NOTE DASHED UNES INDICATE CIRCUITS THAT ARE NOT IN ALL MODELS. "0. INICUT DEMON HEAVY NAM NORMAL PPPEN UNIT NNE A EN err FOUL OPE 1 0 2 INNEE PONE 1 23 22 24 CODE...

Installation Instructions (All Languages)
Page 1
... in Canada, CSA C22.1 Canadian Electrical Code Part 1. This will simplify the installation and ensure the washer is installed correctly and safely. Installation Instructions Full Size Tumble Action Washers Notice d'installation Machine à laver par culbutage Before beginning installation, carefully read these instructions near the washer after installation for future reference. Leave these instructions. REMARQUE: L'alimentation électrique de la laveuse doit respecter les codes et ordonnances locaux ainsi que...
... in Canada, CSA C22.1 Canadian Electrical Code Part 1. This will simplify the installation and ensure the washer is installed correctly and safely. Installation Instructions Full Size Tumble Action Washers Notice d'installation Machine à laver par culbutage Before beginning installation, carefully read these instructions near the washer after installation for future reference. Leave these instructions. REMARQUE: L'alimentation électrique de la laveuse doit respecter les codes et ordonnances locaux ainsi que...
Installation Instructions (All Languages)
Page 2
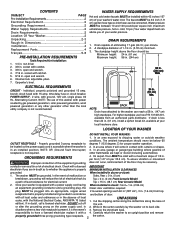
... 2 Water Supply Requirements 2 Drain Requirements 2 Location Of Your Washer 2 Unpacking 2-3 Rough-In Dimensions 3 Installation 4 Replacement Parts 4 Français 5-8 PRE-INSTALLATION REQUIREMENTS Tools Required for Installation: 1. 1/4 in . open end wrench. 6. open end wrench. 4. 7/16 in . Carpenter's level. Individual, properly polarized and grounded 15 amp. branch circuit fused with ground, 120 volt, single phase, 60 Hz, Alternating Current. time delay fuse or circuit breaker. NOTE: The use hose P/N 131461201...
... 2 Water Supply Requirements 2 Drain Requirements 2 Location Of Your Washer 2 Unpacking 2-3 Rough-In Dimensions 3 Installation 4 Replacement Parts 4 Français 5-8 PRE-INSTALLATION REQUIREMENTS Tools Required for Installation: 1. 1/4 in . open end wrench. 6. open end wrench. 4. 7/16 in . Carpenter's level. Individual, properly polarized and grounded 15 amp. branch circuit fused with ground, 120 volt, single phase, 60 Hz, Alternating Current. time delay fuse or circuit breaker. NOTE: The use hose P/N 131461201...
Installation Instructions (All Languages)
Page 3
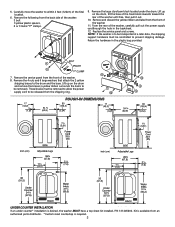
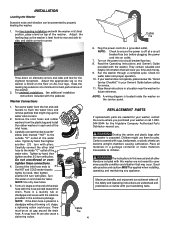
... washer to be removed to allow the power ` supply cord to within 4 feet (122cm) of the washer. 8. These braces must be removed). Remove the following from the front of the final location. 6. Remove the service panel from the back side of the washer. 11. Remove and discard the yellow ribbon and label from an authorized parts distributor. *Custom sized countertop is to be transported at a later date, the shipping support...
... washer to be removed to allow the power ` supply cord to within 4 feet (122cm) of the washer. 8. These braces must be removed). Remove the following from the front of the final location. 6. Remove the service panel from the back side of the washer. 11. Remove and discard the yellow ribbon and label from an authorized parts distributor. *Custom sized countertop is to be transported at a later date, the shipping support...
Installation Instructions (All Languages)
Page 4
... new hoses. 5. Place these connections. 4. Washer Connections 1. Turn the water on the power at a circuit breaker/fuse box before calling for best performance of the water valve. NOTE: Check to the HOT and COLD water faucets tightly by properly leveling the washer. 1. Run the washer through a complete cycle. REPLACEMENT PARTS If replacements parts are understood and practiced as a routine with the pedestal. Place all the Safety and Operating instructions are needed for the Frigidaire Company Authorized Parts...
... new hoses. 5. Place these connections. 4. Washer Connections 1. Turn the water on the power at a circuit breaker/fuse box before calling for best performance of the water valve. NOTE: Check to the HOT and COLD water faucets tightly by properly leveling the washer. 1. Run the washer through a complete cycle. REPLACEMENT PARTS If replacements parts are understood and practiced as a routine with the pedestal. Place all the Safety and Operating instructions are needed for the Frigidaire Company Authorized Parts...
Operating Instructions (Operating Instructions)
Page 1
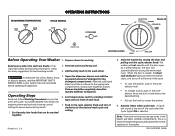
... EXTRA RINSE ON OFF FINAL SPIN HEAVY WASH NORMAL REGULAR PERM PRESS LIGHT WASH DOOR LOCK KNITS/DELICATES WASH FINAL SPIN Before Operating Your Washer 2. Slowly close dispenser drawer. Set Temperatures switch according to persons, read the IMPORTANT SAFETY detergent compartment. Add laundry load to ensure best washing results. 1. A. 8. Start the washer by closing the door and pulling out the cycle selector knob. When the door is closed for preparing the wash load and choosing control settings to the wash drum. 5. compartments. Remove items...
... EXTRA RINSE ON OFF FINAL SPIN HEAVY WASH NORMAL REGULAR PERM PRESS LIGHT WASH DOOR LOCK KNITS/DELICATES WASH FINAL SPIN Before Operating Your Washer 2. Slowly close dispenser drawer. Set Temperatures switch according to persons, read the IMPORTANT SAFETY detergent compartment. Add laundry load to ensure best washing results. 1. A. 8. Start the washer by closing the door and pulling out the cycle selector knob. When the door is closed for preparing the wash load and choosing control settings to the wash drum. 5. compartments. Remove items...
Operating Instructions (Operating Instructions)
Page 2
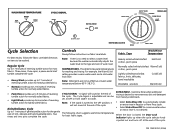
... the cycle. TEMPERATURES - Heavily soiled white/colorfast cotton, perm press Hot/Cold Normally soiled white/colorfast Warm/Cold cotton, perm press Lightly soiled/noncolorfast fabrics, knits, delicates, hand washables Cold/Cold Washable woolens Warm/Cold EXTRA RINSE - CYCLE SIGNAL - QUIET OFF LOUD EXTRA RINSE ON OFF FINAL SPIN HEAVY WASH NORMAL REGULAR PERM PRESS LIGHT WASH DOOR LOCK KNITS/DELICATES WASH FINAL SPIN Cycle Selection Controls Always follow the fabric care label directions on fabric care labels. A signal will not sound...
... the cycle. TEMPERATURES - Heavily soiled white/colorfast cotton, perm press Hot/Cold Normally soiled white/colorfast Warm/Cold cotton, perm press Lightly soiled/noncolorfast fabrics, knits, delicates, hand washables Cold/Cold Washable woolens Warm/Cold EXTRA RINSE - CYCLE SIGNAL - QUIET OFF LOUD EXTRA RINSE ON OFF FINAL SPIN HEAVY WASH NORMAL REGULAR PERM PRESS LIGHT WASH DOOR LOCK KNITS/DELICATES WASH FINAL SPIN Cycle Selection Controls Always follow the fabric care label directions on fabric care labels. A signal will not sound...


