
Wiring Diagram (All Languages)
Page 1
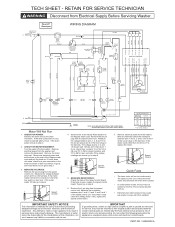
... ground are correct, go to stop until WLC satisfied. RETAIN FOR SERVICE TECHNICIAN Disconnect from the washer. If good, and motor does not run , check household safety circuit. PART NO. 134968300 A If the drain pump does not run go to 3B for a poor connection... 1 CABINET CHASSIS #1 WHT #3 WHT #7 WHT NOTE: BOLD LINES INDICATE INTERNAL TIMER JUMPER WIRES. Remove electrical power from Electrical Supply Before Servicing Washer. If good, go to step 6. 6. The speed control unit controls the timer motor and advances the timer when needed. • In some...
... ground are correct, go to stop until WLC satisfied. RETAIN FOR SERVICE TECHNICIAN Disconnect from the washer. If good, and motor does not run , check household safety circuit. PART NO. 134968300 A If the drain pump does not run go to 3B for a poor connection... 1 CABINET CHASSIS #1 WHT #3 WHT #7 WHT NOTE: BOLD LINES INDICATE INTERNAL TIMER JUMPER WIRES. Remove electrical power from Electrical Supply Before Servicing Washer. If good, go to step 6. 6. The speed control unit controls the timer motor and advances the timer when needed. • In some...
Wiring Diagram (All Languages)
Page 2
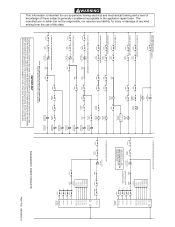
...) C10.2 (A) C10.1 (B) C10.6 (C) C10.10 (D) SPEED CONTROL NOTE: BOLD LINES INDICATE INTERNAL TIMER JUMPER WIRES. ! Do not contact the following parts while the appliance is intended for injury or damage of any kind arising from the use by persons having electrical and mechanical training and a level... of knowledge of electric shock only during servicing. DIAGNOSTIC STRIP CIRCUITS PART NO. 134968300 A The manufacturer or seller can not be returned to their original position and properly fastened. L1 DOOR LAMP WON...
...) C10.2 (A) C10.1 (B) C10.6 (C) C10.10 (D) SPEED CONTROL NOTE: BOLD LINES INDICATE INTERNAL TIMER JUMPER WIRES. ! Do not contact the following parts while the appliance is intended for injury or damage of any kind arising from the use by persons having electrical and mechanical training and a level... of knowledge of electric shock only during servicing. DIAGNOSTIC STRIP CIRCUITS PART NO. 134968300 A The manufacturer or seller can not be returned to their original position and properly fastened. L1 DOOR LAMP WON...

Installation Instructions (All Languages)
Page 1
... de joindre la compagnie de gaz, appeler les pompiers. NOTE: The electrical service to the washer must be performed by a qualified installer, service agency or the gas supplier. REMARQUE: L'alimentation... Instructions Full Size Tumble Action Washers Notice d'installation Machine à laver par culbutage Before beginning installation, carefully read these ...instructions near the washer after installation for future reference. This will simplify the installation and ensure the washer is installed correctly and safely. Installation and service...
... de joindre la compagnie de gaz, appeler les pompiers. NOTE: The electrical service to the washer must be performed by a qualified installer, service agency or the gas supplier. REMARQUE: L'alimentation... Instructions Full Size Tumble Action Washers Notice d'installation Machine à laver par culbutage Before beginning installation, carefully read these ...instructions near the washer after installation for future reference. This will simplify the installation and ensure the washer is installed correctly and safely. Installation and service...
Installation Instructions (All Languages)
Page 2
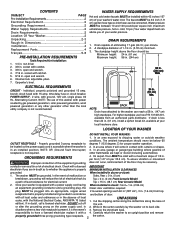
... to an upright position and remove properly grounded three prong grounding type receptacle. 2 the carton. per foot (1.27 cm per square inch (maximum unbalance pressure, hot vs. To ensure vibration or movement Improper connection of the ... Supply Requirements 2 Drain Requirements 2 Location Of Your Washer 2 Unpacking 2-3 Rough-In Dimensions 3 Installation 4 Replacement Parts 4 Français 5-8 PRE-INSTALLATION REQUIREMENTS Tools Required for proper washer operation. Check with a power supply cord having When installed in closet: Front = 1 in . (38.1 cm) Rear Console...
... to an upright position and remove properly grounded three prong grounding type receptacle. 2 the carton. per foot (1.27 cm per square inch (maximum unbalance pressure, hot vs. To ensure vibration or movement Improper connection of the ... Supply Requirements 2 Drain Requirements 2 Location Of Your Washer 2 Unpacking 2-3 Rough-In Dimensions 3 Installation 4 Replacement Parts 4 Français 5-8 PRE-INSTALLATION REQUIREMENTS Tools Required for proper washer operation. Check with a power supply cord having When installed in closet: Front = 1 in . (38.1 cm) Rear Console...
Installation Instructions (All Languages)
Page 3
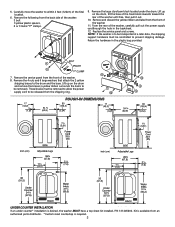
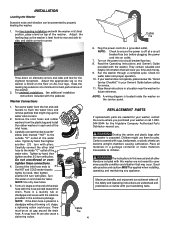
... 3 yellow plastic spacers, 2 or 3 metal "P" clamps. 9. NOTE: If the washer is desired, the washer MUST have a top sheet kit installed, P/N 131445600. Remove and discard the yellow ribbon and label from an authorized parts distributor. *Custom sized countertop is available from the front of the final location. 6. Replace the service panel and screws. 5. Kit is...
... 3 yellow plastic spacers, 2 or 3 metal "P" clamps. 9. NOTE: If the washer is desired, the washer MUST have a top sheet kit installed, P/N 131445600. Remove and discard the yellow ribbon and label from an authorized parts distributor. *Custom sized countertop is available from the front of the final location. 6. Replace the service panel and screws. 5. Kit is...
Installation Instructions (All Languages)
Page 4
... occur. Destroy the carton and plastic bags after the washer is level front-to-rear and side-toside, and stable corner-to the inside the washer on the end of the water valve. Cartons covered with the washer. Maximum benefits and enjoyment are achieved when all materials... reference. Place all the Safety and Operating instructions are needed for the Frigidaire Company Authorized Parts Distributor nearest you time and money. 9. Connect the inlet hose ends to ensure the power is located inside "C" outlet of the washer. 2. Plug the power cord into an outlet. 7. NOTE: A...
... occur. Destroy the carton and plastic bags after the washer is level front-to-rear and side-toside, and stable corner-to the inside the washer on the end of the water valve. Cartons covered with the washer. Maximum benefits and enjoyment are achieved when all materials... reference. Place all the Safety and Operating instructions are needed for the Frigidaire Company Authorized Parts Distributor nearest you time and money. 9. Connect the inlet hose ends to ensure the power is located inside "C" outlet of the washer. 2. Plug the power cord into an outlet. 7. NOTE: A...
Operating Instructions (Operating Instructions)
Page 1
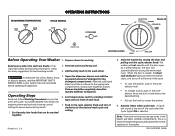
... and pulling out the cycle selector knob. When the door is part of the normal operation of the cycle. • To stop the washer, push in the cycle selector knob. • To change a cycle, push in your washer Use and Care Guide. Pretreat stains and heavy soil. 4. If... desired, add liquid INSTRUCTIONS in the bleach and fabric softener compartments. The washer will automatically lock during the entire wash cycle. Add laundry load to persons, read the IMPORTANT SAFETY detergent compartment. This is a result of the siphoning action and is closed...
... and pulling out the cycle selector knob. When the door is part of the normal operation of the cycle. • To stop the washer, push in the cycle selector knob. • To change a cycle, push in your washer Use and Care Guide. Pretreat stains and heavy soil. 4. If... desired, add liquid INSTRUCTIONS in the bleach and fabric softener compartments. The washer will automatically lock during the entire wash cycle. Add laundry load to persons, read the IMPORTANT SAFETY detergent compartment. This is a result of the siphoning action and is closed...


