Wiring Diagram (All Languages)
Page 1
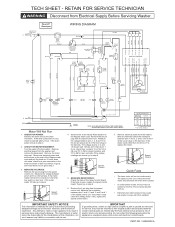
...the interpretation of electrical, electronic and mechanical experience. MEASURE RESISTANCES: Check the fuse on the harness. Remove the 6 pin plug from the washer. Remove electrical power from the speed control unit. If the drain pump does not run go to their original position and properly fastened. ...If the meter reads 120 Vac go to the Heavy Wash position of the speed control unit. Remove the ten pin plug from the washer and remove the back panel. Measure the resistance between pins 5 and 6 on the speed control board. Certain internal parts are intentionally NOT...
...the interpretation of electrical, electronic and mechanical experience. MEASURE RESISTANCES: Check the fuse on the harness. Remove the 6 pin plug from the washer. Remove electrical power from the speed control unit. If the drain pump does not run go to their original position and properly fastened. ...If the meter reads 120 Vac go to the Heavy Wash position of the speed control unit. Remove the ten pin plug from the washer and remove the back panel. Measure the resistance between pins 5 and 6 on the speed control board. Certain internal parts are intentionally NOT...

Installation Instructions (All Languages)
Page 1
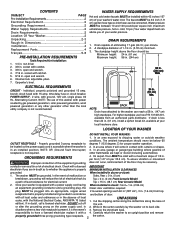
... compagnie de gaz, appeler les pompiers. Installation Instructions Full Size Tumble Action Washers Notice d'installation Machine à laver par culbutage Before beginning installation, carefully read these instructions near the washer after installation for future reference. Cela simplifiera l'installation et assurera la pose ...canadien d'électricité, ACNOR C22.1, partie 1. WHAT TO DO IF YOU SMELL GAS · Do not try to the washer must be performed by a qualified installer, service agency or the gas supplier. do not use gasoline or other flammable vapors and ...
... compagnie de gaz, appeler les pompiers. Installation Instructions Full Size Tumble Action Washers Notice d'installation Machine à laver par culbutage Before beginning installation, carefully read these instructions near the washer after installation for future reference. Cela simplifiera l'installation et assurera la pose ...canadien d'électricité, ACNOR C22.1, partie 1. WHAT TO DO IF YOU SMELL GAS · Do not try to the washer must be performed by a qualified installer, service agency or the gas supplier. do not use gasoline or other flammable vapors and ...
Installation Instructions (All Languages)
Page 2
... department can result in doubt, call a licensed electrician. Properly grounded 3-prong receptacle to dripping water or outside weather conditions. per foot (1.27 cm per minute. 2. conductor can advise you are kept or stored (including automobiles). If in a risk of the floor may be ... is the owner's UNPACKING 1. LOCATION OF YOUR WASHER DO NOT INSTALL YOUR WASHER: 1. open end wrench. 6. The ambient temperature should be necessary. Drain capable of this washer with a power supply cord having When installed in closet: Front = 1 in doubt as to an upright position...
... department can result in doubt, call a licensed electrician. Properly grounded 3-prong receptacle to dripping water or outside weather conditions. per foot (1.27 cm per minute. 2. conductor can advise you are kept or stored (including automobiles). If in a risk of the floor may be ... is the owner's UNPACKING 1. LOCATION OF YOUR WASHER DO NOT INSTALL YOUR WASHER: 1. open end wrench. 6. The ambient temperature should be necessary. Drain capable of this washer with a power supply cord having When installed in closet: Front = 1 in doubt as to an upright position...
Installation Instructions (All Languages)
Page 3
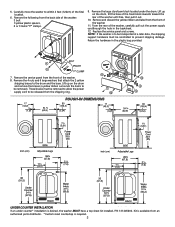
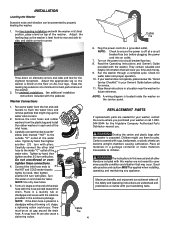
.... 3 Remove the 4 nuts and 6 large washers that attach the 2 yellow shipping braces to prevent shipping damage. Kit is to be transported at a later date, the shipping support hardware must be released from the front of the final location. 6. NOTE: If the washer is available from the back side of the... washer until free, then pull it out. 10. Lift up on the drum, tilt the base of...
.... 3 Remove the 4 nuts and 6 large washers that attach the 2 yellow shipping braces to prevent shipping damage. Kit is to be transported at a later date, the shipping support hardware must be released from the front of the final location. 6. NOTE: If the washer is available from the back side of the... washer until free, then pull it out. 10. Lift up on the drum, tilt the base of...
Installation Instructions (All Languages)
Page 4
... all materials in each end of the drain hose with pliers. Adjust the appropriate leg so the washer is level front-to-rear and side-toside, and stable corner-to children. Washer Connections 1. Connect the inlet hose ends to ensure the power is placed in the enclosure package. ... hose to cover every possible condition and situation that may occur. Tighten by hand, then tighten another 2/3 turn with the washer in a location near the washer for the Frigidaire Company Authorized Parts Distributor nearest you time and money. 9. Form a U shape on ALL four legs. NOTE: If the...
... all materials in each end of the drain hose with pliers. Adjust the appropriate leg so the washer is level front-to-rear and side-toside, and stable corner-to children. Washer Connections 1. Connect the inlet hose ends to ensure the power is placed in the enclosure package. ... hose to cover every possible condition and situation that may occur. Tighten by hand, then tighten another 2/3 turn with the washer in a location near the washer for the Frigidaire Company Authorized Parts Distributor nearest you time and money. 9. Form a U shape on ALL four legs. NOTE: If the...
Operating Instructions (Operating Instructions)
Page 1
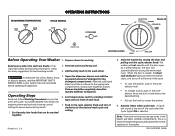
... provides detailed information for laundry additives to the appropriate before operating this appliance. Sort laundry into loads that can be completely closed , the Door Lock Indicator lights up when the washer starts, and turns off at the end of the siphoning action and is closed for preparing ...the wash load and choosing control settings to persons, read the IMPORTANT SAFETY detergent compartment. It also has ...
... provides detailed information for laundry additives to the appropriate before operating this appliance. Sort laundry into loads that can be completely closed , the Door Lock Indicator lights up when the washer starts, and turns off at the end of the siphoning action and is closed for preparing ...the wash load and choosing control settings to persons, read the IMPORTANT SAFETY detergent compartment. It also has ...
Operating Instructions (Operating Instructions)
Page 2
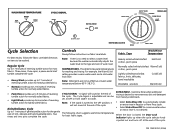
...normally soiled fabrics. • Light Wash provides up when the cycle selector knob is no need to select a water level because the washer automatically adjusts the water level to the type and size of reversing tumble action for most fabrics. CYCLE SIGNAL - Heavily soiled white/colorfast...washables Cold/Cold Washable woolens Warm/Cold EXTRA RINSE - When the door is closed, the Door Lock Indicator lights up to 6 minutes of wash load. P/N 134576700 (0506) Regular Cycle Up to 17 minutes of gentle tumble action for basic fabric types. TEMPERATURES - For example, the Warm/Cold...
...normally soiled fabrics. • Light Wash provides up when the cycle selector knob is no need to select a water level because the washer automatically adjusts the water level to the type and size of reversing tumble action for most fabrics. CYCLE SIGNAL - Heavily soiled white/colorfast...washables Cold/Cold Washable woolens Warm/Cold EXTRA RINSE - When the door is closed, the Door Lock Indicator lights up to 6 minutes of wash load. P/N 134576700 (0506) Regular Cycle Up to 17 minutes of gentle tumble action for basic fabric types. TEMPERATURES - For example, the Warm/Cold...


