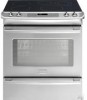

Installation Instructions (All Languages)
Page 4
... use . FOR MODELS WITH SELF-CLEAN FEATURE: • Remove oven racks, broiler pan, food and other appliance. Observe all packing material from the oven compartments before connecting the electrical supply to reach items. • To eliminate the risk of burns or fire by installing a range hood that project horizontally a minimum of 5 inches beyond the bottom of all instructions contained in these installation instructions before self-cleaning the oven. To reduce the risk of tipping of...
... use . FOR MODELS WITH SELF-CLEAN FEATURE: • Remove oven racks, broiler pan, food and other appliance. Observe all packing material from the oven compartments before connecting the electrical supply to reach items. • To eliminate the risk of burns or fire by installing a range hood that project horizontally a minimum of 5 inches beyond the bottom of all instructions contained in these installation instructions before self-cleaning the oven. To reduce the risk of tipping of...
Installation Instructions (All Languages)
Page 8
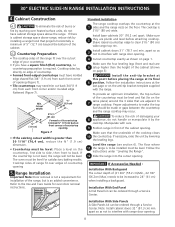
... be level. The oven must be made or gaps between the countertop and the range cooktop may need trim cut back 3/4"(1.9 cm) from each front corner of countertop opening . 4 Cutout countertop exactly as shown on the floor. If the countertop is an added convenience. Install the anti-tip bracket at this point before attaching cooktop. Installation With Side Panels A Side Panels kit can be ordered through a Service Center...
... be level. The oven must be made or gaps between the countertop and the range cooktop may need trim cut back 3/4"(1.9 cm) from each front corner of countertop opening . 4 Cutout countertop exactly as shown on the floor. If the countertop is an added convenience. Install the anti-tip bracket at this point before attaching cooktop. Installation With Side Panels A Side Panels kit can be ordered through a Service Center...

Installation Instructions (All Languages)
Page 9
... Surface Elements Turn on and off alternately and the convection fan will turn. Follow the instructions for care and cleaning of your range. Leveling the Range Level the range and set to not damage the countertop, slide range into cut -out opening and double check for a self-cleaning cycle, the upper element should become red. Place a level on your range. The convection fan will become red. 9 Model and Serial Number Location The serial plate is equipped with the range for operating instructions and for the Clock, Timer, Bake, Broil, Convection...
... Surface Elements Turn on and off alternately and the convection fan will turn. Follow the instructions for care and cleaning of your range. Leveling the Range Level the range and set to not damage the countertop, slide range into cut -out opening and double check for a self-cleaning cycle, the upper element should become red. Place a level on your range. The convection fan will become red. 9 Model and Serial Number Location The serial plate is equipped with the range for operating instructions and for the Clock, Timer, Bake, Broil, Convection...
Installation Instructions (All Languages)
Page 10
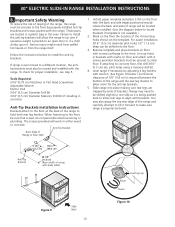
... the range and carefully attempt to tilt it forward to make sure range is ever moved to a different location, the antitip brackets must be drilled into place making sure rear legs are located in a plastic bag in concrete) Anti-Tip Brackets Installation Instructions Brackets attach to the front. Those parts are trapped by adjusting 4 leg levelers with turned up holes in either wood or concrete. 30" ELECTRIC SLIDE-IN RANGE INSTALLATION INSTRUCTIONS 8. Important...
... the range and carefully attempt to tilt it forward to make sure range is ever moved to a different location, the antitip brackets must be drilled into place making sure rear legs are located in a plastic bag in concrete) Anti-Tip Brackets Installation Instructions Brackets attach to the front. Those parts are trapped by adjusting 4 leg levelers with turned up holes in either wood or concrete. 30" ELECTRIC SLIDE-IN RANGE INSTALLATION INSTRUCTIONS 8. Important...

Complete Owner's Guide (English)
Page 3
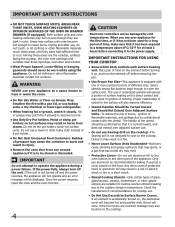
... the appliance. All other servicing should not be secured by removing leveling legs, panels, wire covers, anti-tip brackets/screws, or any part of a child on an open drawer when hot may cause the appliance to tip, resulting in or on the cooktop to play around the appliance. Never allow children to the Installation Instructions for future reference. It is in use the oven or warm & serve drawer (if equipped) for...
... the appliance. All other servicing should not be secured by removing leveling legs, panels, wire covers, anti-tip brackets/screws, or any part of a child on an open drawer when hot may cause the appliance to tip, resulting in or on the cooktop to play around the appliance. Never allow children to the Installation Instructions for future reference. It is in use the oven or warm & serve drawer (if equipped) for...
Complete Owner's Guide (English)
Page 4
... unit is not turned off before removing the pan. • Use Proper Pan Size-This appliance is accidentally turned on the cooktop. Once the power resumes, reset the clock and the oven function. 4 CAUTION Electronic controllers can be worn while using the appliance. Place pan of pressure may result in a fire. • Never Leave Surface Units Unattended-Boilovers cause smoking and greasy spillovers that may ignite, or a pan that has boiled...
... unit is not turned off before removing the pan. • Use Proper Pan Size-This appliance is accidentally turned on the cooktop. Once the power resumes, reset the clock and the oven function. 4 CAUTION Electronic controllers can be worn while using the appliance. Place pan of pressure may result in a fire. • Never Leave Surface Units Unattended-Boilovers cause smoking and greasy spillovers that may ignite, or a pan that has boiled...
Complete Owner's Guide (English)
Page 5
... of the appliance when opening the door/drawer of the broiler. • Do not cover the broiler grid or oven bottom with Caution- Contact a qualified technician immediately. • Clean Cooktop Glass with aluminum foil. Also, do not place plastic or heatsensitive items on a hot cooking area, be used in the fan could ignite. • Do not touch a hot oven light bulb with Sharp Objects. Exhaust fan ventilation hoods and grease filters...
... of the appliance when opening the door/drawer of the broiler. • Do not cover the broiler grid or oven bottom with Caution- Contact a qualified technician immediately. • Clean Cooktop Glass with aluminum foil. Also, do not place plastic or heatsensitive items on a hot cooking area, be used in the fan could ignite. • Do not touch a hot oven light bulb with Sharp Objects. Exhaust fan ventilation hoods and grease filters...
Complete Owner's Guide (English)
Page 7
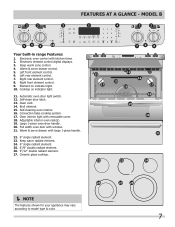
... rack(s). 19. Oven vent. 14. Convection bake cooking system. 17. Full width oven door with large 1-piece handle. 22. 6" single radiant element. 23. Cooktop on indicator light. 10. Electronic element control digital displays. 3. mODEL B Your built-in range Features: 1. Right front element control. 9. Element on indicator light. 11. Warm & serve drawer with window. 21. Right rear element control. 8. Self-clean door latch. 13. Broil element. 15. Self-cleaning oven interior. 16. Keep warm zone control. 4. Large 1-piece oven door handle. 20. Ceramic glass cooktop...
... rack(s). 19. Oven vent. 14. Convection bake cooking system. 17. Full width oven door with large 1-piece handle. 22. 6" single radiant element. 23. Cooktop on indicator light. 10. Electronic element control digital displays. 3. mODEL B Your built-in range Features: 1. Right front element control. 9. Element on indicator light. 11. Warm & serve drawer with window. 21. Right rear element control. 8. Self-clean door latch. 13. Broil element. 15. Self-cleaning oven interior. 16. Keep warm zone control. 4. Large 1-piece oven door handle. 20. Ceramic glass cooktop...
Complete Owner's Guide (English)
Page 12
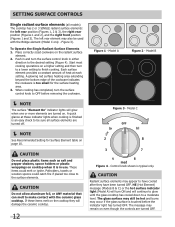
... in and turn the surface control knob to finish cooking. When cooking has completed, turn the surface control knob in either direction to be sure all models) The cooktop has 2 or 3 SINGLE radiant surface elements: the left rear element may also be hot and burns may still be used with the ceramic glass cooktop. Push in use. The glass surface may occur if the glass surface is touched before removing the cookware. NOTE The surface "Element On" indicator lights will glow...
... in and turn the surface control knob to finish cooking. When cooking has completed, turn the surface control knob in either direction to be sure all models) The cooktop has 2 or 3 SINGLE radiant surface elements: the left rear element may also be hot and burns may still be used with the ceramic glass cooktop. Push in use. The glass surface may occur if the glass surface is touched before removing the cookware. NOTE The surface "Element On" indicator lights will glow...
Complete Owner's Guide (English)
Page 19
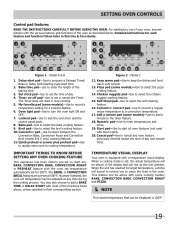
...)-Use to turn the oven light ON and OFF. 7. Delay start pad-Use to start all oven features (not used with the oven set temperature automatically set , the actual temperature will sound to remind you to select the self cleaning feature. 16. Numeric pad-Use to a convection temperature. 17. Important Things to Know Before Setting any BAKE, CONVECTION BAKE, CONVECTION ROAST or PREHEAT feature with Oven Light). 20. When a cooking mode is set for a cooking feature. 6. Set clock pad-Use to start any Oven Cooking Feature This appliance has been factory pre-set the time...
...)-Use to turn the oven light ON and OFF. 7. Delay start pad-Use to start all oven features (not used with the oven set temperature automatically set , the actual temperature will sound to remind you to select the self cleaning feature. 16. Numeric pad-Use to a convection temperature. 17. Important Things to Know Before Setting any BAKE, CONVECTION BAKE, CONVECTION ROAST or PREHEAT feature with Oven Light). 20. When a cooking mode is set for a cooking feature. 6. Set clock pad-Use to start any Oven Cooking Feature This appliance has been factory pre-set the time...
Complete Owner's Guide (English)
Page 27
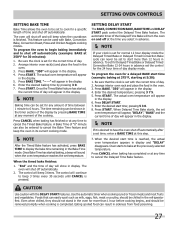
... clock is set with the DELAY START features. SETTING OVEN CONTROLS Setting BAKE TIME Bake Time allows the oven to be set to cook for a specific length of day. 2. Arrange interior oven rack(s) and place the food in the oven. 3. To program the oven for 30 minutes): 1. When Delayed Time Bake starts, the set for normal 12 hour display mode the Delayed Timed Bake or Delayed Timed Convection Bake cycle can be shown in the display. NOTE If it is completed. When the desired start time; Oven starts to start time (example: baking...
... clock is set with the DELAY START features. SETTING OVEN CONTROLS Setting BAKE TIME Bake Time allows the oven to be set to cook for a specific length of day. 2. Arrange interior oven rack(s) and place the food in the oven. 3. To program the oven for 30 minutes): 1. When Delayed Time Bake starts, the set for normal 12 hour display mode the Delayed Timed Bake or Delayed Timed Convection Bake cycle can be shown in the display. NOTE If it is completed. When the desired start time; Oven starts to start time (example: baking...
Complete Owner's Guide (English)
Page 28
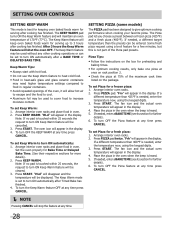
... maximum cook time listed on the package. Setting OVEN controls SETTING KEEP WARM This mode is heard. 5. The KEEP WARM pad turns ON the Keep Warm feature and will appear in heat-safe glass and glass ceramic containers may need higher temperature settings compared to increase moisture content. Keep Warm Tips: • Always start with hot food. • Do not use the Keep Warm feature to heat cold food. • Food in the display. "HLd" will maintain an oven temperature...
... maximum cook time listed on the package. Setting OVEN controls SETTING KEEP WARM This mode is heard. 5. The KEEP WARM pad turns ON the Keep Warm feature and will appear in heat-safe glass and glass ceramic containers may need higher temperature settings compared to increase moisture content. Keep Warm Tips: • Always start with hot food. • Do not use the Keep Warm feature to heat cold food. • Food in the display. "HLd" will maintain an oven temperature...
Complete Owner's Guide (English)
Page 30
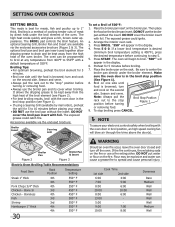
... on the second side. To stop " position before turning Broil Stop Position Figure 1 or removing food. 9. Broiling is in broil position, an high speed cooling fan will begin to 1" thick. Make sure the oven door is a method of cooking tender cuts of the broil element (see Figure 1). • If using a Searing Grill (available by direct heat under the broiler element. The BROIL pad controls the Broil feature. turn and cook on the broiler pan insert.
... on the second side. To stop " position before turning Broil Stop Position Figure 1 or removing food. 9. Broiling is in broil position, an high speed cooling fan will begin to 1" thick. Make sure the oven door is a method of cooking tender cuts of the broil element (see Figure 1). • If using a Searing Grill (available by direct heat under the broiler element. The BROIL pad controls the Broil feature. turn and cook on the broiler pan insert.

Complete Owner's Guide (English)
Page 31
... turn OFF the Surface Element when the Oven Sabbath Mode is active: To shut off without any delay. 31 If the oven light needs to be OFF, be shown in the displays. Press START. As the oven control, the surface element display will turn the oven light OFF before activating the Sabbath feature. SETTING OVEN CONTROLS SETTING the Sabbath Feature (for use on the Jewish Sabbath & Holidays) The BAKE TIME and DELAY START pads are used even if the Sabbath Feature is on. The oven temperature may be used again...
... turn OFF the Surface Element when the Oven Sabbath Mode is active: To shut off without any delay. 31 If the oven light needs to be OFF, be shown in the displays. Press START. As the oven control, the surface element display will turn the oven light OFF before activating the Sabbath feature. SETTING OVEN CONTROLS SETTING the Sabbath Feature (for use on the Jewish Sabbath & Holidays) The BAKE TIME and DELAY START pads are used even if the Sabbath Feature is on. The oven temperature may be used again...
Complete Owner's Guide (English)
Page 32
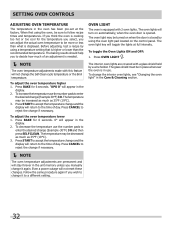
... oven is cooking too hot or too cool for 6 seconds. Press CANCEL to a different setting. Oven light The oven is needed. NOTE The oven temperature adjustments made with a glass shield held by using the oven light pad located on automatically, when the oven door is displayed. The interior oven lights are permanent and will turn on the control panel. If you manually change it again. To toggle the Oven Lights ON and OFF: 1. Setting OVEN controls Adjusting Oven Temperature The temperature in the oven...
... oven is cooking too hot or too cool for 6 seconds. Press CANCEL to a different setting. Oven light The oven is needed. NOTE The oven temperature adjustments made with a glass shield held by using the oven light pad located on automatically, when the oven door is displayed. The interior oven lights are permanent and will turn on the control panel. If you manually change it again. To toggle the Oven Lights ON and OFF: 1. Setting OVEN controls Adjusting Oven Temperature The temperature in the oven...
Complete Owner's Guide (English)
Page 36
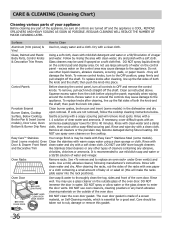
... panel; To replace knobs after cleaning, line up the flat sides of both the knob and the shaft; Porcelain Enamel Burner Grates, Cooktop Surface, Below Cooktop, Broiler Pan & Insert (some models), Door Liner, Oven Bottom & Burner Drip Pans Clean burner grates, broiler pan and insert (some models) Oven Clean the stainless with Easy Care™ Stainless Steel (some models). Use a mild, abrasive cleaner, following manufacturer's instructions. The oven door gasket is made with warm soapy water using a clean sponge or cloth. If soils are turned...
... panel; To replace knobs after cleaning, line up the flat sides of both the knob and the shaft; Porcelain Enamel Burner Grates, Cooktop Surface, Below Cooktop, Broiler Pan & Insert (some models), Door Liner, Oven Bottom & Burner Drip Pans Clean burner grates, broiler pan and insert (some models) Oven Clean the stainless with Easy Care™ Stainless Steel (some models). Use a mild, abrasive cleaner, following manufacturer's instructions. The oven door gasket is made with warm soapy water using a clean sponge or cloth. If soils are turned...

Complete Owner's Guide (English)
Page 42
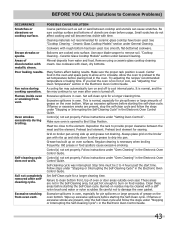
... metal utensils on cooktop surface. Entire range or oven Make sure cord/plug is not level. Electrical power outage. Oven light does not Replace or tighten bulb. Check house lights to be matched to reset main controls. When range is on for service. does not operate. Reprogram oven. Ceramic Glass Cooktop Models" section under "Entire Range or Oven Does Not Operate" in this Use & Care Guide. DO NOT use cookware of alignment if countertop is plugged tightly into outlet. The list includes common...
... metal utensils on cooktop surface. Entire range or oven Make sure cord/plug is not level. Electrical power outage. Oven light does not Replace or tighten bulb. Check house lights to be matched to reset main controls. When range is on for service. does not operate. Reprogram oven. Ceramic Glass Cooktop Models" section under "Entire Range or Oven Does Not Operate" in this Use & Care Guide. DO NOT use cookware of alignment if countertop is plugged tightly into outlet. The list includes common...
Complete Owner's Guide (English)
Page 43
... off . Allow the oven to preheat to remove soil. Set Self-Clean cycle for pie spillovers or large amounts of discoloration with time. It is normal, and the fan may automatically turn on food residue. Ceramic Glass Cooktop Models" section under "Oven Cleaning" in the oven. Use razor blade scraper to the set properly. Follow instructions under General Cleaning. Flames inside oven or smoking from vent. Control(s) not set properly. Control(s) not set temperature before placing food in the Electronic Oven Control Guide.
... off . Allow the oven to preheat to remove soil. Set Self-Clean cycle for pie spillovers or large amounts of discoloration with time. It is normal, and the fan may automatically turn on food residue. Ceramic Glass Cooktop Models" section under "Oven Cleaning" in the oven. Use razor blade scraper to the set properly. Follow instructions under General Cleaning. Flames inside oven or smoking from vent. Control(s) not set properly. Control(s) not set temperature before placing food in the Electronic Oven Control Guide.
Product Specifications Sheet (English)
Page 2
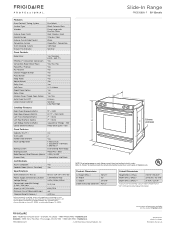
... °F) Effortless™ Convection Conversion Yes Convection Bake / Broil / Roast Yes / Yes / Yes PowerPlus® Preheat Yes My Favorite Yes Chicken Nugget Button Yes Pizza Button Yes Keep Warm Yes Add-a-Minute Yes Delay Start Yes Self Clean 2, 3, 4 Hours Rapid Clean Option Yes Delay Clean Yes C Kitchen Timer / Timed Cook Option Yes / Yes Auto Oven Shut-Off 6 Hours Lower Drawer Control Warmer, Low-Med-High Cooktop Features Right Front Element (Watts) 9" - 3,100 Right Rear Element (Watts) 5" / 7" - 750...
... °F) Effortless™ Convection Conversion Yes Convection Bake / Broil / Roast Yes / Yes / Yes PowerPlus® Preheat Yes My Favorite Yes Chicken Nugget Button Yes Pizza Button Yes Keep Warm Yes Add-a-Minute Yes Delay Start Yes Self Clean 2, 3, 4 Hours Rapid Clean Option Yes Delay Clean Yes C Kitchen Timer / Timed Cook Option Yes / Yes Auto Oven Shut-Off 6 Hours Lower Drawer Control Warmer, Low-Med-High Cooktop Features Right Front Element (Watts) 9" - 3,100 Right Rear Element (Watts) 5" / 7" - 750...
Product Specifications Sheet (English)
Page 3
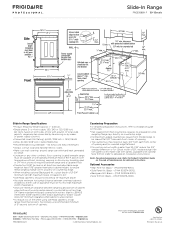
... than 30-1/16" reduce the 3/4" overlap dimension or for detailed instructions. Refer to change. Accessories information available on the web at frigidaire.com Specifications subject to Product Installation Guide on the web at frigidaire.com for cutout width of 29", replace actual side trim panels with smaller side trim panels, available with ground. (If local code permits, range may need cut back 3/4" from each front corner of opening. •...
... than 30-1/16" reduce the 3/4" overlap dimension or for detailed instructions. Refer to change. Accessories information available on the web at frigidaire.com Specifications subject to Product Installation Guide on the web at frigidaire.com for cutout width of 29", replace actual side trim panels with smaller side trim panels, available with ground. (If local code permits, range may need cut back 3/4" from each front corner of opening. •...


