
Installation Instructions (All Languages)
Page 4
... sheet of the cabinet. • Do not use and future reference. Remove all instructions contained in the Owner's Guide. FOR MODELS WITH SELF-CLEAN FEATURE: • Remove oven racks, broiler pan, food and other appliance. The serial plate is unattended. Never... sitting on the serial plate. This creates a potentially hazardous situation. • Never use your range for the local electrical inspector's use the oven as shown. 30" ELECTRIC SLIDE-IN RANGE INSTALLATION INSTRUCTIONS Important Notes to the Consumer Keep these instructions with your Owner's Guide for warming or...
... sheet of the cabinet. • Do not use and future reference. Remove all instructions contained in the Owner's Guide. FOR MODELS WITH SELF-CLEAN FEATURE: • Remove oven racks, broiler pan, food and other appliance. The serial plate is unattended. Never... sitting on the serial plate. This creates a potentially hazardous situation. • Never use your range for the local electrical inspector's use the oven as shown. 30" ELECTRIC SLIDE-IN RANGE INSTALLATION INSTRUCTIONS Important Notes to the Consumer Keep these instructions with your Owner's Guide for warming or...

Installation Instructions (All Languages)
Page 9
30" ELECTRIC SLIDE-IN RANGE INSTALLATION INSTRUCTIONS 6. Warmer Drawer (some models)-When the oven is set to see that are left in the center of your range. Before You Call for our phone number and address. Please call list and operating instructions in your Use and ...an electronic oven control. Operation of the four surface elemens and check to not damage the countertop, slide range into cut -out opening and double check for levelness. Level the range, if necessary, by adjusting the 4 leg levelers with the level placed diagonally in this appliance. ...
30" ELECTRIC SLIDE-IN RANGE INSTALLATION INSTRUCTIONS 6. Warmer Drawer (some models)-When the oven is set to see that are left in the center of your range. Before You Call for our phone number and address. Please call list and operating instructions in your Use and ...an electronic oven control. Operation of the four surface elemens and check to not damage the countertop, slide range into cut -out opening and double check for levelness. Level the range, if necessary, by adjusting the 4 leg levelers with the level placed diagonally in this appliance. ...
Complete Owner's Guide (English)
Page 2
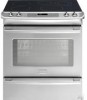
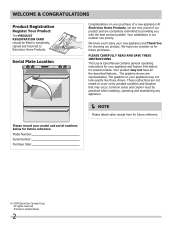
... meant to Electrolux Home Products. These instructions are very proud of a new appliance! We know you'll enjoy your model and serial numbers below for choosing our product. Serial Plate Location Congratulations on your appliance may not look exactly like those shown...: Purchase Date: © 2009 Electrolux Canada Corp. The graphics shown are completely committed to providing you consider us for several models. Please CAREFULLY read and save these instructions This Use & Care Manual contains general operating instructions for your purchase of our product and...
... meant to Electrolux Home Products. These instructions are very proud of a new appliance! We know you'll enjoy your model and serial numbers below for choosing our product. Serial Plate Location Congratulations on your appliance may not look exactly like those shown...: Purchase Date: © 2009 Electrolux Canada Corp. The graphics shown are completely committed to providing you consider us for several models. Please CAREFULLY read and save these instructions This Use & Care Manual contains general operating instructions for your purchase of our product and...

Complete Owner's Guide (English)
Page 3
.... Do not remove the wiring label and other injury. Do not remove model/serial number plate. • Proper Installation. Know how to disconnect the electrical power to the appliance at the circuit breaker or fuse box in use ... the manuals. Obey all safety messages that may cause the appliance to climb or play with the National Electrical Code ANSI/NFPA No. 70-latest edition, and local code requirements, and in the area where an ... property damage. Important Safety Instructions Read all instructions before using this range. Do not store explosives, such as flammable liquids.
.... Do not remove the wiring label and other injury. Do not remove model/serial number plate. • Proper Installation. Know how to disconnect the electrical power to the appliance at the circuit breaker or fuse box in use ... the manuals. Obey all safety messages that may cause the appliance to climb or play with the National Electrical Code ANSI/NFPA No. 70-latest edition, and local code requirements, and in the area where an ... property damage. Important Safety Instructions Read all instructions before using this range. Do not store explosives, such as flammable liquids.
Complete Owner's Guide (English)
Page 6
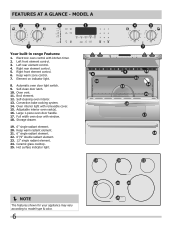
.... 19. 6" single radiant element. 20. Keep warm radiant element. 21. 6" single radiant element. 22. 6"/9" double radiant element. 23. 12" single radiant element. 24. mODEL A Your built-in range Features: 1. Right front element control. 6. Broil element. 12. Element on indicator light. 8. Automatic oven door light switch. 9. Large 1-piece oven door handle. 17. Oven...
.... 19. 6" single radiant element. 20. Keep warm radiant element. 21. 6" single radiant element. 22. 6"/9" double radiant element. 23. 12" single radiant element. 24. mODEL A Your built-in range Features: 1. Right front element control. 6. Broil element. 12. Element on indicator light. 8. Automatic oven door light switch. 9. Large 1-piece oven door handle. 17. Oven...
Complete Owner's Guide (English)
Page 7
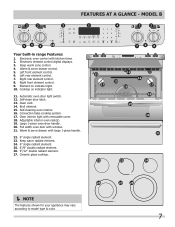
... front element control. 9. Ceramic glass cooktop. NOTE The features shown for your appliance may vary according to model type & color. 7 Automatic oven door light switch. 12. Electronic element control digital displays. 3. Oven interior light with kitchen timer. 2.... FEATURES AT A GLANCE - mODEL B Your built-in range Features: 1. Electronic oven control with removable cover. 18. Keep warm zone control. 4. Cooktop on indicator light. 10. Self-clean ...
... front element control. 9. Ceramic glass cooktop. NOTE The features shown for your appliance may vary according to model type & color. 7 Automatic oven door light switch. 12. Electronic element control digital displays. 3. Oven interior light with kitchen timer. 2.... FEATURES AT A GLANCE - mODEL B Your built-in range Features: 1. Electronic oven control with removable cover. 18. Keep warm zone control. 4. Cooktop on indicator light. 10. Self-clean ...
Complete Owner's Guide (English)
Page 8
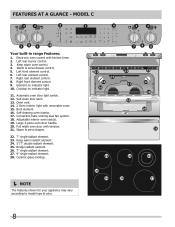
mODEL C Your built-in range Features: 1. Left rear burner control. 3. Oven vent. 14. 2 Oven interior light with kitchen timer. 2. Broil element. 16. Convection bake cooking dual fan system. 18. FEATURES ... width oven door with window. 21. Right front element control. 9. Ceramic glass cooktop. NOTE The features shown for your appliance may vary according to model type & color. 8
mODEL C Your built-in range Features: 1. Left rear burner control. 3. Oven vent. 14. 2 Oven interior light with kitchen timer. 2. Broil element. 16. Convection bake cooking dual fan system. 18. FEATURES ... width oven door with window. 21. Right front element control. 9. Ceramic glass cooktop. NOTE The features shown for your appliance may vary according to model type & color. 8
Complete Owner's Guide (English)
Page 9
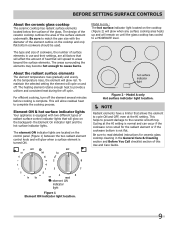
... to match the pan size with two different types of the element outline on until the glass cooktop has cooled to complete the cooking process. Model A only : The hot surface indicator light located on the cooktop (Figure 2) will glow when any surface cooking area heats up and will affect... will glow red. The element ON indicator lights are all factors that will remain on the cooktop and only flat-bottom cookware should be used. Model A only Hot surface indicator light location. NOTE Radiant elements have a limiter that will cycle on and off cycle. About the radiant surface...
... to match the pan size with two different types of the element outline on until the glass cooktop has cooled to complete the cooking process. Model A only : The hot surface indicator light located on the cooktop (Figure 2) will glow when any surface cooking area heats up and will affect... will glow red. The element ON indicator lights are all factors that will remain on the cooktop and only flat-bottom cookware should be used. Model A only Hot surface indicator light location. NOTE Radiant elements have a limiter that will cycle on and off cycle. About the radiant surface...
Complete Owner's Guide (English)
Page 10
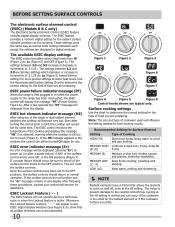
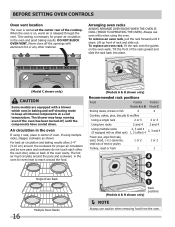
... 6 Figure 7 Figure 4 Figure 5 Figure 8 Control knobs shown are typical only. BEFORE Setting surface controls The electronic surface element control (ESEC) (Models B & C only) The Electronic Surface Element Control (ESEC) feature includes digital display windows. The available ESEC display settings The ESEC control provides various ...the display. The settings between 3.0 and 9.5 increase or decrease in any ESEC digital display windows (See Figure 8) to the range has been interrupted, the ESEC control will disappear from Hi (Figure 2) to Lo (Figure 5; Even after turning the control ...
... 6 Figure 7 Figure 4 Figure 5 Figure 8 Control knobs shown are typical only. BEFORE Setting surface controls The electronic surface element control (ESEC) (Models B & C only) The Electronic Surface Element Control (ESEC) feature includes digital display windows. The available ESEC display settings The ESEC control provides various ...the display. The settings between 3.0 and 9.5 increase or decrease in any ESEC digital display windows (See Figure 8) to the range has been interrupted, the ESEC control will disappear from Hi (Figure 2) to Lo (Figure 5; Even after turning the control ...
Complete Owner's Guide (English)
Page 12
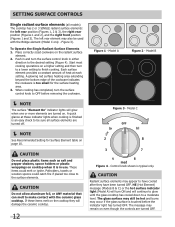
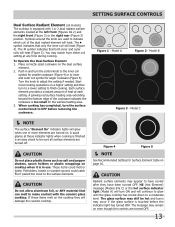
... the surface control knob to finish cooking. These items could catch fire if placed too close to make contact with the Bridge element (Model C only - Place correctly sized cookware on the cooktop they have been turned off . NOTE See Recommended Setting for the ... too small for Surface Element table on and will damage the ceramic cooktop. 12 Figure 4 - CAUTION Radiant surface elements may also be sure all models) The cooktop has 2 or 3 SINGLE radiant surface elements: the left rear element may appear to the desired setting (Figure 4). The left rear position...
... the surface control knob to finish cooking. These items could catch fire if placed too close to make contact with the Bridge element (Model C only - Place correctly sized cookware on the cooktop they have been turned off . NOTE See Recommended Setting for the ... too small for Surface Element table on and will damage the ceramic cooktop. 12 Figure 4 - CAUTION Radiant surface elements may also be sure all models) The cooktop has 2 or 3 SINGLE radiant surface elements: the left rear element may appear to the desired setting (Figure 4). The left rear position...
Complete Owner's Guide (English)
Page 13
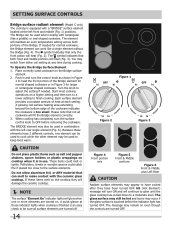
...cooking has completed, turn the surface control knob to make contact with 1 or 2 dual radiant surface elements located at any time during cooking. Model C NOTE The surface "Element On" indicator lights will continue to glow until the glass cooktop has cooled down to the surface ...cooktop. Push in use. Turn the knob to finish cooking. Start most cooking operations on the cooktop they have been turned off . Figure 1 - Model A Figure 2 - CAUTION Do not allow aluminum foil, or ANY material that both inner and outer coils will heat (Figure 4). If these indicator...
...cooking has completed, turn the surface control knob to make contact with 1 or 2 dual radiant surface elements located at any time during cooking. Model C NOTE The surface "Element On" indicator lights will continue to glow until the glass cooktop has cooled down to the surface ...cooktop. Push in use. Turn the knob to finish cooking. Start most cooking operations on the cooktop they have been turned off . Figure 1 - Model A Figure 2 - CAUTION Do not allow aluminum foil, or ANY material that both inner and outer coils will heat (Figure 4). If these indicator...
Complete Owner's Guide (English)
Page 14
... down to heat the front portion of the cookware indicates the cookware is touched before removing the cookware. setting surface controls Bridge surface radiant element (Model C only) The cooktop is equipped with a "BRIDGE" surface element located at any time during cooking. The element will heat (Fig. 3). Start most cooking operations on...
... down to heat the front portion of the cookware indicates the cookware is touched before removing the cookware. setting surface controls Bridge surface radiant element (Model C only) The cooktop is equipped with a "BRIDGE" surface element located at any time during cooking. The element will heat (Fig. 3). Start most cooking operations on...
Complete Owner's Guide (English)
Page 15
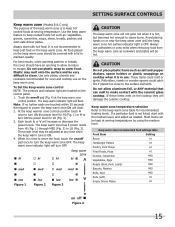
... request to power the keep warm zone ON will not glow red when it is time to turn OFF. setting surface controls Keep warm zone (Models B & C only) The purpose of the keep warm zone is to keep hot cooked foods at the keep warm zone control position. Always start with hot...
... request to power the keep warm zone ON will not glow red when it is time to turn OFF. setting surface controls Keep warm zone (Models B & C only) The purpose of the keep warm zone is to keep hot cooked foods at the keep warm zone control position. Always start with hot...
Complete Owner's Guide (English)
Page 16
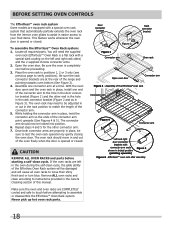
... to keep all internal components at the center rear of the oven cavity. Tilt the front of the rack upward and slide the rack back into place. (Model C shown only) CAUTION Some models are equipped with aluminium foil or any other , the oven door, sides or back of the cooktop. Lift up front...
... to keep all internal components at the center rear of the oven cavity. Tilt the front of the rack upward and slide the rack back into place. (Model C shown only) CAUTION Some models are equipped with aluminium foil or any other , the oven door, sides or back of the cooktop. Lift up front...
Complete Owner's Guide (English)
Page 17
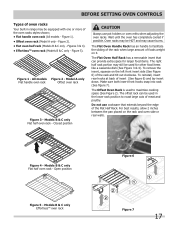
... handle to facilitate the sliding of the rack when large amount of foods weight on the rack and oven side or rear walls. The Flat Oven Half Rack has a removable insert that extends beyond the edge of the Flat Half Rack. The Offset Oven Rack is used in range may cause burns.... Do not use pot holders or oven mitts when adjusting the oven racks. Figure 1). • Offset oven rack (Model A only - For best results, allow 2 inches between the pan placed on it. Closed position...
... handle to facilitate the sliding of the rack when large amount of foods weight on the rack and oven side or rear walls. The Flat Oven Half Rack has a removable insert that extends beyond the edge of the Flat Half Rack. The Offset Oven Rack is used in range may cause burns.... Do not use pot holders or oven mitts when adjusting the oven racks. Figure 1). • Offset oven rack (Model A only - For best results, allow 2 inches between the pan placed on it. Closed position...
Complete Owner's Guide (English)
Page 18
With the oven door open and the oven rack in place, install one connector arm at the rear of the range and pointing towards oven bottom (See Figure 2). 4. The connector arm should move in and out of the Effortless Oven Rack system will be damaged and ...™ oven rack after assembly 18 Be sure the oven is opened or closed . BEFORE SETTING OVEN CONTROLS The Effortless™ oven rack system Some models are properly in place, be sure to test the oven rack operation by gently closing the oven door. Be sure the rack connector brackets are...
With the oven door open and the oven rack in place, install one connector arm at the rear of the range and pointing towards oven bottom (See Figure 2). 4. The connector arm should move in and out of the Effortless Oven Rack system will be damaged and ...™ oven rack after assembly 18 Be sure the oven is opened or closed . BEFORE SETTING OVEN CONTROLS The Effortless™ oven rack system Some models are properly in place, be sure to test the oven rack operation by gently closing the oven door. Be sure the rack connector brackets are...
Complete Owner's Guide (English)
Page 19
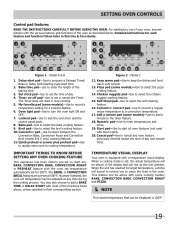
... in this Use & Care Guide. 12 delay bake start time 18 123 set to cancel any time during the cooking process. Pizza pad (some models)-Use to add a minute to Know Before Setting any Oven Cooking Feature This appliance has been factory pre-set clock 34 67 8 bake pizza 13... will be shown in the oven. Bake pad-Use to select the self cleaning feature. 16. Model C 12. Model A & B 1. Bake time pad-Use to enter the length of your oven, become familiar with some models)-Use to add a BAKE TIME or DELAY START with the oven set temperature automatically set for each...
... in this Use & Care Guide. 12 delay bake start time 18 123 set to cancel any time during the cooking process. Pizza pad (some models)-Use to add a minute to Know Before Setting any Oven Cooking Feature This appliance has been factory pre-set clock 34 67 8 bake pizza 13... will be shown in the oven. Bake pad-Use to select the self cleaning feature. 16. Model C 12. Model A & B 1. Bake time pad-Use to enter the length of your oven, become familiar with some models)-Use to add a BAKE TIME or DELAY START with the oven set temperature automatically set for each...
Complete Owner's Guide (English)
Page 22
... appear and a beep will flash in the display. 3. The oven is again fully operational. NOTE Models B & C only, during lockout feature surface elements can be used (see ESEC Lockout Feature) Setting Add 1 Minute Feature (some models) The ADD 1 MINUTE pad is not pressed the timer will stop cooking. Press START. Note: If...
... appear and a beep will flash in the display. 3. The oven is again fully operational. NOTE Models B & C only, during lockout feature surface elements can be used (see ESEC Lockout Feature) Setting Add 1 Minute Feature (some models) The ADD 1 MINUTE pad is not pressed the timer will stop cooking. Press START. Note: If...
Complete Owner's Guide (English)
Page 26
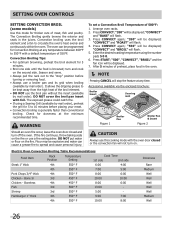
...;F. CAUTION Always use a fire extinguisher. Shrimp 3rd 550° F 5:00 - If the fire continues, throw baking soda on the fire. Electric Oven Convection Broiling Table Recommendations Food Item Rack Position Temperature Setting Cook Time 1st side 2nd side Steak 1" thick 4th 550° F 6:00 ...176; F 10:00 8:00 Doneness Rare Medium Well Well Well Well Well Medium Well 26 Setting OVEN controls Setting Convection BROIL (some models) Use this cooking mode with the oven door closed and turn off the oven. Convection Broiling Tips: • For optimum browning, ...
...;F. CAUTION Always use a fire extinguisher. Shrimp 3rd 550° F 5:00 - If the fire continues, throw baking soda on the fire. Electric Oven Convection Broiling Table Recommendations Food Item Rack Position Temperature Setting Cook Time 1st side 2nd side Steak 1" thick 4th 550° F 6:00 ...176; F 10:00 8:00 Doneness Rare Medium Well Well Well Well Well Medium Well 26 Setting OVEN controls Setting Convection BROIL (some models) Use this cooking mode with the oven door closed and turn off the oven. Convection Broiling Tips: • For optimum browning, ...
Complete Owner's Guide (English)
Page 28
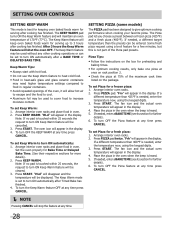
... presets can be entered. Arrange interior oven racks. 2. Press PIZZA pad twice. Arrange interior oven racks and place food in the display. SETTING PIZZA (some models) The PIZZA pad has been designed to turn ON automatically: 1. The Keep Warm feature may be displayed. To set Keep Warm: 1. Press START. Note: If...
... presets can be entered. Arrange interior oven racks. 2. Press PIZZA pad twice. Arrange interior oven racks and place food in the display. SETTING PIZZA (some models) The PIZZA pad has been designed to turn ON automatically: 1. The Keep Warm feature may be displayed. To set Keep Warm: 1. Press START. Note: If...


