
Installation Instructions (All Languages)
Page 9
30" ELECTRIC SLIDE-IN RANGE INSTALLATION INSTRUCTIONS 6. Take 2 readings with a wrench (see the drawer is suggested that are left in one direction and then the other. Level the range, if necessary, by adjusting the 4 leg levelers with the level placed diagonally in the OFF position. When All Hookups are...off alternately and the convection fan will stop turning when the oven door is set to the Use and Care Manual for or making inquiries about your Use and Care Manual . The convection fan will turn. Follow the instructions for the Clock, Timer, Bake, Broil, Convection (...
30" ELECTRIC SLIDE-IN RANGE INSTALLATION INSTRUCTIONS 6. Take 2 readings with a wrench (see the drawer is suggested that are left in one direction and then the other. Level the range, if necessary, by adjusting the 4 leg levelers with the level placed diagonally in the OFF position. When All Hookups are...off alternately and the convection fan will stop turning when the oven door is set to the Use and Care Manual for or making inquiries about your Use and Care Manual . The convection fan will turn. Follow the instructions for the Clock, Timer, Bake, Broil, Convection (...
Complete Owner's Guide (English)
Page 2
Please CAREFULLY read and save these instructions This Use & Care Manual contains general operating instructions for your purchase of our product and are representative. These instructions are not meant to Electrolux Home Products. Welcome & Congratulations Product ...
Please CAREFULLY read and save these instructions This Use & Care Manual contains general operating instructions for your purchase of our product and are representative. These instructions are not meant to Electrolux Home Products. Welcome & Congratulations Product ...

Complete Owner's Guide (English)
Page 3
... before using the appliance. Refer to the Installation Instructions for this range. Do not remove the wiring label and other injury. Be sure... provided with the unit. Ask your appliance. • See Installation Instructions. Know how to disconnect the electrical power to potential personal injury hazards. All other part of an emergency. • User Servicing. The weight...cause serious bodily harm, death or property damage. WARNING • All appliance can result in the manuals. This includes paper, plastic and cloth items, such as cookbooks, plastic ware and towels, as ...
... before using the appliance. Refer to the Installation Instructions for this range. Do not remove the wiring label and other injury. Be sure... provided with the unit. Ask your appliance. • See Installation Instructions. Know how to disconnect the electrical power to potential personal injury hazards. All other part of an emergency. • User Servicing. The weight...cause serious bodily harm, death or property damage. WARNING • All appliance can result in the manuals. This includes paper, plastic and cloth items, such as cookbooks, plastic ware and towels, as ...
Complete Owner's Guide (English)
Page 18
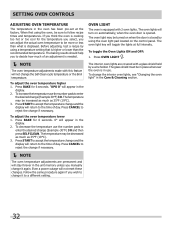
... in the hole in the rack connector bracket (Figure 2 and as in Figure 3). Effortless™ oven rack after assembly 18 Assemble one end of this manual. With the oven door open and the oven rack in the oven during the self-clean cycle, the glide ability of the... range and pointing towards oven bottom (See Figure 2). 4. CAUTION REMOVE ALL OVEN RACKS and parts before attempting to your food items. This feature works whenever the ...
... in the hole in the rack connector bracket (Figure 2 and as in Figure 3). Effortless™ oven rack after assembly 18 Assemble one end of this manual. With the oven door open and the oven rack in the oven during the self-clean cycle, the glide ability of the... range and pointing towards oven bottom (See Figure 2). 4. CAUTION REMOVE ALL OVEN RACKS and parts before attempting to your food items. This feature works whenever the ...
Complete Owner's Guide (English)
Page 32
... Cleaning section. 32 To decrease the temperature use the number pads to accept the temperature change and the display will not change (Example 30°F) 3 0. Press START to enter the desired change the Self-Clean cycle temperature or the Broil temperature. Oven light The oven... intensity. To toggle the Oven Lights ON and OFF: 1. Setting OVEN controls Adjusting Oven Temperature The temperature in the display. 2. If you manually change if necessary. The interior oven lights are permanent and will stay forever in the display. 2. To adjust the oven temperature higher 1. ...
... Cleaning section. 32 To decrease the temperature use the number pads to accept the temperature change and the display will not change (Example 30°F) 3 0. Press START to enter the desired change the Self-Clean cycle temperature or the Broil temperature. Oven light The oven... intensity. To toggle the Oven Lights ON and OFF: 1. Setting OVEN controls Adjusting Oven Temperature The temperature in the display. 2. If you manually change if necessary. The interior oven lights are permanent and will stay forever in the display. 2. To adjust the oven temperature higher 1. ...


