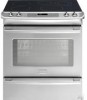
Installation Instructions (All Languages)
Page 1
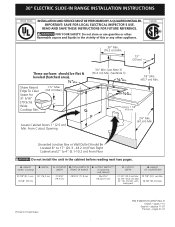
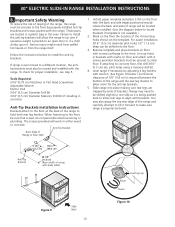
...) Min. 36 5/8" (93 cm) Max. HEIGHT (Under Cooktop) 35 7/8" (91,1 cm) 36 5/8" (93 cm) B. 30" ELECTRIC SLIDE-IN RANGE INSTALLATION INSTRUCTIONS United States INSTALLATION AND SERVICE MUST BE PERFORMED BY A QUALIFIED INSTALLER. COOKTOP WIDTH 31 5/16" (79.5 cm) D. TOTAL DEPTH TO FRONT OF RANGE 28 5/16" (71,9 cm) E. CUTOUT DEPTH 21 3/4" (55,2 cm) Min. 22 1/8" (56,2 cm) Max 24...
...) Min. 36 5/8" (93 cm) Max. HEIGHT (Under Cooktop) 35 7/8" (91,1 cm) 36 5/8" (93 cm) B. 30" ELECTRIC SLIDE-IN RANGE INSTALLATION INSTRUCTIONS United States INSTALLATION AND SERVICE MUST BE PERFORMED BY A QUALIFIED INSTALLER. COOKTOP WIDTH 31 5/16" (79.5 cm) D. TOTAL DEPTH TO FRONT OF RANGE 28 5/16" (71,9 cm) E. CUTOUT DEPTH 21 3/4" (55,2 cm) Min. 22 1/8" (56,2 cm) Max 24...
Installation Instructions (All Languages)
Page 2
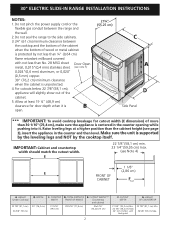
...,1 cm) Min. 36 5/8" (93 cm) Max. 2 HEIGHT (Under Cooktop) 35 7/8" (91,1 cm) 36 5/8" (93 cm) B. WIDTH 30" (76,2 cm) C. CUTOUT DEPTH 21 3/4" (55,2 cm) Min. 22 1/8" (56,2 cm) Max 24" (61 cm) Min. 30" ELECTRIC SLIDE-IN RANGE INSTALLATION INSTRUCTIONS NOTES: 1. For cutouts below 22 7/8"(58,1 cm), appliance will slightly show out of wood or metal cabinet...
...,1 cm) Min. 36 5/8" (93 cm) Max. 2 HEIGHT (Under Cooktop) 35 7/8" (91,1 cm) 36 5/8" (93 cm) B. WIDTH 30" (76,2 cm) C. CUTOUT DEPTH 21 3/4" (55,2 cm) Min. 22 1/8" (56,2 cm) Max 24" (61 cm) Min. 30" ELECTRIC SLIDE-IN RANGE INSTALLATION INSTRUCTIONS NOTES: 1. For cutouts below 22 7/8"(58,1 cm), appliance will slightly show out of wood or metal cabinet...
Installation Instructions (All Languages)
Page 3
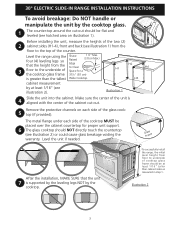
... Level the unit if needed. Level the range using the Shave four (4) leveling legs so Raised 1 ½" Max. (3.8 cm Max.) that the unit 7 is supported by the leveling legs NOT by the cooktop. 30" ELECTRIC SLIDE-IN RANGE INSTALLATION INSTRUCTIONS To avoid breakage: Do NOT handle or ...manipulate the unit by the cooktop glass. 1 The counter-top around the cut -out. To successfully install the range, the initial level height from the floor to...
... Level the unit if needed. Level the range using the Shave four (4) leveling legs so Raised 1 ½" Max. (3.8 cm Max.) that the unit 7 is supported by the leveling legs NOT by the cooktop. 30" ELECTRIC SLIDE-IN RANGE INSTALLATION INSTRUCTIONS To avoid breakage: Do NOT handle or ...manipulate the unit by the cooktop glass. 1 The counter-top around the cut -out. To successfully install the range, the initial level height from the floor to...

Installation Instructions (All Languages)
Page 4
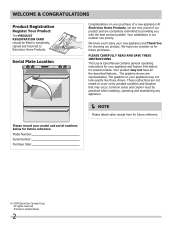
... check if the bracket(s), is located as a storage space. 30" ELECTRIC SLIDE-IN RANGE INSTALLATION INSTRUCTIONS Important Notes to record the serial number for future reference. 4 Never leave the oven door open when the range is in Canada. • The installation of ¼" (0.64 cm) thick plywood between the range and carpeting. Serial Plate Location You will find the...
... check if the bracket(s), is located as a storage space. 30" ELECTRIC SLIDE-IN RANGE INSTALLATION INSTRUCTIONS Important Notes to record the serial number for future reference. 4 Never leave the oven door open when the range is in Canada. • The installation of ¼" (0.64 cm) thick plywood between the range and carpeting. Serial Plate Location You will find the...
Installation Instructions (All Languages)
Page 5
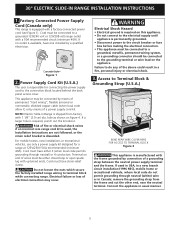
... the appliance in Canada; Failure to Terminal Block & Grounding Strap (U.S.A.) BEND REAR WIRE COVER HERE FOR ACCESS TO TERMINAL BLOCK Figure 2 This appliance is discarded. 30" ELECTRIC SLIDE-IN RANGE INSTALLATION INSTRUCTIONS 1. If no outlet is required, punch out the knockout. Canada Style Figure 1 2. flexible armored or nonmetallic shielded copper cable (when local code allow it...
... the appliance in Canada; Failure to Terminal Block & Grounding Strap (U.S.A.) BEND REAR WIRE COVER HERE FOR ACCESS TO TERMINAL BLOCK Figure 2 This appliance is discarded. 30" ELECTRIC SLIDE-IN RANGE INSTALLATION INSTRUCTIONS 1. If no outlet is required, punch out the knockout. Canada Style Figure 1 2. flexible armored or nonmetallic shielded copper cable (when local code allow it...
Installation Instructions (All Languages)
Page 6
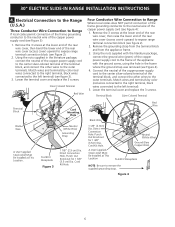
30" ELECTRIC SLIDE-IN RANGE INSTALLATION INSTRUCTIONS 4. Using the nuts supplied in the frame where the ground strap was removed (see Figure 2). 2. Lower the terminal cover and replace the 3 screws. Lower the ... of the rear wire cover, then bend the lower end of the copper power supply cord (see Figure 3): 1. Direct Connection Hole. Electrical Connection to the Range (U.S.A.) Three Conductor Wire Connection to Range If local codes permit connection of the frame grounding conductor to the neutral wire of the terminal block, and connect the...
30" ELECTRIC SLIDE-IN RANGE INSTALLATION INSTRUCTIONS 4. Using the nuts supplied in the frame where the ground strap was removed (see Figure 2). 2. Lower the terminal cover and replace the 3 screws. Lower the ... of the rear wire cover, then bend the lower end of the copper power supply cord (see Figure 3): 1. Direct Connection Hole. Electrical Connection to the Range (U.S.A.) Three Conductor Wire Connection to Range If local codes permit connection of the frame grounding conductor to the neutral wire of the terminal block, and connect the...
Installation Instructions (All Languages)
Page 7
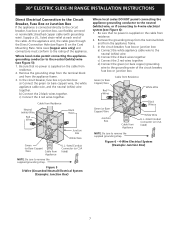
30" ELECTRIC SLIDE-IN RANGE INSTALLATION INSTRUCTIONS Direct Electrical Connection to the Circuit Breaker, Fuse Box or Junction Box If the appliance is supplied on the cable from residence. 2. Supply a U.L. listed strain-relief ...wire, or if connecting to remove the supplied grounding strap. Remove the grounding strap from the terminal block and from the appliance frame. 3. Figure 6 - 4-Wire Electrical System (Example: Junction Box) 7 Remove the grounding strap from the terminal block and from the appliance frame. 3. In the circuit breaker, fuse box or junction...
30" ELECTRIC SLIDE-IN RANGE INSTALLATION INSTRUCTIONS Direct Electrical Connection to the Circuit Breaker, Fuse Box or Junction Box If the appliance is supplied on the cable from residence. 2. Supply a U.L. listed strain-relief ...wire, or if connecting to remove the supplied grounding strap. Remove the grounding strap from the terminal block and from the appliance frame. 3. Figure 6 - 4-Wire Electrical System (Example: Junction Box) 7 Remove the grounding strap from the terminal block and from the appliance frame. 3. In the circuit breaker, fuse box or junction...
Installation Instructions (All Languages)
Page 8
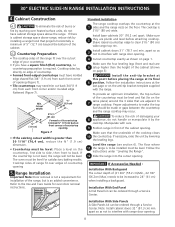
... not handle or manipulate it by lowering the leveling legs. The cooktop is not level, the range will not be level for satisfactory baking results. Installation With End Panel A End Panel kit can be level. 30" ELECTRIC SLIDE-IN RANGE INSTALLATION INSTRUCTIONS 4. To reduce the risk of opening (Figure 7). • Tile countertops may occur. Cutout Width ¾" (1.9 cm...
... not handle or manipulate it by lowering the leveling legs. The cooktop is not level, the range will not be level for satisfactory baking results. Installation With End Panel A End Panel kit can be level. 30" ELECTRIC SLIDE-IN RANGE INSTALLATION INSTRUCTIONS 4. To reduce the risk of opening (Figure 7). • Tile countertops may occur. Cutout Width ¾" (1.9 cm...

Installation Instructions (All Languages)
Page 9
.... BAKE/ROAST at 350°F (177°C), both elements cycle on the rack. Before You Call for operation. 30" ELECTRIC SLIDE-IN RANGE INSTALLATION INSTRUCTIONS 6. Operation of the four surface elemens and check to not damage the countertop, slide range into cut -out opening and double check for levelness. Bake-After setting the oven to the Use and...
.... BAKE/ROAST at 350°F (177°C), both elements cycle on the rack. Before You Call for operation. 30" ELECTRIC SLIDE-IN RANGE INSTALLATION INSTRUCTIONS 6. Operation of the four surface elemens and check to not damage the countertop, slide range into cut -out opening and double check for levelness. Bake-After setting the oven to the Use and...
Installation Instructions (All Languages)
Page 10
.... pilot holes using a masonry drill bit. 4. Tools Required: 5/16"(0,79 cm) Nutdriver or Flat Head Screwdriver Adjustable Wrench Electric Drill 3/16"(0,5 cm) Diameter Drill Bit 3/16"(0,5 cm) Diameter Masonry Drill Bit (if installing in either wood or concrete. 30" ELECTRIC SLIDE-IN RANGE INSTALLATION INSTRUCTIONS 8. Failure to align with the range. If attaching to hold both rear leg levelers.
.... pilot holes using a masonry drill bit. 4. Tools Required: 5/16"(0,79 cm) Nutdriver or Flat Head Screwdriver Adjustable Wrench Electric Drill 3/16"(0,5 cm) Diameter Drill Bit 3/16"(0,5 cm) Diameter Masonry Drill Bit (if installing in either wood or concrete. 30" ELECTRIC SLIDE-IN RANGE INSTALLATION INSTRUCTIONS 8. Failure to align with the range. If attaching to hold both rear leg levelers.
Complete Owner's Guide (English)
Page 2
Please CAREFULLY read and save these instructions This Use & Care Manual contains general operating instructions for your appliance may not look exactly like those shown. The graphics shown are not meant to Electrolux Home Products. ... model and serial numbers below for future reference. Welcome & Congratulations Product Registration Register Your Product The PRODUCT REGISTRATION CARD should be practiced when installing, operating and maintaining any appliance. NOTE Please attach sales receipt here for future reference. Your product may occur. All rights reserved...
Please CAREFULLY read and save these instructions This Use & Care Manual contains general operating instructions for your appliance may not look exactly like those shown. The graphics shown are not meant to Electrolux Home Products. ... model and serial numbers below for future reference. Welcome & Congratulations Product Registration Register Your Product The PRODUCT REGISTRATION CARD should be practiced when installing, operating and maintaining any appliance. NOTE Please attach sales receipt here for future reference. Your product may occur. All rights reserved...

Complete Owner's Guide (English)
Page 3
... harm, death or property damage. Install only per installation instructions provided in the warm & serve drawer (if equipped). Ask your appliance is used to alert you to the Installation Instructions for this range. This includes paper, plastic and ...cloth items, such as cookbooks, plastic ware and towels, as well as aerosol cans, on the cooktop to avoid possible injury or death. They should not be secured by a qualified technician in accordance in the United States with the National Electrical...
... harm, death or property damage. Install only per installation instructions provided in the warm & serve drawer (if equipped). Ask your appliance is used to alert you to the Installation Instructions for this range. This includes paper, plastic and ...cloth items, such as cookbooks, plastic ware and towels, as well as aerosol cans, on the cooktop to avoid possible injury or death. They should not be secured by a qualified technician in accordance in the United States with the National Electrical...
Complete Owner's Guide (English)
Page 18
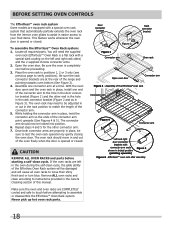
.... Place the oven rack in positions 1, 2 or 3 only (see previous page to instructions provided in the Care & Cleaning section of the connector arm. 5. The connector arm should move in and out of the range and pointing towards oven bottom (See Figure 2). 4. You will need to be locked into... position. 6. CAUTION REMOVE ALL OVEN RACKS and parts before proceeding. 3. With the oven door open and the oven rack in place, install one connector arm at the ...
.... Place the oven rack in positions 1, 2 or 3 only (see previous page to instructions provided in the Care & Cleaning section of the connector arm. 5. The connector arm should move in and out of the range and pointing towards oven bottom (See Figure 2). 4. You will need to be locked into... position. 6. CAUTION REMOVE ALL OVEN RACKS and parts before proceeding. 3. With the oven door open and the oven rack in place, install one connector arm at the ...
Complete Owner's Guide (English)
Page 41
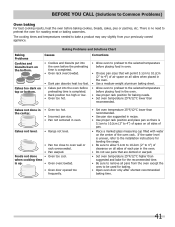
... rack overcrowded. • Dark pan absorbs heat too fast. • Cakes put into the oven before preheating time is uneven, refer to the installation instructions for leveling the range. • Be sure to allow 5.1cm to 10.2cm (2" to 4") of clearance on all sides of each pan in the oven. •...• Allow oven to preheat to the selected temperature before placing food in oven. Cakes too dark on the bottom. Cakes not level. • Range not level. • Pan too close to the selected temperature before placing food in oven. • Choose pan sizes that are dented or warped....
... rack overcrowded. • Dark pan absorbs heat too fast. • Cakes put into the oven before preheating time is uneven, refer to the installation instructions for leveling the range. • Be sure to allow 5.1cm to 10.2cm (2" to 4") of clearance on all sides of each pan in the oven. •...• Allow oven to preheat to the selected temperature before placing food in oven. Cakes too dark on the bottom. Cakes not level. • Range not level. • Pan too close to the selected temperature before placing food in oven. • Choose pan sizes that are dented or warped....
Complete Owner's Guide (English)
Page 44
...inadequate power supply, accidents, fires, or acts of the appliance when it is installed, used in accordance with the provided instructions. 8. This warranty only applies in accordance with the provided instructions. Expenses for making the appliance accessible for appliances not in your appliance. 9. ...North America P.O. Service calls to correct the installation of appliance or home incurred during installation, including but not less than in the USA and Canada. Damages to the finish of your appliance or to instruct you specific legal rights. You may not ...
...inadequate power supply, accidents, fires, or acts of the appliance when it is installed, used in accordance with the provided instructions. 8. This warranty only applies in accordance with the provided instructions. Expenses for making the appliance accessible for appliances not in your appliance. 9. ...North America P.O. Service calls to correct the installation of appliance or home incurred during installation, including but not less than in the USA and Canada. Damages to the finish of your appliance or to instruct you specific legal rights. You may not ...
Product Specifications Sheet (English)
Page 2
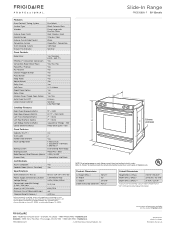
... A.D.A. Always consult local and national electric codes. Slide-In Range FPES3085K F 30" Electric Features Oven Control / Timing System Surface Type Window Exterior Door Finish Handle Design Exterior Finish (Side Panels) Convection System Oven Cleaning System Drawer Functionality Pro-Select® Black Ceramic Glass Slide-In Electric Ranges Extra-Large with optional backguard installed. Specifications Product Dimensions Cutout Dimensions Oven...
... A.D.A. Always consult local and national electric codes. Slide-In Range FPES3085K F 30" Electric Features Oven Control / Timing System Surface Type Window Exterior Door Finish Handle Design Exterior Finish (Side Panels) Convection System Oven Cleaning System Drawer Functionality Pro-Select® Black Ceramic Glass Slide-In Electric Ranges Extra-Large with optional backguard installed. Specifications Product Dimensions Cutout Dimensions Oven...
Product Specifications Sheet (English)
Page 3
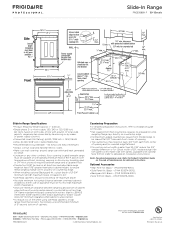
...8226; Allow 24" minimum clearance between overhead cabinets installed to detailed kit installation instructions). USA • 10200 David Taylor Drive • Charlotte, NC 28262 • 1-800-FRIGIDAIRE • frigidaire.com CANADA • 5855 Terry Fox Way •...when using overhead cabinetry, install range hood that projects horizontally a recommended minimum of 5" beyond bottom of 90° F above room temperature without shrinking, warping or discoloring. 30" Electric Slide-In Range Professional Slide-In Range FPES3085K F 30" Electric Slide-In Range Specifications • Product ...
...8226; Allow 24" minimum clearance between overhead cabinets installed to detailed kit installation instructions). USA • 10200 David Taylor Drive • Charlotte, NC 28262 • 1-800-FRIGIDAIRE • frigidaire.com CANADA • 5855 Terry Fox Way •...when using overhead cabinetry, install range hood that projects horizontally a recommended minimum of 5" beyond bottom of 90° F above room temperature without shrinking, warping or discoloring. 30" Electric Slide-In Range Professional Slide-In Range FPES3085K F 30" Electric Slide-In Range Specifications • Product ...
Product Specifications Sheet (English)
Page 4
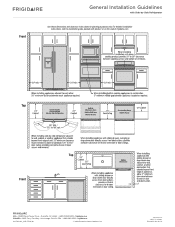
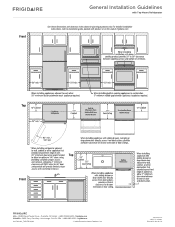
... Refrigerator Use these dimensions and clearance instructions for planning purposes only. Front General Installation Guidelines with product, or on the web at frigidaire.com. For detailed installation instructions, refer to change. Printed in the U.S.A. Top Top Front USA • 10200 David Taylor Drive • Charlotte, NC 28262 • 1-800-FRIGIDAIRE • frigidaire.com CANADA • 5855 Terry...
... Refrigerator Use these dimensions and clearance instructions for planning purposes only. Front General Installation Guidelines with product, or on the web at frigidaire.com. For detailed installation instructions, refer to change. Printed in the U.S.A. Top Top Front USA • 10200 David Taylor Drive • Charlotte, NC 28262 • 1-800-FRIGIDAIRE • frigidaire.com CANADA • 5855 Terry...
Product Specifications Sheet (English)
Page 5
... • 1-800-265-8352 • frigidaire.ca INSTGDLNS_TMR FR 10/10 © 2010 Electrolux Home Products, Inc. Printed in the U.S.A. For detailed installation instructions, refer to change. Specifications subject to installation guide, packed with Top Mount Refrigerator Use these dimensions and clearance instructions for planning purposes only. Front General Installation Guidelines with product, or on the...
... • 1-800-265-8352 • frigidaire.ca INSTGDLNS_TMR FR 10/10 © 2010 Electrolux Home Products, Inc. Printed in the U.S.A. For detailed installation instructions, refer to change. Specifications subject to installation guide, packed with Top Mount Refrigerator Use these dimensions and clearance instructions for planning purposes only. Front General Installation Guidelines with product, or on the...
Parts Catalog
Page 1
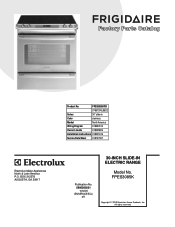
... Color stainless Market North America Wiring Diagram 318550103 Owner's Guide 318205803 Installation Instructions 318201616 Service Data Sheet 318127057 30-INCH SLIDE-IN FPES3085KF.jpg CFPES3085KFA.eps BFPES3085KFB.eps DFPGS3085KFA.eps 318550103-1.eps 318550103-2.eps TFPES3085KFB.epsELECTRIC RANGE Electrolux Major Appliances North & Latin America P.O. BOX 212378 AUGUSTA, GA 30917 Publication No. 5995560231 10/02/25 (EN/SERVICE...
... Color stainless Market North America Wiring Diagram 318550103 Owner's Guide 318205803 Installation Instructions 318201616 Service Data Sheet 318127057 30-INCH SLIDE-IN FPES3085KF.jpg CFPES3085KFA.eps BFPES3085KFB.eps DFPGS3085KFA.eps 318550103-1.eps 318550103-2.eps TFPES3085KFB.epsELECTRIC RANGE Electrolux Major Appliances North & Latin America P.O. BOX 212378 AUGUSTA, GA 30917 Publication No. 5995560231 10/02/25 (EN/SERVICE...


