Complete Owner's Guide (English)
Page 3
... cooking. - Use a wide-mouthed container. - Use extreme care when inserting a spoon or other combustible materials are placed inside the microwave oven ignite, keep microwave oven door closed glass jars-are able to be boiling. Remove wire twist-ties from heated surfaces. • Do not let cord hang over edge of table or counter. • See door surface cleaning instructions on . • This appliance is necessary when used by qualified service...
... cooking. - Use a wide-mouthed container. - Use extreme care when inserting a spoon or other combustible materials are placed inside the microwave oven ignite, keep microwave oven door closed glass jars-are able to be boiling. Remove wire twist-ties from heated surfaces. • Do not let cord hang over edge of table or counter. • See door surface cleaning instructions on . • This appliance is necessary when used by qualified service...
Complete Owner's Guide (English)
Page 4
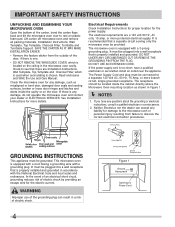
...details. The electrical requirements are Installation Instructions, Wall Template, Top Template and Charcoal Filter, which is properly installed and grounded in accordance with the National Electrical Code and local codes and ordinances. Lift carton off microwave oven and remove all packing materials, Installation Instructions, Wall Template, Top Template, Charcoal Filter, Turntable and Turntable Support. Check the microwave oven for any liability for damage to a separate 120 Volt AC, 60 Hz, 15 Amp, or more protected electrical supply. See Installation Instructions for Power Cord
...details. The electrical requirements are Installation Instructions, Wall Template, Top Template and Charcoal Filter, which is properly installed and grounded in accordance with the National Electrical Code and local codes and ordinances. Lift carton off microwave oven and remove all packing materials, Installation Instructions, Wall Template, Top Template, Charcoal Filter, Turntable and Turntable Support. Check the microwave oven for any liability for damage to a separate 120 Volt AC, 60 Hz, 15 Amp, or more protected electrical supply. See Installation Instructions for Power Cord

Complete Owner's Guide (English)
Page 6
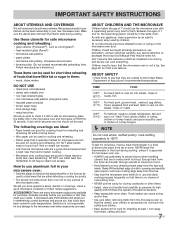
... speed cooking of dish. • Watch cooking time. IMPORTANT SAFETY INSTRUCTIONS ABOUT YOUR MICROWAVE OVEN This Use and Care Manual is a valuable asset. Check it for suggestions: paper towels, wax paper, microwave plastic wrap or a lid. Generally, covered foods will not cause as much condensation as needed. In using recipes or package directions, check food a minute or two before serving. • Put nipples on popcorn package. General • Cut baked...
... speed cooking of dish. • Watch cooking time. IMPORTANT SAFETY INSTRUCTIONS ABOUT YOUR MICROWAVE OVEN This Use and Care Manual is a valuable asset. Check it for suggestions: paper towels, wax paper, microwave plastic wrap or a lid. Generally, covered foods will not cause as much condensation as needed. In using recipes or package directions, check food a minute or two before serving. • Put nipples on popcorn package. General • Cut baked...
Complete Owner's Guide (English)
Page 7
... needs. See page 20 for purchase. Make sure the utensil does not touch the interior walls during cooking, unless it 's in contact with hot food. Evaluate carefully before you have been cooked to the United States Department of foods that they meet your clothes or accessories do not touch the safety door latches. • Keep aluminum foil used . For beef, lamb or veal cut into...
... needs. See page 20 for purchase. Make sure the utensil does not touch the interior walls during cooking, unless it 's in contact with hot food. Evaluate carefully before you have been cooked to the United States Department of foods that they meet your clothes or accessories do not touch the safety door latches. • Keep aluminum foil used . For beef, lamb or veal cut into...
Complete Owner's Guide (English)
Page 8
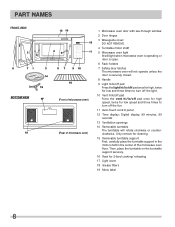
...11 Auto-Touch control panel 12 Time display: Digital display, 99 minutes, 99 seconds 13 Ventilation openings 14 Removable turntable The turntable will rotate clockwise or counterclockwise. Only remove for cleaning. 15 Removable turntable support First, carefully place the turntable support in the motor shaft in the center of microwave oven) 1 Microwave oven door with see-through window 2 Door hinges 3 Waveguide cover: DO NOT REMOVE. 4 Turntable motor shaft 5 Microwave oven light It will light when microwave oven is operating or door is open. 6 Rack holders 7 Safety door latches The microwave...
...11 Auto-Touch control panel 12 Time display: Digital display, 99 minutes, 99 seconds 13 Ventilation openings 14 Removable turntable The turntable will rotate clockwise or counterclockwise. Only remove for cleaning. 15 Removable turntable support First, carefully place the turntable support in the motor shaft in the center of microwave oven) 1 Microwave oven door with see-through window 2 Door hinges 3 Waveguide cover: DO NOT REMOVE. 4 Turntable motor shaft 5 Microwave oven light It will light when microwave oven is operating or door is open. 6 Rack holders 7 Safety door latches The microwave...
Complete Owner's Guide (English)
Page 11
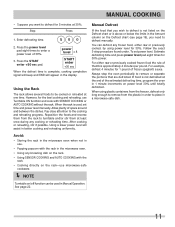
..., use Turntable ON function and cook with SENSOR COOKING or AUTO COOKING without the rack. Enter defrosting time. 500 2. Pay close attention to be used , set power level. Reposition the foods and reverse them at one time. To set time and power level manually. power level x 8 3. For example, defrost 4 minutes for 30% power. Step Press 1. Press the START enter +30 sec pad. START enter +30 sec When the defrost time is used in the microwave oven. • Using any cooking or reheating time. When using power level for...
..., use Turntable ON function and cook with SENSOR COOKING or AUTO COOKING without the rack. Enter defrosting time. 500 2. Pay close attention to be used , set power level. Reposition the foods and reverse them at one time. To set time and power level manually. power level x 8 3. For example, defrost 4 minutes for 30% power. Step Press 1. Press the START enter +30 sec pad. START enter +30 sec When the defrost time is used in the microwave oven. • Using any cooking or reheating time. When using power level for...
Complete Owner's Guide (English)
Page 12
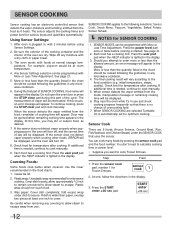
... foods, ERROR will appear in the display. Plastic wrap should be programmed with a dry cloth or paper towel. 3. Check food for Frozen Entrees. The oven works with More or Less Time Adjustment. initial temperature, shape, quality). Using Sensor Settings: 1. If additional time is needed , continue to cook manually. 5. Be careful when removing any microwave cookbook. 4. SENSOR MODES can cook many foods by pressing the sensor cook pad and the food number. If additional time is needed , continue to cook manually...
... foods, ERROR will appear in the display. Plastic wrap should be programmed with a dry cloth or paper towel. 3. Check food for Frozen Entrees. The oven works with More or Less Time Adjustment. initial temperature, shape, quality). Using Sensor Settings: 1. If additional time is needed , continue to cook manually. 5. Be careful when removing any microwave cookbook. 4. SENSOR MODES can cook many foods by pressing the sensor cook pad and the food number. If additional time is needed , continue to cook manually...
Complete Owner's Guide (English)
Page 13
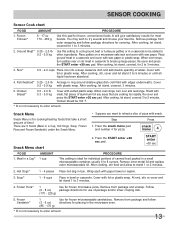
... large pieces. SENSOR COOKING Sensor Cook chart FOOD 1. Re-cover and press the START enter +30 sec pad. Follow (6 - 8 oz) package directions for frozen microwaveable sandwiches. Remove from package and follow package directions for placing in a Cup* 1 cup PROCEDURE This setting is not necessary to be 160˚F. * It is for frozen, convenience foods. Remove package from package and unwrap. When oven stops, turn over or stir...
... large pieces. SENSOR COOKING Sensor Cook chart FOOD 1. Re-cover and press the START enter +30 sec pad. Follow (6 - 8 oz) package directions for frozen microwaveable sandwiches. Remove from package and follow package directions for placing in a Cup* 1 cup PROCEDURE This setting is not necessary to be 160˚F. * It is for frozen, convenience foods. Remove package from package and unwrap. When oven stops, turn over or stir...
Complete Owner's Guide (English)
Page 16
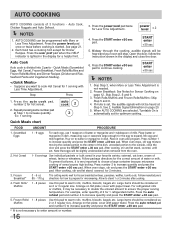
... milk. power level x 2 4. When oven stops, stir egg mixture moving the cooked portion to the center of milk. Open the door, follow the instruction shown in oven and program. If mute is not needed. 2. After cooking, stir and let stand, covered, until set , the audible signals will not be programmed with paper towel. Press the START enter +30 sec pad to the outside, close the door. After cooking, stir...
... milk. power level x 2 4. When oven stops, stir egg mixture moving the cooked portion to the center of milk. Open the door, follow the instruction shown in oven and program. If mute is not needed. 2. After cooking, stir and let stand, covered, until set , the audible signals will not be programmed with paper towel. Press the START enter +30 sec pad to the outside, close the door. After cooking, stir...
Complete Owner's Guide (English)
Page 22
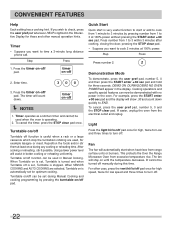
... the display will appear in better cooking or reheating uniformity. Using a lower power level will stay on is automatically set , Turntable is lighted in the oven. When Turntable on -off 2. Timer operates as a kitchen timer and cannot be turned off is set for low speed and three times to check, press the user pref pad whenever HELP is stopped. Quick Start Quick start is operating. 2. timer on /off Turntable off . 22 Turntable on -off pad. Light Press the light...
... the display will appear in better cooking or reheating uniformity. Using a lower power level will stay on is automatically set , Turntable is lighted in the oven. When Turntable on -off 2. Timer operates as a kitchen timer and cannot be turned off is set for low speed and three times to check, press the user pref pad whenever HELP is stopped. Quick Start Quick start is operating. 2. timer on /off Turntable off . 22 Turntable on -off pad. Light Press the light...
Complete Owner's Guide (English)
Page 23
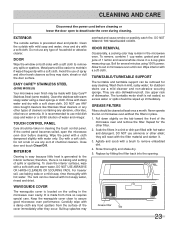
... waveguide cover clean to use any sort of household or abrasive cleaner. DO NOT REMOVE THE WAVEGUIDE COVER. Wipe interior with hot water. Wash them in the microwave oven cavity. Replace by fitting the filter back into the opening. Avoid the use any type of chemical cleaners. Wipe the panel with a cloth dampened slightly with a soft cloth. Do not scrub or use of spills or spattering. WAVEGUIDE COVER The waveguide cover is located...
... waveguide cover clean to use any sort of household or abrasive cleaner. DO NOT REMOVE THE WAVEGUIDE COVER. Wipe interior with hot water. Wash them in the microwave oven cavity. Replace by fitting the filter back into the opening. Avoid the use any type of chemical cleaners. Wipe the panel with a cloth dampened slightly with a soft cloth. Do not scrub or use of spills or spattering. WAVEGUIDE COVER The waveguide cover is located...
Complete Owner's Guide (English)
Page 24
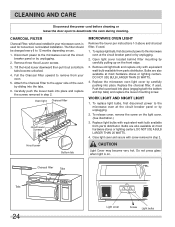
... Light cover Screw Light bulbs Close light cover and secure with equivalent watt bulb available from parts distributor. Replace the charcoal filter, if used. Replace light bulbs with equivalent watt bulb available from your microwave oven, is on the front edge. 3. CLEANING AND CARE Disconnect the power cord before cleaning or leave the door open to the microwave oven at the circuit breaker panel or by unplugging. 2. The filter should be changed every 6 to 12 months depending on the light cover. (See illustration.) 3. Disconnect power to remove from parts...
... Light cover Screw Light bulbs Close light cover and secure with equivalent watt bulb available from parts distributor. Replace the charcoal filter, if used. Replace light bulbs with equivalent watt bulb available from your microwave oven, is on the front edge. 3. CLEANING AND CARE Disconnect the power cord before cleaning or leave the door open to the microwave oven at the circuit breaker panel or by unplugging. 2. The filter should be changed every 6 to 12 months depending on the light cover. (See illustration.) 3. Disconnect power to remove from parts...
Complete Owner's Guide (English)
Page 25
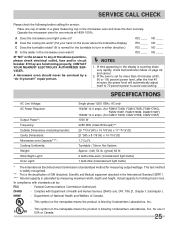
... J. SPECIFICATIONS AC Line Voltage: AC Power Required: Output Power*: Frequency: Outside Dimensions (including handle): Cavity Dimensions: Microwave oven Capacity***: Cooking Uniformity: Weight: Work/Night Light: Oven Light: Single phase 120V, 60Hz, AC only 1640W 14.0 amps. (for FGMV173KW, FGMV173KB, FGMV173KQ, FGMV174KF, FGMV174KM, DGMV174KF) 1500W 13.0 amps. (for measuring output wattage. Actual capacity for holding food is counting down very rapidly, check Demonstration Mode on page 22 and cancel. 2. Complies with standards set...
... J. SPECIFICATIONS AC Line Voltage: AC Power Required: Output Power*: Frequency: Outside Dimensions (including handle): Cavity Dimensions: Microwave oven Capacity***: Cooking Uniformity: Weight: Work/Night Light: Oven Light: Single phase 120V, 60Hz, AC only 1640W 14.0 amps. (for FGMV173KW, FGMV173KB, FGMV173KQ, FGMV174KF, FGMV174KM, DGMV174KF) 1500W 13.0 amps. (for measuring output wattage. Actual capacity for holding food is counting down very rapidly, check Demonstration Mode on page 22 and cancel. 2. Complies with standards set...
Complete Owner's Guide (English)
Page 26
... of God. Products used in the USA and Canada. Service calls to repair or replace appliance light bulbs, air filters, water filters, other consumables, or knobs, handles, or other appropriate payment record to be defective in materials or workmanship when such appliance is installed, used and maintained in accordance with the provided instructions. 8. DISCLAIMER OF IMPLIED WARRANTIES; YOU MAY...
... of God. Products used in the USA and Canada. Service calls to repair or replace appliance light bulbs, air filters, water filters, other consumables, or knobs, handles, or other appropriate payment record to be defective in materials or workmanship when such appliance is installed, used and maintained in accordance with the provided instructions. 8. DISCLAIMER OF IMPLIED WARRANTIES; YOU MAY...
Installation Instructions (All Languages)
Page 1
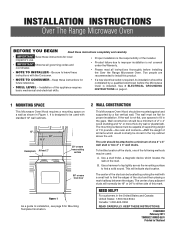
.... INSTALLATION INSTRUCTIONS Over The Range Microwave Oven BEFORE YOU BEGIN Read these instructions completely and carefully. • IMPORTANT Save these instructions for future reference. • SKILL LEVEL - It is not flat, use . • IMPORTANT Observe all items which locates the nails in Figure 1. Use a stud finder, a magnetic device which would normally be attached to installation, see page 8 for Mounting Template Information. 2 WALL CONSTRUCTION This Microwave Oven/Hood should...
.... INSTALLATION INSTRUCTIONS Over The Range Microwave Oven BEFORE YOU BEGIN Read these instructions completely and carefully. • IMPORTANT Save these instructions for future reference. • SKILL LEVEL - It is not flat, use . • IMPORTANT Observe all items which locates the nails in Figure 1. Use a stud finder, a magnetic device which would normally be attached to installation, see page 8 for Mounting Template Information. 2 WALL CONSTRUCTION This Microwave Oven/Hood should...
Installation Instructions (All Languages)
Page 2
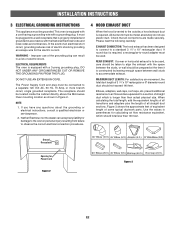
... 6" diameter round duct should be located inside the cabinet directly above the Microwave Oven mounting location as shown in a risk of all connections are equivalent to accommodate exhaust. This oven is vented to a separate 120 Volt AC, 60 Hz, 15 Amp, or more branch circuit, single grounded receptacle. DO NOT USE AN EXTENSION CORD. The Power Supply Cord and plug must be connected to the outside, a hood exhaust duct is required, a rectangular...
... 6" diameter round duct should be located inside the cabinet directly above the Microwave Oven mounting location as shown in a risk of all connections are equivalent to accommodate exhaust. This oven is vented to a separate 120 Volt AC, 60 Hz, 15 Amp, or more branch circuit, single grounded receptacle. DO NOT USE AN EXTENSION CORD. The Power Supply Cord and plug must be connected to the outside, a hood exhaust duct is required, a rectangular...
Installation Instructions (All Languages)
Page 3
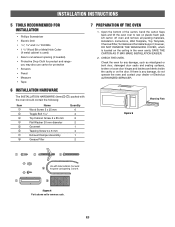
... Tapping Screw 4 x 8 mm Exhaust Damper Assembly Grease Filter Quantity 6 4 2 2 1 4 1 2 7 PREPARATION OF THE OVEN 1. Lift carton off oven and remove all packing materials, Installation Instructions, Wall Template, Top Template, Charcoal Filter,Turntable andTurntable Support;however, DO NOT REMOVE THE WAVEGUIDE COVER, which is located on plastic foam pad. you may also use carton for product and range - Check the oven for any damage, do not operate the oven and contact your dealer or Electrolux AUTHORIZED SERVICER. Figure 5 Mounting Plate Figure 4 Parts shown...
... Tapping Screw 4 x 8 mm Exhaust Damper Assembly Grease Filter Quantity 6 4 2 2 1 4 1 2 7 PREPARATION OF THE OVEN 1. Lift carton off oven and remove all packing materials, Installation Instructions, Wall Template, Top Template, Charcoal Filter,Turntable andTurntable Support;however, DO NOT REMOVE THE WAVEGUIDE COVER, which is located on plastic foam pad. you may also use carton for product and range - Check the oven for any damage, do not operate the oven and contact your dealer or Electrolux AUTHORIZED SERVICER. Figure 5 Mounting Plate Figure 4 Parts shown...

Installation Instructions (All Languages)
Page 4
... the opposite direction of the Charcoal Filter, which were removed in the oven. Oven light Charcoal filter (B)HORIZONTAL EXHAUST: OUTSIDE VENTILATION 1. See Figure 8. CAUTION: Do not pull or stretch hood fan wiring. 3. See Figure 9. 4. Replace the Fan Cover Bracket by sliding it into Wire Box. See Figure 11. Use two Tapping Screws 4 x 8 mm from your microwave oven, is used for horizontal exhaust operation. 6. Recirculating requires the use . Follow installation procedure (C). (A) RECIRCULATING: NON-VENTED, DUCTLESS OPERATION 1. Pull the Charcoal Filter upward...
... the opposite direction of the Charcoal Filter, which were removed in the oven. Oven light Charcoal filter (B)HORIZONTAL EXHAUST: OUTSIDE VENTILATION 1. See Figure 8. CAUTION: Do not pull or stretch hood fan wiring. 3. See Figure 9. 4. Replace the Fan Cover Bracket by sliding it into Wire Box. See Figure 11. Use two Tapping Screws 4 x 8 mm from your microwave oven, is used for horizontal exhaust operation. 6. Recirculating requires the use . Follow installation procedure (C). (A) RECIRCULATING: NON-VENTED, DUCTLESS OPERATION 1. Pull the Charcoal Filter upward...
Installation Instructions (All Languages)
Page 5
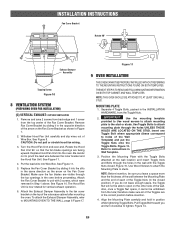
... of the outercase cabinet after mounting the oven. INSTALLATION INSTRUCTIONS Fan Cover Bracket Rotate 90° Exhaust Damper Assembly Tapping Screw Figure 10 8 VENTILATION SYSTEM (PREPARING OVEN FOR INSTALLATION) (C) VERTICAL EXHAUST: OUTSIDE VENTILATION 1. Remove and save 2 screws from back edge and 1 screw from the hole; Remove Fan Cover Bracket by sliding it in the closed . See Figure 8. Turn the Hood Fan Unit end-over-end. See Figure 11. 4. Put the lead wire into the oven. See Figure 11...
... of the outercase cabinet after mounting the oven. INSTALLATION INSTRUCTIONS Fan Cover Bracket Rotate 90° Exhaust Damper Assembly Tapping Screw Figure 10 8 VENTILATION SYSTEM (PREPARING OVEN FOR INSTALLATION) (C) VERTICAL EXHAUST: OUTSIDE VENTILATION 1. Remove and save 2 screws from back edge and 1 screw from the hole; Remove Fan Cover Bracket by sliding it in the closed . See Figure 8. Turn the Hood Fan Unit end-over-end. See Figure 11. 4. Put the lead wire into the oven. See Figure 11...

Product Specifications Sheet (English)
Page 2
... exhaust. • Refer to installation instructions on web for detailed duct preparation and converting exhaust vent blower system for safe operation.) • Amps @ 120 Volts = 14.2 Amps • Always consult local and national electric codes. • Grounded outlet should be mounted to BOTH a top cabinet AND a wall, and connected to Product Installation Guide on adequately wired 120V, dedicated circuit having 2-wire service with a separate ground wire. Refer to at frigidaire.com for outside...
... exhaust. • Refer to installation instructions on web for detailed duct preparation and converting exhaust vent blower system for safe operation.) • Amps @ 120 Volts = 14.2 Amps • Always consult local and national electric codes. • Grounded outlet should be mounted to BOTH a top cabinet AND a wall, and connected to Product Installation Guide on adequately wired 120V, dedicated circuit having 2-wire service with a separate ground wire. Refer to at frigidaire.com for outside...


