Complete Owner's Guide (English)
Page 4
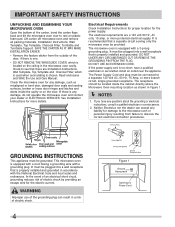
...NOT USE AN EXTENSION CORD. Electrical Requirements Check Installation Instructions for proper location for any damage, do not operate the microwave oven and contact your dealer or ELECTROLUX SERVICER. The electrical requirements are Installation Instructions, Wall Template, Top Template and ... Read enclosures and SAVE the Use and Care Manual. Lift carton off microwave oven and remove all packing materials, Installation Instructions, Wall Template, Top Template, Charcoal Filter, Turntable and Turntable Support. If you have a qualified electrician or serviceman install an...
...NOT USE AN EXTENSION CORD. Electrical Requirements Check Installation Instructions for proper location for any damage, do not operate the microwave oven and contact your dealer or ELECTROLUX SERVICER. The electrical requirements are Installation Instructions, Wall Template, Top Template and ... Read enclosures and SAVE the Use and Care Manual. Lift carton off microwave oven and remove all packing materials, Installation Instructions, Wall Template, Top Template, Charcoal Filter, Turntable and Turntable Support. If you have a qualified electrician or serviceman install an...

Complete Owner's Guide (English)
Page 6
The turntable will turn the turntable over at edge. - When using the microwave oven at pieces of aluminum foil any thin areas of meat or poultry to prevent overcooking before dense, thick areas are cooked thoroughly. • Stir foods from microwave oven and stir, if possible. Cook for the shortest amount... dry clothes or newspapers. Cover for the exterior of the dish to finish cooking without the turntable and support nor turn both from top to bottom and from the center of the microwave oven to be destroyed. • Deep fat fry. • Dry wood, gourds, herbs or wet...
The turntable will turn the turntable over at edge. - When using the microwave oven at pieces of aluminum foil any thin areas of meat or poultry to prevent overcooking before dense, thick areas are cooked thoroughly. • Stir foods from microwave oven and stir, if possible. Cook for the shortest amount... dry clothes or newspapers. Cover for the exterior of the dish to finish cooking without the turntable and support nor turn both from top to bottom and from the center of the microwave oven to be destroyed. • Deep fat fry. • Dry wood, gourds, herbs or wet...
Complete Owner's Guide (English)
Page 8
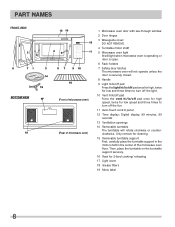
... 18 Grease filters 19 Menu label 8 PART NAMES BOTTOM VIEW (Front of microwave oven) (Rear of the microwave oven floor. Only remove for cleaning. 15 Removable turntable support First, carefully place the turntable support in the motor shaft in the center of microwave oven) 1 Microwave oven door with see-through window 2 Door hinges 3 Waveguide cover: DO...
... 18 Grease filters 19 Menu label 8 PART NAMES BOTTOM VIEW (Front of microwave oven) (Rear of the microwave oven floor. Only remove for cleaning. 15 Removable turntable support First, carefully place the turntable support in the motor shaft in the center of microwave oven) 1 Microwave oven door with see-through window 2 Door hinges 3 Waveguide cover: DO...
Complete Owner's Guide (English)
Page 11
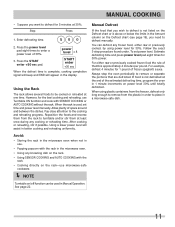
...minute increments on power level 30% until totally defrosted. Allow plenty of frozen spaghetti sauce. Using a lower power level will appear in the microwave oven. • Using any cooking or reheating time. For either raw or previously cooked, by using plastic containers from the freezer, defrost ...per pound. power level x 8 3. After cooking or reheating, stir if possible. Avoid: • Storing the rack in the microwave oven when not in use Turntable ON function and cook with the rack. • Cooking directly on the Defrost chart or is used in better cooking and reheating ...
...minute increments on power level 30% until totally defrosted. Allow plenty of frozen spaghetti sauce. Using a lower power level will appear in the microwave oven. • Using any cooking or reheating time. For either raw or previously cooked, by using plastic containers from the freezer, defrost ...per pound. power level x 8 3. After cooking or reheating, stir if possible. Avoid: • Storing the rack in the microwave oven when not in use Turntable ON function and cook with the rack. • Cooking directly on the Defrost chart or is used in better cooking and reheating ...
Complete Owner's Guide (English)
Page 12
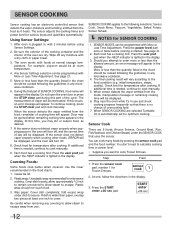
...will appear in the display. Check food for temperature after cooking. Stay near the oven while it heats. When SENSOR COOKING are selected Turntable On is started. Sensor Cook There are dry. Press the START enter +30 sec pad. SENSOR COOKING Sensor cooking has an electronic...appear. Plastic wrap: Use plastic wrap recommended for Frozen Entrees. Each food has a cooking hint. Press the sensor cook pad, number 1 for microwave cooking. For example, popcorn would be interrupted. Press the user pref pad when the HELP indicator is needed , continue to escape. At this ...
...will appear in the display. Check food for temperature after cooking. Stay near the oven while it heats. When SENSOR COOKING are selected Turntable On is started. Sensor Cook There are dry. Press the START enter +30 sec pad. SENSOR COOKING Sensor cooking has an electronic...appear. Plastic wrap: Use plastic wrap recommended for Frozen Entrees. Each food has a cooking hint. Press the sensor cook pad, number 1 for microwave cooking. For example, popcorn would be interrupted. Press the user pref pad when the HELP indicator is needed , continue to escape. At this ...
Complete Owner's Guide (English)
Page 15
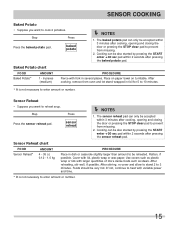
... covers such as plastic wrap or lids with lid, plastic wrap or wax paper. After reheating, stir well, if possible. Place on paper towel on turntable. After stirring, re-cover and allow to stand 2 to reheat soup. Foods should be accepted within 3 minutes after cooking, opening and closing the door or...
... covers such as plastic wrap or lids with lid, plastic wrap or wax paper. After reheating, stir well, if possible. Place on paper towel on turntable. After stirring, re-cover and allow to stand 2 to reheat soup. Foods should be accepted within 3 minutes after cooking, opening and closing the door or...
Complete Owner's Guide (English)
Page 16
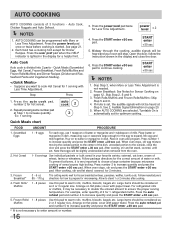
...Auto cook is not necessary to increase quantity. Step Press 1. Ex: 1 serving. If mute is automatically set . When AUTO COOKING are selected, Turntable On is set, the audible signals will stop. Place in your oven will not be heard at Step 1 to enter amount or number. 16... door. Press the power level pad twice for 2 minutes. 3. power level x 2 4. Open the door, follow the instruction shown in the display for microwaving. Repeat pressing same number pad at Step 5. START enter +30 sec NOTES 1. Frozen Breakfast: See Notes for 1 serving with paper towel. When oven stops...
...Auto cook is not necessary to increase quantity. Step Press 1. Ex: 1 serving. If mute is automatically set . When AUTO COOKING are selected, Turntable On is set, the audible signals will stop. Place in your oven will not be heard at Step 1 to enter amount or number. 16... door. Press the power level pad twice for 2 minutes. 3. power level x 2 4. Open the door, follow the instruction shown in the display for microwaving. Repeat pressing same number pad at Step 5. START enter +30 sec NOTES 1. Frozen Breakfast: See Notes for 1 serving with paper towel. When oven stops...
Complete Owner's Guide (English)
Page 22
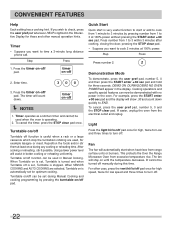
... function is turned and when Turntable off pad. Step Press Press number 2. 2 Demonstration Mode To demonstrate, press the user pref pad, number 5, 0 and then press the START enter +30 sec pad and hold for low speed and three times to END. This protects the Over the Range Microwave Oven from the electrical...
... function is turned and when Turntable off pad. Step Press Press number 2. 2 Demonstration Mode To demonstrate, press the user pref pad, number 5, 0 and then press the START enter +30 sec pad and hold for low speed and three times to END. This protects the Over the Range Microwave Oven from the electrical...
Complete Owner's Guide (English)
Page 23
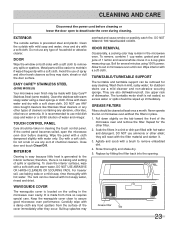
... wiped frequently with hot soapy water, rinsed and dried. Keep the waveguide cover clean to remove any type of chemical cleaners. TURNTABLE/TURNTABLE SUPPORT The turntable and turntable support can be removed for the other harsh cleaners as they may be cleaned at least once a month. Wash them in place.... 1. Never operate the fan or microwave oven without the filters in mild, sudsy water; Grease filter Tab 23 Do not ...
... wiped frequently with hot soapy water, rinsed and dried. Keep the waveguide cover clean to remove any type of chemical cleaners. TURNTABLE/TURNTABLE SUPPORT The turntable and turntable support can be removed for the other harsh cleaners as they may be cleaned at least once a month. Wash them in place.... 1. Never operate the fan or microwave oven without the filters in mild, sudsy water; Grease filter Tab 23 Do not ...
Complete Owner's Guide (English)
Page 25
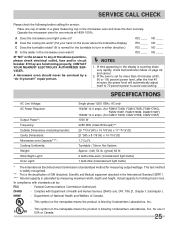
... of National Health and Welfare of water in a glass measuring cup in the microwave oven and close the door securely. for CGMV173KW, CGMV173KB, CGMV174KF) 1000 W 2450 MHz (Class B/Group2)** 29 15/16"(W) x 16 3/8"(H) x 17 15/16"(D) 21"(W) x 8 7/8"(H) x 14 7/16"(D) 1.7 Cu.Ft. YES ____ NO ____ B Does the cooling fan work? (Put your hand...
... of National Health and Welfare of water in a glass measuring cup in the microwave oven and close the door securely. for CGMV173KW, CGMV173KB, CGMV174KF) 1000 W 2450 MHz (Class B/Group2)** 29 15/16"(W) x 16 3/8"(H) x 17 15/16"(D) 21"(W) x 8 7/8"(H) x 14 7/16"(D) 1.7 Cu.Ft. YES ____ NO ____ B Does the cooling fan work? (Put your hand...
Installation Instructions (All Languages)
Page 3
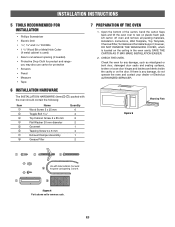
... or on the ceiling in the oven cavity. Lift carton off oven and remove all packing materials, Installation Instructions, Wall Template, Top Template, Charcoal Filter,Turntable andTurntable Support;however, DO NOT REMOVE THE WAVEGUIDE COVER, which is located on the door. CHECK THE OVEN. E3 Figure 5 Mounting Plate Figure 4 Parts shown...
... or on the ceiling in the oven cavity. Lift carton off oven and remove all packing materials, Installation Instructions, Wall Template, Top Template, Charcoal Filter,Turntable andTurntable Support;however, DO NOT REMOVE THE WAVEGUIDE COVER, which is located on the door. CHECK THE OVEN. E3 Figure 5 Mounting Plate Figure 4 Parts shown...
Product Specifications Sheet (English)
Page 1
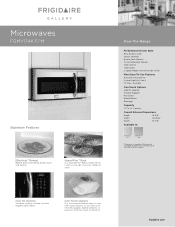
Ft. SpaceWise™ Rack Our SpaceWise™ Rack creates more room so you can cook two dishes at the touch of a button. Over-The-Range Performance-...-Use Features Auto-Start Heat Sensor 2-Level Light ( Hi / Low ) 13" Glass Turntable One-Touch Options Add-30-Seconds Chicken Nuggets Pizza Slice Baked Potato Beverage Capacity 1.7 Cu. Microwaves FGMV174K F/ M Signature Features Effortless™ Reheat Reheat almost anything at once. frigidaire.com Capacity Overall Exterior Dimensions Height 16-3/8" Width 29-15/16" Depth 16...
Ft. SpaceWise™ Rack Our SpaceWise™ Rack creates more room so you can cook two dishes at the touch of a button. Over-The-Range Performance-...-Use Features Auto-Start Heat Sensor 2-Level Light ( Hi / Low ) 13" Glass Turntable One-Touch Options Add-30-Seconds Chicken Nuggets Pizza Slice Baked Potato Beverage Capacity 1.7 Cu. Microwaves FGMV174K F/ M Signature Features Effortless™ Reheat Reheat almost anything at once. frigidaire.com Capacity Overall Exterior Dimensions Height 16-3/8" Width 29-15/16" Depth 16...


