Complete Owner's Guide (English)
Page 2
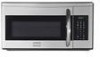
... damage, personal injury or loss of a new microwave oven! Common sense and caution must be practiced when installing, operating and maintaining any object between the oven front.... Model Number Serial Number Purchase Date NEED HELP? It contains instructions to help is no damage to microwave energy. A list of toll-free customer service numbers is damaged... Or call Frigidaire Customer Services at : http://www.frigidaire.com Before you can result in this manual. Please record your new microwave oven and Thank You for future reference. Visit the Frigidaire Web Site at...
... damage, personal injury or loss of a new microwave oven! Common sense and caution must be practiced when installing, operating and maintaining any object between the oven front.... Model Number Serial Number Purchase Date NEED HELP? It contains instructions to help is no damage to microwave energy. A list of toll-free customer service numbers is damaged... Or call Frigidaire Customer Services at : http://www.frigidaire.com Before you can result in this manual. Please record your new microwave oven and Thank You for future reference. Visit the Frigidaire Web Site at...
Complete Owner's Guide (English)
Page 3
...fied service personnel. CAUTION CAUTION indicates a potentially hazardous situation which , if not avoided, could result in microwave oven. - Obey all instructions before using your appliance, follow basic precautions, including the following sections. • Read all safety messages that follow...64257;c "PRECAUTIONS TO AVOID POSSIBLE EXPOSURE TO EXCESSIVE MICROWAVE ENERGY" on page 2. • This appliance must be allowed to avoid possible injury or death. Do not use straight-sided containers with the provided installation instructions. • Some products such as lye-based...
...fied service personnel. CAUTION CAUTION indicates a potentially hazardous situation which , if not avoided, could result in microwave oven. - Obey all instructions before using your appliance, follow basic precautions, including the following sections. • Read all safety messages that follow...64257;c "PRECAUTIONS TO AVOID POSSIBLE EXPOSURE TO EXCESSIVE MICROWAVE ENERGY" on page 2. • This appliance must be allowed to avoid possible injury or death. Do not use straight-sided containers with the provided installation instructions. • Some products such as lye-based...
Complete Owner's Guide (English)
Page 4
... THE WAVEGUIDE COVER, which is used when recirculating is any questions about the grounding or electrical instructions, consult a qualified electrician or service person. 2. See Installation Instructions for damage to see that a separate circuit serving only the microwave oven be grounded. The Power Supply Cord and plug must be provided. It must be...
... THE WAVEGUIDE COVER, which is used when recirculating is any questions about the grounding or electrical instructions, consult a qualified electrician or service person. 2. See Installation Instructions for damage to see that a separate circuit serving only the microwave oven be grounded. The Power Supply Cord and plug must be provided. It must be...

Complete Owner's Guide (English)
Page 5
... is the responsibility of the radio or television. • Relocate the microwave oven with respect to provide reasonable protection against such interference in a residential installation. If this microwave oven. It has been type tested and found to comply with the manufacturer's instructions, may cause interference to this equipment does cause interference to radio or...
... is the responsibility of the radio or television. • Relocate the microwave oven with respect to provide reasonable protection against such interference in a residential installation. If this microwave oven. It has been type tested and found to comply with the manufacturer's instructions, may cause interference to this equipment does cause interference to radio or...
Complete Owner's Guide (English)
Page 24
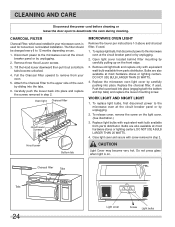
...Oven light Charcoal filter Hood louver Scrrews Hood louver Bottom tab MICROWAVE OVEN LIGHT Remove the louver per instructions 1-3 above and charcoal filter, if used . To replace light bulb, first disconnect power to the microwave oven at the circuit breaker panel or by unplugging. 2. Remove old... most hardware stores or lighting centers. CHARCOAL FILTER Charcoal Filter, which was installed in step 2. CLEANING AND CARE Disconnect the power cord before cleaning or leave the door open to remove from your microwave oven, is on the light cover. (See illustration.) 3. Pull the ...
...Oven light Charcoal filter Hood louver Scrrews Hood louver Bottom tab MICROWAVE OVEN LIGHT Remove the louver per instructions 1-3 above and charcoal filter, if used . To replace light bulb, first disconnect power to the microwave oven at the circuit breaker panel or by unplugging. 2. Remove old... most hardware stores or lighting centers. CHARCOAL FILTER Charcoal Filter, which was installed in step 2. CLEANING AND CARE Disconnect the power cord before cleaning or leave the door open to remove from your microwave oven, is on the light cover. (See illustration.) 3. Pull the ...
Complete Owner's Guide (English)
Page 26
...how to use your receipt, delivery slip, or some other than in accordance with the provided instructions. 8. Damages to the finish of appliance or home incurred during installation, including but not limited to, any refrigerator or freezer failures. 6. or external causes such as.... 10. Service under this appliance that prove to be defective in materials or workmanship when such appliance is installed, used and maintained in accordance with the provided instructions. Product features or specifications as abuse, misuse, inadequate power supply, accidents, fires, or...
...how to use your receipt, delivery slip, or some other than in accordance with the provided instructions. 8. Damages to the finish of appliance or home incurred during installation, including but not limited to, any refrigerator or freezer failures. 6. or external causes such as.... 10. Service under this appliance that prove to be defective in materials or workmanship when such appliance is installed, used and maintained in accordance with the provided instructions. Product features or specifications as abuse, misuse, inadequate power supply, accidents, fires, or...
Installation Instructions (All Languages)
Page 1
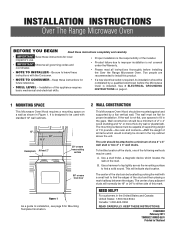
... THESE INSTRUCTIONS. 316495062 February 2011 TINSEB221WRRZ-EL91 Printed in the gaps. INSTALLATION INSTRUCTIONS Over The Range Microwave Oven BEFORE YOU BEGIN Read these instructions completely and carefully. • IMPORTANT Save these instructions for Mounting Template Information. 2 WALL CONSTRUCTION This Microwave Oven/...A. This will normally be completed by probing the wall with the Consumer. • Proper installation is the responsibility of all instructions thoroughly before the Microwave Oven is not flat for future reference. • SKILL LEVEL - The unit ...
... THESE INSTRUCTIONS. 316495062 February 2011 TINSEB221WRRZ-EL91 Printed in the gaps. INSTALLATION INSTRUCTIONS Over The Range Microwave Oven BEFORE YOU BEGIN Read these instructions completely and carefully. • IMPORTANT Save these instructions for Mounting Template Information. 2 WALL CONSTRUCTION This Microwave Oven/...A. This will normally be completed by probing the wall with the Consumer. • Proper installation is the responsibility of all instructions thoroughly before the Microwave Oven is not flat for future reference. • SKILL LEVEL - The unit ...
Installation Instructions (All Languages)
Page 2
... 6" diameter round duct should be located inside the cabinet directly above the Microwave Oven mounting location as shown in accordance with the space between wall studs ... Elbow (10 ft.) 45° Elbow (5 ft.) Adaptor (5 ft.) 10" Wide Elbow (10 ft.) 90° Elbow (25 ft.) 45° Elbow (5 ft.) Wall cap (40 ft.) Roof cap (24 ft.) Figure 3 E2...plug can accept any questions about the grounding or electrical instructions, consult a qualified electrician or serviceperson. 2. INSTALLATION INSTRUCTIONS 3 ELECTRICAL GROUNDING INSTRUCTIONS This appliance must be metal; This oven is to ...
... 6" diameter round duct should be located inside the cabinet directly above the Microwave Oven mounting location as shown in accordance with the space between wall studs ... Elbow (10 ft.) 45° Elbow (5 ft.) Adaptor (5 ft.) 10" Wide Elbow (10 ft.) 90° Elbow (25 ft.) 45° Elbow (5 ft.) Wall cap (40 ft.) Roof cap (24 ft.) Figure 3 E2...plug can accept any questions about the grounding or electrical instructions, consult a qualified electrician or serviceperson. 2. INSTALLATION INSTRUCTIONS 3 ELECTRICAL GROUNDING INSTRUCTIONS This appliance must be metal; This oven is to ...
Installation Instructions (All Languages)
Page 3
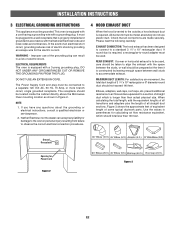
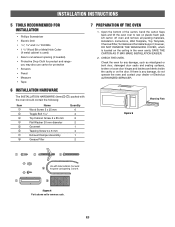
... Grommet Tapping Screw 4 x 8 mm Exhaust Damper Assembly Grease Filter Quantity 6 4 2 2 1 4 1 2 7 PREPARATION OF THE OVEN 1. INSTALLATION INSTRUCTIONS 5 TOOLS RECOMMENDED FOR INSTALLATION • Phillips Screwdriver • Electric Drill • 1/2", 5/8" and 3/32" Drill Bits • 1 1/2" Wood Bit or Metal Hole Cutter ... and contact your dealer or Electrolux AUTHORIZED SERVICER. Lift carton off oven and remove all packing materials, Installation Instructions, Wall Template, Top Template, Charcoal Filter,Turntable andTurntable Support;however, DO NOT REMOVE THE WAVEGUIDE COVER,...
... Grommet Tapping Screw 4 x 8 mm Exhaust Damper Assembly Grease Filter Quantity 6 4 2 2 1 4 1 2 7 PREPARATION OF THE OVEN 1. INSTALLATION INSTRUCTIONS 5 TOOLS RECOMMENDED FOR INSTALLATION • Phillips Screwdriver • Electric Drill • 1/2", 5/8" and 3/32" Drill Bits • 1 1/2" Wood Bit or Metal Hole Cutter ... and contact your dealer or Electrolux AUTHORIZED SERVICER. Lift carton off oven and remove all packing materials, Installation Instructions, Wall Template, Top Template, Charcoal Filter,Turntable andTurntable Support;however, DO NOT REMOVE THE WAVEGUIDE COVER,...

Installation Instructions (All Languages)
Page 4
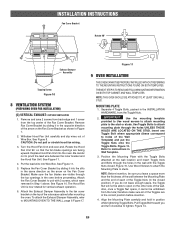
... the Hood louver downward then pull it into the slits in the same direction as shown in your microwave oven, is used for nonvented, recirculated installation. Attach the Charcoal Filter to the upper side of hood ventilation systems. Select the type required for... to unit with 3 screws, which has already been installed in the oven before proceeding. Use two Tapping Screws 4 x 8 mm from the INSTALLATION HARDWARE and tighten into Wire Box. INSTALLATION INSTRUCTIONS 8 VENTILATION SYSTEM (PREPARING OVEN FOR INSTALLATION) This microwave oven/hood is designed for adaptation to three types of...
... the Hood louver downward then pull it into the slits in the same direction as shown in your microwave oven, is used for nonvented, recirculated installation. Attach the Charcoal Filter to the upper side of hood ventilation systems. Select the type required for... to unit with 3 screws, which has already been installed in the oven before proceeding. Use two Tapping Screws 4 x 8 mm from the INSTALLATION HARDWARE and tighten into Wire Box. INSTALLATION INSTRUCTIONS 8 VENTILATION SYSTEM (PREPARING OVEN FOR INSTALLATION) This microwave oven/hood is designed for adaptation to three types of...
Installation Instructions (All Languages)
Page 5
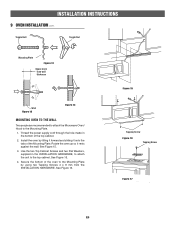
... Step 1 above. The Hood Fan Unit is now rotated for vertical exhaust operation. 6. Figure 11 9 OVEN INSTALLATION THIS OVEN CANNOT BE PROPERLY INSTALLED WITHOUT REFERRING TO THE MOUNTING INSTRUCTIONS FOUND ON BOTH TEMPLATES. IMPORTANT Use the mounting template provided to Use wood screws to attach mounting plate to...over-end. Figure 15. THE NEXT STEP IS TO READ AND FOLLOW MOUNTING INFORMATION ON BOTH TOP CABINET AND WALL TEMPLATES. INSTALLATION INSTRUCTIONS Fan Cover Bracket Rotate 90° Exhaust Damper Assembly Tapping Screw Figure 10 8 VENTILATION SYSTEM (PREPARING OVEN FOR...
... Step 1 above. The Hood Fan Unit is now rotated for vertical exhaust operation. 6. Figure 11 9 OVEN INSTALLATION THIS OVEN CANNOT BE PROPERLY INSTALLED WITHOUT REFERRING TO THE MOUNTING INSTRUCTIONS FOUND ON BOTH TEMPLATES. IMPORTANT Use the mounting template provided to Use wood screws to attach mounting plate to...over-end. Figure 15. THE NEXT STEP IS TO READ AND FOLLOW MOUNTING INFORMATION ON BOTH TOP CABINET AND WALL TEMPLATES. INSTALLATION INSTRUCTIONS Fan Cover Bracket Rotate 90° Exhaust Damper Assembly Tapping Screw Figure 10 8 VENTILATION SYSTEM (PREPARING OVEN FOR...
Installation Instructions (All Languages)
Page 6
See Figure 16. 4. INSTALLATION INSTRUCTIONS 9 OVEN INSTALLATION cont. Rotate the oven up so it onto the tabs of the Mounting Plate. Use the two Top Cabinet Screws and two Flat Washers, supplied ... Plate Figure 12 Space more than wall thickness Wall Figure 13 Figure 14 MOUNTING OVEN TO THE WALL Two people are recommended to attach the Microwave Oven/ Hood to the top cabinet. See Figure 15. 3. Figure 15 Tapping Screw Figure 16 Tapping Screw Figure 17 E6 Thread the power supply cord...
See Figure 16. 4. INSTALLATION INSTRUCTIONS 9 OVEN INSTALLATION cont. Rotate the oven up so it onto the tabs of the Mounting Plate. Use the two Top Cabinet Screws and two Flat Washers, supplied ... Plate Figure 12 Space more than wall thickness Wall Figure 13 Figure 14 MOUNTING OVEN TO THE WALL Two people are recommended to attach the Microwave Oven/ Hood to the top cabinet. See Figure 15. 3. Figure 15 Tapping Screw Figure 16 Tapping Screw Figure 17 E6 Thread the power supply cord...

Installation Instructions (All Languages)
Page 7
Plug in the power cord. 3. INSTALLATION INSTRUCTIONS CHECKLIST FOR INSTALLATION 1. E7 Make sure the unit has been installed according to all of the Installation Instructions and the Wall and Top Cabinet Templates. 2. Keep the Operation Manual.
Plug in the power cord. 3. INSTALLATION INSTRUCTIONS CHECKLIST FOR INSTALLATION 1. E7 Make sure the unit has been installed according to all of the Installation Instructions and the Wall and Top Cabinet Templates. 2. Keep the Operation Manual.

Product Specifications Sheet (English)
Page 2
Gallery (1.7 Cu. Ft.) Microwaves FGMV174K F/ M Over-The-Range Microwave Specifications • Product Shipping Weight (approx.) - 60 Lbs. ... x 10" rectangular duct. Can NOT be needed for detailed instructions. If round duct required, rectangular-to installation instructions on web for detailed duct preparation and converting exhaust vent blower system...FRIGIDAIRE® USA • 250 Bobby Jones Expressway • Martinez, GA 30907 • 1-800-FRIGIDAIRE • frigidaire.com CANADA • 5855 Terry Fox Way • Mississauga, ON L5V 3E4 • 1-800-265-8352 • frigidaire...
Gallery (1.7 Cu. Ft.) Microwaves FGMV174K F/ M Over-The-Range Microwave Specifications • Product Shipping Weight (approx.) - 60 Lbs. ... x 10" rectangular duct. Can NOT be needed for detailed instructions. If round duct required, rectangular-to installation instructions on web for detailed duct preparation and converting exhaust vent blower system...FRIGIDAIRE® USA • 250 Bobby Jones Expressway • Martinez, GA 30907 • 1-800-FRIGIDAIRE • frigidaire.com CANADA • 5855 Terry Fox Way • Mississauga, ON L5V 3E4 • 1-800-265-8352 • frigidaire...


