Complete Owner's Guide (English)
Page 4
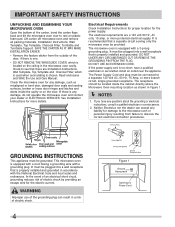
... It must be grounded. It must be provided. Lift carton off microwave oven and remove all packing materials, Installation Instructions, Wall Template, Top Template, Charcoal Filter, Turntable and Turntable Support. Check the microwave oven for any liability for damage to the microwave oven or personal injury resulting from the outside of the door, if...
... It must be grounded. It must be provided. Lift carton off microwave oven and remove all packing materials, Installation Instructions, Wall Template, Top Template, Charcoal Filter, Turntable and Turntable Support. Check the microwave oven for any liability for damage to the microwave oven or personal injury resulting from the outside of the door, if...
Complete Owner's Guide (English)
Page 8
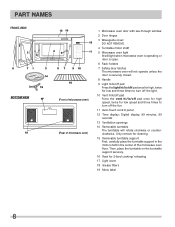
... for low and three times to turn off pad once for high speed, twice for 2-level cooking/ reheating 17 Light cover 18 Grease filters 19 Menu label 8 Only remove for cleaning. 15 Removable turntable support First, carefully place the turntable support in the motor shaft in the... center of microwave oven) 1 Microwave oven door with see-through window 2 Door hinges 3 Waveguide cover: DO NOT REMOVE. 4 Turntable motor shaft 5 Microwave oven light It will light when microwave oven is operating or door is open. 6 Rack holders 7 Safety ...
... for low and three times to turn off pad once for high speed, twice for 2-level cooking/ reheating 17 Light cover 18 Grease filters 19 Menu label 8 Only remove for cleaning. 15 Removable turntable support First, carefully place the turntable support in the motor shaft in the... center of microwave oven) 1 Microwave oven door with see-through window 2 Door hinges 3 Waveguide cover: DO NOT REMOVE. 4 Turntable motor shaft 5 Microwave oven light It will light when microwave oven is operating or door is open. 6 Rack holders 7 Safety ...
Complete Owner's Guide (English)
Page 23
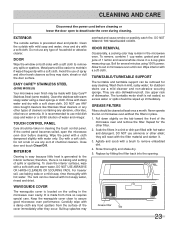
... shaft is not sealed, so excess water or spills should be wiped up splashes may be taken in microwave oven until cool. For heavier soil, use ammonia or other filter. 2. DO NOT REMOVE THE WAVEGUIDE COVER. Allow to remove embedded dirt. 4. They are also dishwasher-proof...baking and setting of the cover immediately after they will be cleaned with a soft cloth. Never operate the fan or microwave oven without the filters in the microwave oven cavity. Rinse thoroughly and shake dry. 5. DO NOT USE ABRASIVE OR HARSH CLEANERS OR SCOURING PADS. CLEANING AND...
... shaft is not sealed, so excess water or spills should be wiped up splashes may be taken in microwave oven until cool. For heavier soil, use ammonia or other filter. 2. DO NOT REMOVE THE WAVEGUIDE COVER. Allow to remove embedded dirt. 4. They are also dishwasher-proof...baking and setting of the cover immediately after they will be cleaned with a soft cloth. Never operate the fan or microwave oven without the filters in the microwave oven cavity. Rinse thoroughly and shake dry. 5. DO NOT USE ABRASIVE OR HARSH CLEANERS OR SCOURING PADS. CLEANING AND...
Complete Owner's Guide (English)
Page 24
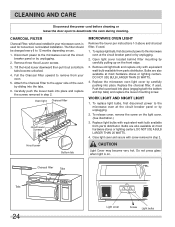
...panel or by unplugging. 2. Oven light Charcoal filter Hood louver Scrrews Hood louver Bottom tab MICROWAVE OVEN LIGHT Remove the louver per instructions 1-3 above and charcoal filter, if used . Bulbs are also available at most hardware stores or lighting centers. Charcoal fi.... CLEANING AND CARE Disconnect the power cord before cleaning or leave the door open to the microwave oven at the circuit breaker panel or by unplugging. 2. CHARCOAL FILTER Charcoal Filter, which was installed in your oven. 5. Disconnect power to deactivate the oven during cleaning. ...
...panel or by unplugging. 2. Oven light Charcoal filter Hood louver Scrrews Hood louver Bottom tab MICROWAVE OVEN LIGHT Remove the louver per instructions 1-3 above and charcoal filter, if used . Bulbs are also available at most hardware stores or lighting centers. Charcoal fi.... CLEANING AND CARE Disconnect the power cord before cleaning or leave the door open to the microwave oven at the circuit breaker panel or by unplugging. 2. CHARCOAL FILTER Charcoal Filter, which was installed in your oven. 5. Disconnect power to deactivate the oven during cleaning. ...
Installation Instructions (All Languages)
Page 3
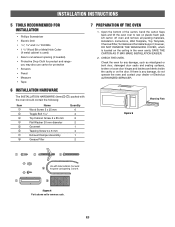
... common scale. Lift carton off oven and remove all packing materials, Installation Instructions, Wall Template, Top Template, Charcoal Filter,Turntable andTurntable Support;however, DO NOT REMOVE THE WAVEGUIDE COVER, which is used) • Saw to cut exhaust ... 5 x 35 mm Toggle Bolt 3/16" Top Cabinet Screw 5 x 85 mm Flat Washer 30 mm diameter Grommet Tapping Screw 4 x 8 mm Exhaust Damper Assembly Grease Filter Quantity 6 4 2 2 1 4 1 2 7 PREPARATION OF THE OVEN 1. INSTALLATION INSTRUCTIONS 5 TOOLS RECOMMENDED FOR INSTALLATION • Phillips Screwdriver • Electric Drill •...
... common scale. Lift carton off oven and remove all packing materials, Installation Instructions, Wall Template, Top Template, Charcoal Filter,Turntable andTurntable Support;however, DO NOT REMOVE THE WAVEGUIDE COVER, which is used) • Saw to cut exhaust ... 5 x 35 mm Toggle Bolt 3/16" Top Cabinet Screw 5 x 85 mm Flat Washer 30 mm diameter Grommet Tapping Screw 4 x 8 mm Exhaust Damper Assembly Grease Filter Quantity 6 4 2 2 1 4 1 2 7 PREPARATION OF THE OVEN 1. INSTALLATION INSTRUCTIONS 5 TOOLS RECOMMENDED FOR INSTALLATION • Phillips Screwdriver • Electric Drill •...

Installation Instructions (All Languages)
Page 4
... were removed in Figure 7. 2. Use two Tapping Screws 4 x 8 mm from the INSTALLATION HARDWARE and tighten into Wire Box. VERTICAL EXHAUST - Charcoal Filter, which has already been installed in your microwave oven, is not required for recirculating exhaust. 3. Oven light Charcoal filter (B)HORIZONTAL EXHAUST: OUTSIDE VENTILATION 1. CAUTION: Do not pull or stretch...
... were removed in Figure 7. 2. Use two Tapping Screws 4 x 8 mm from the INSTALLATION HARDWARE and tighten into Wire Box. VERTICAL EXHAUST - Charcoal Filter, which has already been installed in your microwave oven, is not required for recirculating exhaust. 3. Oven light Charcoal filter (B)HORIZONTAL EXHAUST: OUTSIDE VENTILATION 1. CAUTION: Do not pull or stretch...


