Complete Owner's Guide (English)
Page 8
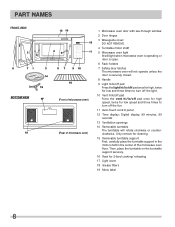
... The microwave oven will not operate unless the door is securely closed. 8 Handle 9 Light hi/lo/off pad Press the light hi/lo/off pad once for high, twice for low and three times to turn off pad once for high speed, twice for 2-level cooking/ reheating 17 Light cover 18 Grease filters... 19 Menu label 8 PART NAMES BOTTOM VIEW (Front of microwave oven) (Rear of the...
... The microwave oven will not operate unless the door is securely closed. 8 Handle 9 Light hi/lo/off pad Press the light hi/lo/off pad once for high, twice for low and three times to turn off pad once for high speed, twice for 2-level cooking/ reheating 17 Light cover 18 Grease filters... 19 Menu label 8 PART NAMES BOTTOM VIEW (Front of microwave oven) (Rear of the...
Complete Owner's Guide (English)
Page 23
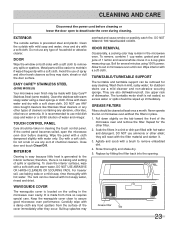
...with a soft cloth. Keep the waveguide cover clean to the interior surfaces; for easy cleaning. Never operate the fan or microwave oven without the filters in mild, sudsy water; Grease filter Tab 23 Do not scrub or use mild dish soap and water or a 50/50 solution of chemical ...cleaners. Allow to use any type of spray and other filter. 2. Repeat for several whole cloves in the microwave oven cavity. rinse and...
...with a soft cloth. Keep the waveguide cover clean to the interior surfaces; for easy cleaning. Never operate the fan or microwave oven without the filters in mild, sudsy water; Grease filter Tab 23 Do not scrub or use mild dish soap and water or a 50/50 solution of chemical ...cleaners. Allow to use any type of spray and other filter. 2. Repeat for several whole cloves in the microwave oven cavity. rinse and...
Installation Instructions (All Languages)
Page 3
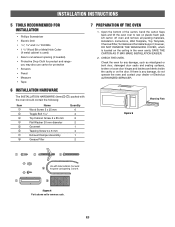
... rest on the ceiling in the oven cavity. E3 Lift carton off oven and remove all packing materials, Installation Instructions, Wall Template, Top Template, Charcoal Filter,Turntable andTurntable Support;however, DO NOT REMOVE THE WAVEGUIDE COVER, which is located on plastic foam pad. Check the oven for protection • Scissors •... 1 2 3 4 5 6 7 8 Name Wood Screw 5 x 35 mm Toggle Bolt 3/16" Top Cabinet Screw 5 x 85 mm Flat Washer 30 mm diameter Grommet Tapping Screw 4 x 8 mm Exhaust Damper Assembly Grease Filter Quantity 6 4 2 2 1 4 1 2 7 PREPARATION OF THE OVEN 1.
... rest on the ceiling in the oven cavity. E3 Lift carton off oven and remove all packing materials, Installation Instructions, Wall Template, Top Template, Charcoal Filter,Turntable andTurntable Support;however, DO NOT REMOVE THE WAVEGUIDE COVER, which is located on plastic foam pad. Check the oven for protection • Scissors •... 1 2 3 4 5 6 7 8 Name Wood Screw 5 x 35 mm Toggle Bolt 3/16" Top Cabinet Screw 5 x 85 mm Flat Washer 30 mm diameter Grommet Tapping Screw 4 x 8 mm Exhaust Damper Assembly Grease Filter Quantity 6 4 2 2 1 4 1 2 7 PREPARATION OF THE OVEN 1.


