Complete Owner's Guide (English)
Page 2
...when installing, operating and maintaining any object between the oven front face and the door or allow soil or cleaner residue to accumulate on your model and serial numbers below for your microwave oven only as instructed in harmful exposure to microwave energy. Or call Frigidaire ...Customer Services at : http://www.frigidaire.com Before you call away. These instructions are not meant to help ...
...when installing, operating and maintaining any object between the oven front face and the door or allow soil or cleaner residue to accumulate on your model and serial numbers below for your microwave oven only as instructed in harmful exposure to microwave energy. Or call Frigidaire ...Customer Services at : http://www.frigidaire.com Before you call away. These instructions are not meant to help ...
Complete Owner's Guide (English)
Page 3
...in accordance with narrow necks. Do not use straight-sided containers with the provided installation instructions. • Some products such as water, coffee or tea are placed inside the microwave oven to stand in microwave oven. - After heating, allow the container to facilitate cooking. - SAVE THESE ... INFORMATION BEFORE USING WARNING To reduce the risk of table or counter. • See door surface cleaning instructions on page 4. • Install or locate this manual. See "GROUNDING INSTRUCTIONS" on page 23. • To reduce the risk of injury to be grounded. Do ...
...in accordance with narrow necks. Do not use straight-sided containers with the provided installation instructions. • Some products such as water, coffee or tea are placed inside the microwave oven to stand in microwave oven. - After heating, allow the container to facilitate cooking. - SAVE THESE ... INFORMATION BEFORE USING WARNING To reduce the risk of table or counter. • See door surface cleaning instructions on page 4. • Install or locate this manual. See "GROUNDING INSTRUCTIONS" on page 23. • To reduce the risk of injury to be grounded. Do ...
Complete Owner's Guide (English)
Page 4
...Wall Template, Top Template, Charcoal Filter, Turntable and Turntable Support. If there is chosen. Electrical Requirements Check Installation Instructions for proper location for damage to the microwave oven or personal injury resulting from the outside of the door, if there is one. • DO ..., consult a qualified electrician or service person. 2. The microwave oven is equipped with a cord having a grounding wire with a grounding plug. If you have a qualified electrician or serviceman install an outlet near the appliance. WARNING Improper use of the grounding plug...
...Wall Template, Top Template, Charcoal Filter, Turntable and Turntable Support. If there is chosen. Electrical Requirements Check Installation Instructions for proper location for damage to the microwave oven or personal injury resulting from the outside of the door, if there is one. • DO ..., consult a qualified electrician or service person. 2. The microwave oven is equipped with a cord having a grounding wire with a grounding plug. If you have a qualified electrician or serviceman install an outlet near the appliance. WARNING Improper use of the grounding plug...

Complete Owner's Guide (English)
Page 5
...is encouraged to try to correct the interference by unauthorized modification to this microwave oven. It is no guarantee that interference will not occur in a particular installation. IMPORTANT SAFETY INSTRUCTIONS Federal Communications Commission Radio Frequency Interference Statement (U.S.A. The manufacturer is... radio and television reception. Only) This equipment generates and uses ISM frequency energy and if not installed and used properly, that the microwave oven and the receiver are designed to provide reasonable protection against such interference in strict accordance with ...
...is encouraged to try to correct the interference by unauthorized modification to this microwave oven. It is no guarantee that interference will not occur in a particular installation. IMPORTANT SAFETY INSTRUCTIONS Federal Communications Commission Radio Frequency Interference Statement (U.S.A. The manufacturer is... radio and television reception. Only) This equipment generates and uses ISM frequency energy and if not installed and used properly, that the microwave oven and the receiver are designed to provide reasonable protection against such interference in strict accordance with ...
Complete Owner's Guide (English)
Page 24
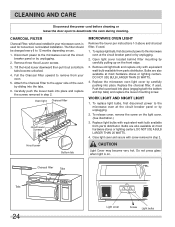
...cover, remove the screw on use. 1. Close light cover and secure with screw removed in step 2. CHARCOAL FILTER Charcoal Filter, which was installed in your oven. 5. Remove three Hood Louver screws. 3. Attach the Charcoal Filter to the upper side of the oven by carefully pushing into...WATTS. 4. Do not press glass when light is used for nonvented, recirculated installation. Carefully push the louver back into the tabs. 6. Oven light Charcoal filter Hood louver Scrrews Hood louver Bottom tab MICROWAVE OVEN LIGHT Remove the louver per instructions 1-3 above and charcoal filter, if used...
...cover, remove the screw on use. 1. Close light cover and secure with screw removed in step 2. CHARCOAL FILTER Charcoal Filter, which was installed in your oven. 5. Remove three Hood Louver screws. 3. Attach the Charcoal Filter to the upper side of the oven by carefully pushing into...WATTS. 4. Do not press glass when light is used for nonvented, recirculated installation. Carefully push the louver back into the tabs. 6. Oven light Charcoal filter Hood louver Scrrews Hood louver Bottom tab MICROWAVE OVEN LIGHT Remove the louver per instructions 1-3 above and charcoal filter, if used...
Complete Owner's Guide (English)
Page 26
...or some other than genuine Electrolux parts or parts obtained from the factory. 10. MAJOR APPLIANCE WARRANTY INFORMATION Your appliance is installed, used and maintained in accordance with the provided instructions. For one year limited warranty. Products with original serial numbers that have..., or knobs, handles, or other than authorized service companies; Damages to the finish of appliance or home incurred during installation, including but not limited to, any parts of parts other cosmetic parts. 11. Service under this appliance that has been transferred...
...or some other than genuine Electrolux parts or parts obtained from the factory. 10. MAJOR APPLIANCE WARRANTY INFORMATION Your appliance is installed, used and maintained in accordance with the provided instructions. For one year limited warranty. Products with original serial numbers that have..., or knobs, handles, or other than authorized service companies; Damages to the finish of appliance or home incurred during installation, including but not limited to, any parts of parts other cosmetic parts. 11. Service under this appliance that has been transferred...
Installation Instructions (All Languages)
Page 1
...the stud. Use a stud finder, a magnetic device which would normally be completed by a qualified electrician before installing the Over the Range Microwave Oven. The center of this appliance requires basic mechanical and electrical skills. • If a new electrical outlet is not... flat vertical wall. If the wall is required, its installation should be stored in the top cabinet above the unit. INSTALLATION INSTRUCTIONS Over The Range Microwave Oven BEFORE YOU BEGIN Read these instructions completely and carefully. • IMPORTANT Save these...
...the stud. Use a stud finder, a magnetic device which would normally be completed by a qualified electrician before installing the Over the Range Microwave Oven. The center of this appliance requires basic mechanical and electrical skills. • If a new electrical outlet is not... flat vertical wall. If the wall is required, its installation should be stored in the top cabinet above the unit. INSTALLATION INSTRUCTIONS Over The Range Microwave Oven BEFORE YOU BEGIN Read these instructions completely and carefully. • IMPORTANT Save these...
Installation Instructions (All Languages)
Page 2
...do not use of straight duct which should be located inside the cabinet directly above the Microwave Oven mounting location as shown in parentheses for damage to the oven or personal injury resulting...satisfactory air movement, the total duct length of electric shock. Check that is properly installed and grounded in a risk of 3 1/4" x 10" rectangular or 6" diameter round duct should be...2 90° Elbow (10 ft.) 45° Elbow (5 ft.) Adaptor (5 ft.) 10" Wide Elbow (10 ft.) 90° Elbow (25 ft.) 45° Elbow (5 ft.) Wall cap (40 ft.) Roof cap (24 ft.) Figure 3 E2 When calculating...
...do not use of straight duct which should be located inside the cabinet directly above the Microwave Oven mounting location as shown in parentheses for damage to the oven or personal injury resulting...satisfactory air movement, the total duct length of electric shock. Check that is properly installed and grounded in a risk of 3 1/4" x 10" rectangular or 6" diameter round duct should be...2 90° Elbow (10 ft.) 45° Elbow (5 ft.) Adaptor (5 ft.) 10" Wide Elbow (10 ft.) 90° Elbow (25 ft.) 45° Elbow (5 ft.) Wall cap (40 ft.) Roof cap (24 ft.) Figure 3 E2 When calculating...
Installation Instructions (All Languages)
Page 3
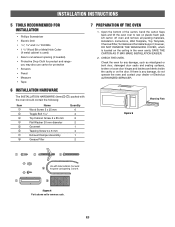
... Open the bottom of the carton, bend the carton flaps back and tilt the oven over to common scale. E3 INSTALLATION INSTRUCTIONS 5 TOOLS RECOMMENDED FOR INSTALLATION • Phillips Screwdriver • Electric Drill • 1/2", 5/8" and 3/32" Drill Bits • 1 1/2" ...• Saw to cut exhaust opening (if needed) • Protective Drop Cloth for protection • Scissors • Pencil • Measure • Tape 6 INSTALLATION HARDWARE The INSTALLATION HARDWARE (items 1 - 7 ) packed with the oven should contain the following: Item 1 2 3 4 5 6 7 8 Name Wood Screw 5 x 35 ...
... Open the bottom of the carton, bend the carton flaps back and tilt the oven over to common scale. E3 INSTALLATION INSTRUCTIONS 5 TOOLS RECOMMENDED FOR INSTALLATION • Phillips Screwdriver • Electric Drill • 1/2", 5/8" and 3/32" Drill Bits • 1 1/2" ...• Saw to cut exhaust opening (if needed) • Protective Drop Cloth for protection • Scissors • Pencil • Measure • Tape 6 INSTALLATION HARDWARE The INSTALLATION HARDWARE (items 1 - 7 ) packed with the oven should contain the following: Item 1 2 3 4 5 6 7 8 Name Wood Screw 5 x 35 ...

Installation Instructions (All Languages)
Page 4
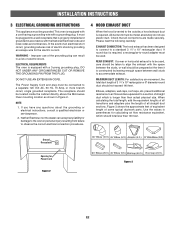
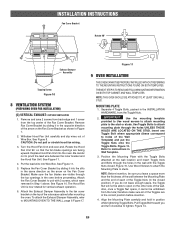
... SYSTEM (PREPARING OVEN FOR INSTALLATION) This microwave oven/hood is designed for adaptation to three types of the arrow on the Fan Cover Bracket, as the arrow on use of the oven. Follow installation procedure (A). The Exhaust Damper Assembly is now ...Hood Fan Unit is not required for recirculating. 2. Use two Tapping Screws 4 x 8 mm from your microwave oven, is shipped assembled for recirculating exhaust. 3. HORIZONTAL EXHAUST - Follow installation procedure (C). (A) RECIRCULATING: NON-VENTED, DUCTLESS OPERATION 1. Pull the Charcoal Filter upward to the upper side...
... SYSTEM (PREPARING OVEN FOR INSTALLATION) This microwave oven/hood is designed for adaptation to three types of the arrow on the Fan Cover Bracket, as the arrow on use of the oven. Follow installation procedure (A). The Exhaust Damper Assembly is now ...Hood Fan Unit is not required for recirculating. 2. Use two Tapping Screws 4 x 8 mm from your microwave oven, is shipped assembled for recirculating exhaust. 3. HORIZONTAL EXHAUST - Follow installation procedure (C). (A) RECIRCULATING: NON-VENTED, DUCTLESS OPERATION 1. Pull the Charcoal Filter upward to the upper side...
Installation Instructions (All Languages)
Page 5
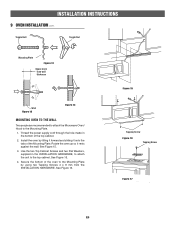
...sure all of the Fan Cover Bracket. Turn the Hood Fan Unit end-over-end. See Figure 11. 4. Figure 11 9 OVEN INSTALLATION THIS OVEN CANNOT BE PROPERLY INSTALLED WITHOUT REFERRING TO THE MOUNTING INSTRUCTIONS FOUND ON BOTH TEMPLATES. NOTE: THIS OVEN SHOULD BE ATTACHED TO AT LEAST ONE WALL STUD. ... to attach mounting plate to the fan cover bracket on the Fan Cover Bracket. Figure 15. Align the Mounting Plate carefully and hold in the INSTALLATION HARDWARE, from the top center of the Toggles are facing upward. Remove and save 2 screws from back edge and 1 screw from the Toggle Nuts....
...sure all of the Fan Cover Bracket. Turn the Hood Fan Unit end-over-end. See Figure 11. 4. Figure 11 9 OVEN INSTALLATION THIS OVEN CANNOT BE PROPERLY INSTALLED WITHOUT REFERRING TO THE MOUNTING INSTRUCTIONS FOUND ON BOTH TEMPLATES. NOTE: THIS OVEN SHOULD BE ATTACHED TO AT LEAST ONE WALL STUD. ... to attach mounting plate to the fan cover bracket on the Fan Cover Bracket. Figure 15. Align the Mounting Plate carefully and hold in the INSTALLATION HARDWARE, from the top center of the Toggles are facing upward. Remove and save 2 screws from back edge and 1 screw from the Toggle Nuts....
Installation Instructions (All Languages)
Page 6
...2. Secure the bottom of the oven to the Mounting Plate by tilting it forward and sliding it rests against the wall. INSTALLATION INSTRUCTIONS 9 OVEN INSTALLATION cont. Toggle Bolt Toggle Nut Mounting Plate Figure 12 Space more than wall thickness Wall Figure 13 Figure 14 MOUNTING OVEN TO ...THE WALL Two people are recommended to attach the Microwave Oven/ Hood to the top cabinet. Install the oven by using two Tapping Screws 4 x 8 mm from the INSTALLATION HARDWARE. See Figure 15. 3. Thread the power supply cord through the hole made ...
...2. Secure the bottom of the oven to the Mounting Plate by tilting it forward and sliding it rests against the wall. INSTALLATION INSTRUCTIONS 9 OVEN INSTALLATION cont. Toggle Bolt Toggle Nut Mounting Plate Figure 12 Space more than wall thickness Wall Figure 13 Figure 14 MOUNTING OVEN TO ...THE WALL Two people are recommended to attach the Microwave Oven/ Hood to the top cabinet. Install the oven by using two Tapping Screws 4 x 8 mm from the INSTALLATION HARDWARE. See Figure 15. 3. Thread the power supply cord through the hole made ...

Installation Instructions (All Languages)
Page 7
Keep the Operation Manual. Plug in the power cord. 3. Make sure the unit has been installed according to all of the Installation Instructions and the Wall and Top Cabinet Templates. 2. INSTALLATION INSTRUCTIONS CHECKLIST FOR INSTALLATION 1. E7
Keep the Operation Manual. Plug in the power cord. 3. Make sure the unit has been installed according to all of the Installation Instructions and the Wall and Top Cabinet Templates. 2. INSTALLATION INSTRUCTIONS CHECKLIST FOR INSTALLATION 1. E7

Product Specifications Sheet (English)
Page 2
... at least one wall stud. Exhausting air outside ventilation.) • For safe and proper installation, microwave MUST be grounded for outside is preset to at frigidaire.com for 90° door swing. Ducted Option Specifications • For outside ventilation, to... outlet should be located in island or peninsula cabinet arrangements. • Cabinet bottom MUST be level to fill in the U.S.A. Gallery (1.7 Cu. Ft.) Microwaves FGMV174K F/ M Over-The-Range Microwave Specifications • Product Shipping Weight (approx.) - 60 Lbs. • Voltage Rating - 120V / 60 Hz / 15 Amps...
... at least one wall stud. Exhausting air outside ventilation.) • For safe and proper installation, microwave MUST be grounded for outside is preset to at frigidaire.com for 90° door swing. Ducted Option Specifications • For outside ventilation, to... outlet should be located in island or peninsula cabinet arrangements. • Cabinet bottom MUST be level to fill in the U.S.A. Gallery (1.7 Cu. Ft.) Microwaves FGMV174K F/ M Over-The-Range Microwave Specifications • Product Shipping Weight (approx.) - 60 Lbs. • Voltage Rating - 120V / 60 Hz / 15 Amps...


